The Right-click Menu
Right-clicking in an empty sheet space
Right-clicking on a Unit in the Site View
Right-clicking on a DSP Module in the Design View
Right-clicking in a Module View
The Right-click Menu really is a fountain of functionality whose contextual commands contained within can speed both your design and control processes. The right-click menu is available in the Site View, Design View and Module View. Depending on the view, what is selected at the current time or what you click on, the right-click menu's contents will change to reflect commands that pertain to or act upon the clicked upon area. Some common examples and descriptions of popular functions follow, but don't be afraid to right-click anywhere to see what functions it holds as you can right-click on nearly anything.
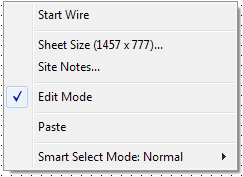
Right-clicking in an empty sheet space:
The picture right depicts the right-click menu shown when you right-click an empty space of a sheet:
-
Start Wire - Starts a new wire from this point.
-
Sheet Size (xxxx x yyyy)... - Allows you to adjust your sheet size for better viewing and/or printing. For the best Composer performance, use the smallest sheet size possible that still supports your design.
-
Site Notes...- Opens the Notes dialog box allowing you to enter or edit notes for the object.
-
Edit Mode - Toggles between edit or operate mode. Also accessible from the Tools menu.
-
Paste - The right-click Paste menu is a "Paste Right Here" command. It allows you to avoid problems with automatic paste placement such as overlapping wires or objects. With this version of the paste command you choose where the data on the clipboard is placed.
-
Smart Select Mode - Switches between the three selection modes. (Modes detailed here.)
Right-clicking on a Wire
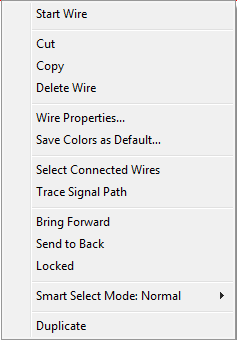
- Start Wire- Starts a new wire from this point.
- Cut/Copy/Delete Wire- Edits the wire.
- Wire Properties- Allows you to change the colors of your wire.
- Save Colors as Default- Saves the current wire colors as the new default.
- Select Connected Wires- Only highlights wires that are connected
- Trace Signal Path- Highlights the path of the signal including Network I/O transmit and receive modules.
- Bring Forward/Send to Back- These commands allow you to easily layer or sort layers of objects.
- Locked- Disallows moving the object on the page.
- Smart Select Mode - Switches between the three selection modes. (Modes detailed here.)
- Duplicate- Duplicates the currently selected object, also found under the edit menu.
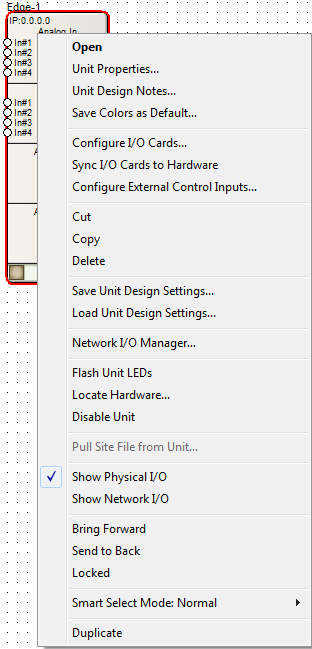
Right-clicking on a Unit in the Site View:
The picture below depicts the right-click menu shown when you right-click on a DSP hardware device in the Site View:
-
Open - Opens the selected object.
-
Unit Properties... - Displays the properties dialog for the selected object allowing you to change things such as the name/label of the object, IP address, module display color, module text color and object specific options.
-
Unit Design Notes... - Opens the Notes dialog box allowing you to enter or edit notes for the object.
-
Save Colors as Default...- Saves the current unit colors as the new default.
-
Configure I/O Cards...- Opens the I/O card configuration dialog allowing you to select which I/O card types are in which slot.
-
Sync I/O Cards to Hardware...- If the hardware has already been located, this option will sync the software unit's configuration on screen to the physical hardware's configuration.
-
Configure External Control Inputs...- Opens a dialog that allows switching each of the four analog control inputs between pot and dual switch mode as well as calibration in pot mode.
-
Cut, Copy, Paste, Delete - Same basic edit commands as found under the Edit Menu.
-
Save/Load Unit Design Settings... - Save or Load Unit Design settings to the Site File or external Settings File as managed in the Settings Library File Manager.
-
Network I/O Manager...- Opens Network I/O Manager dialog to Dante network audio buses and set the operating mode of the Dante ports.
-
Flash Unit LEDs... - Flashes the front panel LEDs of the currently selected unit for diagnostic purposes.
-
Locate Hardware...- Opens the Locate Hardware dialog in order to match the software unit with a physical piece of hardware on the network.
-
Enable/Disable Unit...- Enables/Disables the currently selected unit.
-
Pull Site File from Unit...- Launches the Pull Site File From Hardware Wizard. Refer to Going On-Line.
-
Show Physical I/O, Show Network I/O- When checked, the unit module will show all corresponding input/output nodes.
-
Bring Forward/Send to Back - These commands allow you to easily layer or sort layers of objects.
-
Locked - Disallows moving the object on the page.
-
Smart Select Mode: - Switches between the three selection modes. (Modes detailed here.)
-
Duplicate - Duplicates the currently selected object, also found under the edit menu.
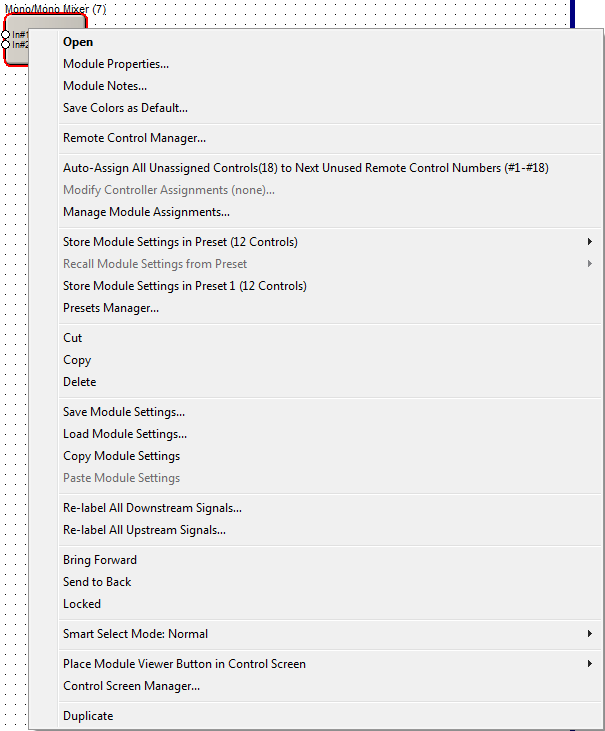
Right-clicking on a DSP Module in the Design View:
The following picture depicts the right-click menu shown when you right-click on a DSP module in the Design view:
-
Open - Opens the selected object.
-
Module Properties... - Displays the properties dialog for the selected object allowing you to change things such as the name/label of the object, module display color, module text color and object specific options.
-
Notes... - Opens the Notes dialog box allowing you to enter or edit notes for the object.
-
Save Colors as Default...- Saves the current module colors as the new default.
-
Remote Control Manager... - Opens the Remote Control Manager, also found under the Tools Menu.
-
Auto-Assign All Unassigned Controls to Next Unused Remote Control Numbers - Automatically assigns all controls control numbers that do not already have an assignment.
-
Modify Controller Assignments... - Opens a dialog box allowing you to reassign ranges of controls.
-
Manage Module Assignments... - Opens the Manage Remote Control Assignments dialog box allowing you to make control assignments for the object's or group or objects' parameters.
-
Store/Recall Module Settings in/from Preset - Stores or recalls the object's parameters in or from a preset.
-
Store Module Settings in Preset x - Stores the module settings into the listed preset location without further steps. "X" will always be the last preset location stored into.
-
Presets Manager - Opens the Presets Manager, also available under the Tools Menu.
-
Cut, Copy, Paste, Delete - Same basic edit commands as found under the Edit menu.
-
Save/Load/Copy/Paste Module Settings... - Save, Load, Copy, or Paste Module settings to the Site File or external Settings File as managed in the Settings File Manager.
-
Re-label All Downstream Signals...- Module output names will be automatically propagated to downstream modules.
-
Re-label All Upstream Signals...- Module input names will be automatically propagated to upstream modules.
-
Bring Forward/Send to Back - These commands allow you to easily layer or sort layers of objects. This can be applied to multiple selected items at once. The order the selected items are in relative to each other is preserved, but the group is moved to the top or bottom of the Z-order.
-
Locked - Disallows moving the object on the page.
-
Smart Select Mode: Switches between the three selection modes. (Modes detailed here.)
-
Place Module Viewer Button in Control Screen - Allows the placement of a button on the chosen Control Screen which opens the module directly.
-
Control Screen Manager... - Opens the Control Screen Manager, also found under the Tools Menu.
-
Duplicate - Duplicates the currently selected object, also found under the edit menu.
Right-clicking in a Module View:
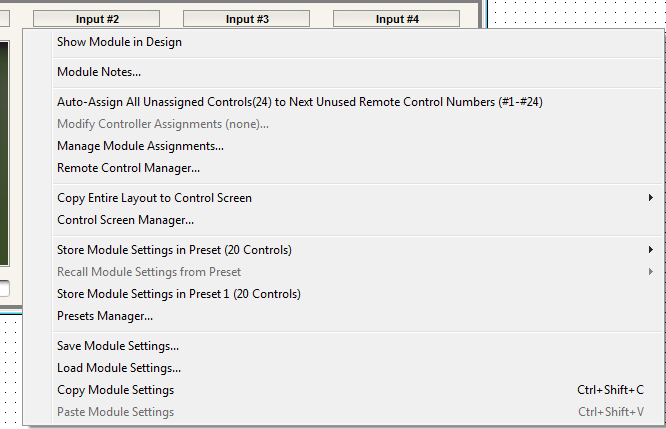
The following picture depicts the right-click menu shown when you right-click in the blank space of a DSP module
:
-
Show Module in Design... - Opens the Design View containing the module and flashes a red box around the module to help locate it..
-
Module Notes... - Opens the Notes dialog box allowing you to enter or edit notes for the object.
-
Auto-Assign All Unassigned Controls to Next Unused Remote Control Numbers - Automatically assigns all controls control numbers that do not already have an assignment.
-
Modify Controller Assignments... - Opens a dialog box allowing you to reassign ranges of controls.
-
Manage Module Assignments... - Opens the Manage Remote Control Assignments dialog box allowing you to make control assignments for the object's or group or objects' parameters.
-
Remote Control Manager...- Opens the Remote Control Manager, also found under the Tools Menu.
-
Copy Entire Layout to Control Screen - Copies clicked upon contents of the module to a new or existing Control Screen.
-
Control Screen Manager... - Opens the Control Screen Manager, also found under the Tools Menu.
-
Store/Recall Module Settings in/from Preset - Stores or recalls the object's parameters in or from a preset.
-
Store Module Settings in Preset x - Stores the module settings into the listed preset location without further steps. "X" will always be the last preset location stored into.
-
Presets Manager - Opens the Presets Manager, also available under the Tools Menu.
-
Save/Load/Copy/Paste Module Settings... - Save, Load, Copy, or Paste Module settings to the Site File or external Settings File as managed in the Settings File Manager.