Intelligent ModulesTM
Using Intelligent ModulesTM with Supported Third-Party Dante Devices
Using Intelligent ModulesTM with Third-Party Non-Dante Devices
Using Intelligent ModulesTM with Symetrix Dante-enabled Analog I/O Expanders
Setting Intelligent ModuleTM Options
Summary
Intelligent ModulesTM in Composer allow seamless integration with various Third-party Dante and non-Dante devices without the need for additional software outside of Composer. Intelligent ModulesTM also offer greatly enhanced control over Symetrix Dante-enabled Analog I/O Expanders.
Using Intelligent ModulesTM with Supported Third-Party Dante Devices
Supported Third-Party Dante Devices with Intelligent ModulesTM
Third-Party Dante Intelligent ModuleTM Anatomy
Supported Third-Party Dante Devices with Intelligent ModulesTM
Alcorn McBride V-Page (4 channel VP4X)
Attero Tech Zip4
Audix DN4
Audix DN43
CLOCKAUDIO TIM-1000
Linea Research 4 DSP 4 channel amplifiers (multiple models included)
Linea Research 4 DSP 8 channel amplifiers (multiple models included)
Linea Research 8 DSP 8 channel amplifiers (multiple models included)
Powersoft Mezzo 2 channel Amplifier
Powersoft Mezzo 4 channel Amplifier
Connections
Typically, each Third-party device will have both a Control IP Address, and a Dante IP Address – oftentimes using a single RJ45 connector. In this case it is easiest if the Dante and Control networks are bridged together.
Site View
Third-party Dante devices that have associated Intelligent ModulesTM will show up as such in the Toolkit in Site View. The example here will use the Alcorn-McBride V-Page Intelligent ModuleTM.
Double-click or drag the third-party Dante device into the Site View: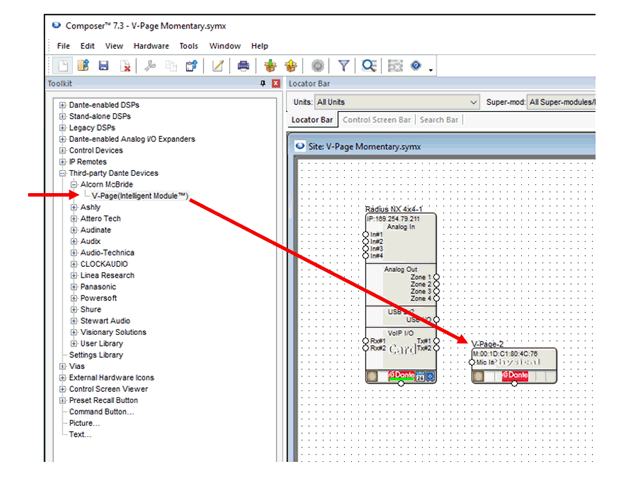
If the appropriate network connections have been made, the Third-party Dante Device can be located – but like other Third-party Dante devices, a Symetrix DSP must first be located. Once the DSP is located, click the square in the lower left-hand corner of the Intelligent ModuleTM, and select the device.
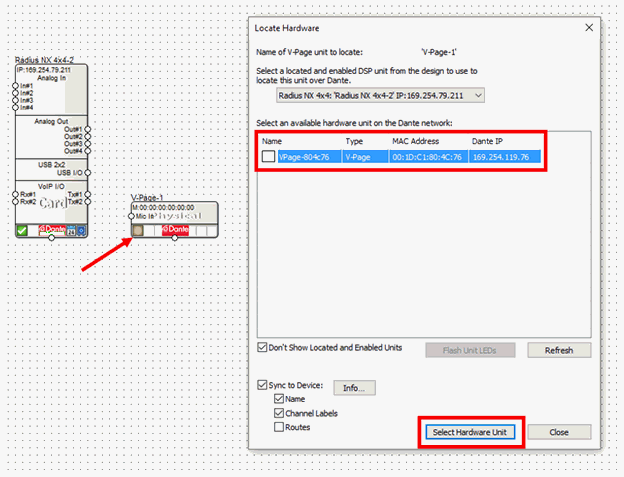
Note that upon dragging a third-party device that has Intelligent ModuleTM capabilities into the Site View, the actual Intelligent ModuleTM itself becomes available in the Design View of any DSP in the site file. This is explained in the following section on Design View.
Also note that as per usual in Composer, locating the physical device is not a requirement to begin pre-programming the site file. The Intelligent ModuleTM will still be waiting for you in Design View to begin your pre-commissioning design.
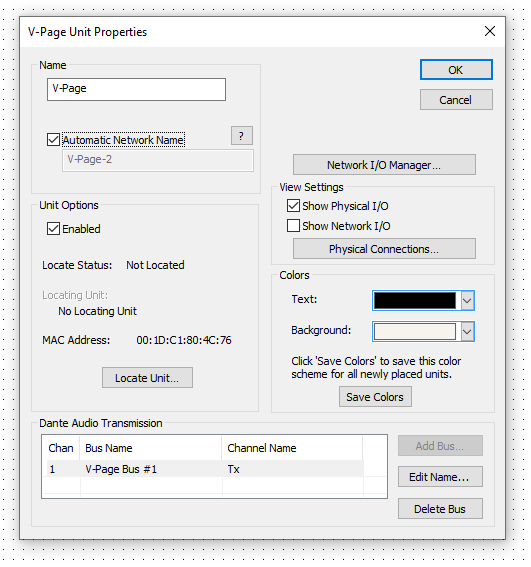
All of the following features are managed in the Unit Properties dialog. To access the Unit Properties, right-click on the Intelligent ModuleTM in the Site View and choose “Unit Properties...”
-
- Name - It is recommended to assign a unique unit name for each unit in the design based on the unit's purpose or location. Composer will always append a unique numeric identifier to this name.
-
Network Name - When Automatic Network Name is checked, the network name is auto-generated from the unit name. Network names cannot contain special characters or spaces and must be unique.
-
Enabled - When the enabled box is checked, the unit must be physically present on the network for a Push of the site file to the hardware. When the enabled box is unchecked, an X will appear on the unit module in the Site View, and the unit will not be required to be physically present for the Push of the site file.
-
Locate Unit... - Opens the 'Locate Hardware' dialog box to select the unit to connect to.
-
Network I/O Manager... - Opens the Network I/O Manager dialog. Click here for instructions on how to program Network Transmit and Receive Buses.
-
View Settings - When either Show Physical I/O or Show Network I/O check box is checked, the unit module in the Site View will show the corresponding connections.
-
Physical Connections... - Opens the Edit Physical Connections dialog.
-
Colors - The text color and background color for the unit module can be customized. To save custom color settings made here as defaults for future units, click the Save Colors button.
-
Dante Audio Transmission - Information on Bus Name and Channel Name of the Dante audio channel the device transmits onto the Dante network. Typically, this channel will be received into a DSP for processing and routing.
Design View
As mentioned in the prior section, once a Third-party Dante device with Intelligent ModuleTM capabilities is brought into Site View, the actual Intelligent ModuleTM becomes available in the Design View. It can be found in the Toolkit under Intelligent ModulesTM/Dante Device Modules.
Double-click or drag the Intelligent ModuleTM into the Design View:
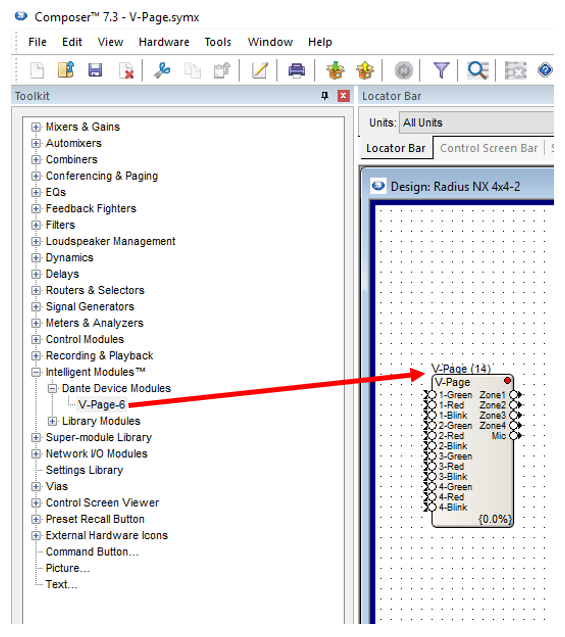
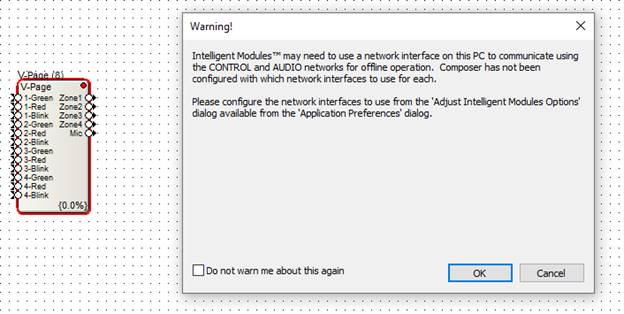
Note that Intelligent ModulesTM can be used even when not online with a DSP - this works because Composer itself will directly communicate with the device via the computer’s network interface(s). Upon dragging in an Intelligent ModuleTM, a warning will initially pop up regarding which PC network interface Composer should use for offline operation of the module. This warning can be disregarded if offline operation isn’t required. Otherwise,Setting Intelligent ModuleTM Optionsto set this up. Click the “Do not warn me about this again” to hide this dialog in the future.
Third-Party Dante Intelligent ModuleTM Anatomy
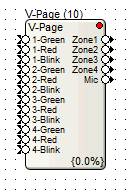
The outside of the Intelligent ModuleTM will typically (but not always) have input and output nodes, the number of which varies by the particulars of the device it’s tied to. Note that these nodes are control signals, not audio.
-
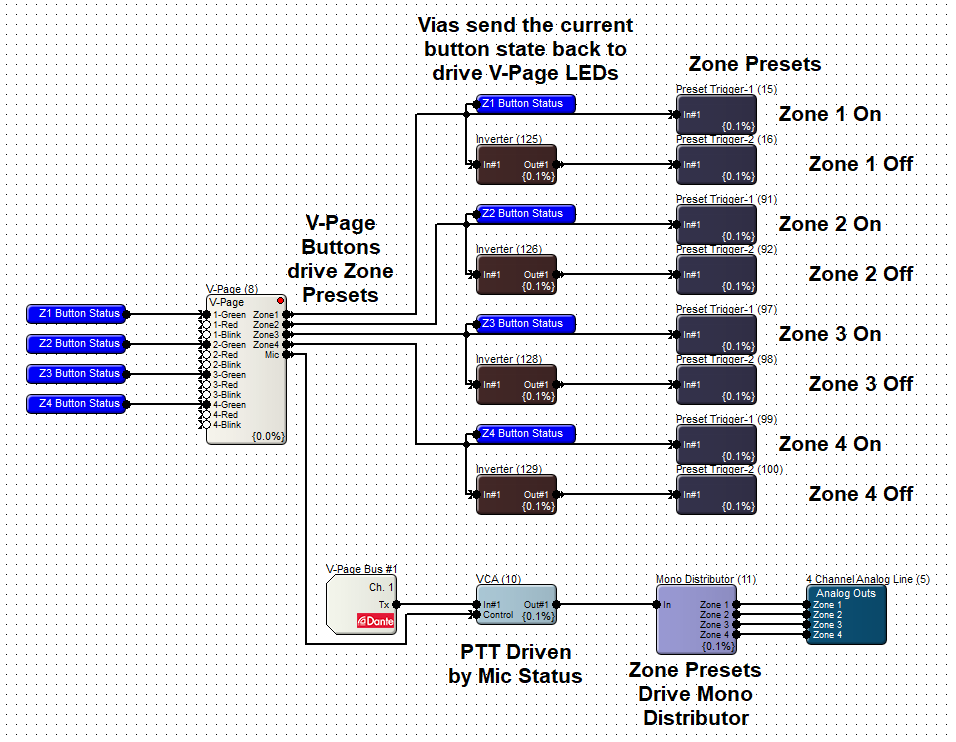
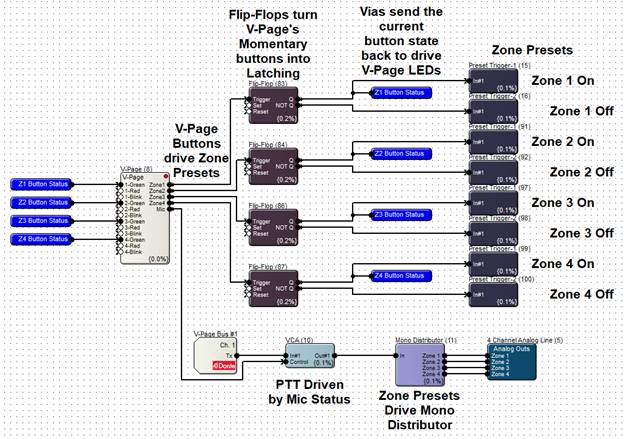
- Input Nodes - Generally, these control input nodes are used to trigger commands that get sent to the actual device via the Intelligent ModuleTM. In our Alcorn-McBride example, these nodes will drive the 4 Zone LEDs on the physical device, with options for green, red, and blinking for each zone.
-
Output Nodes - These will receive commands from the device and give the user the ability to trigger functions in the DSP. In the case of the Alcorn-McBride, there is an output node for each physical zone button on the device. For instance, when button 1 is held down, the Zone1 control output node will be driven high, which can then be used to drive a preset. There is also a Mic control output node which will go high when the mic handset is keyed.
-
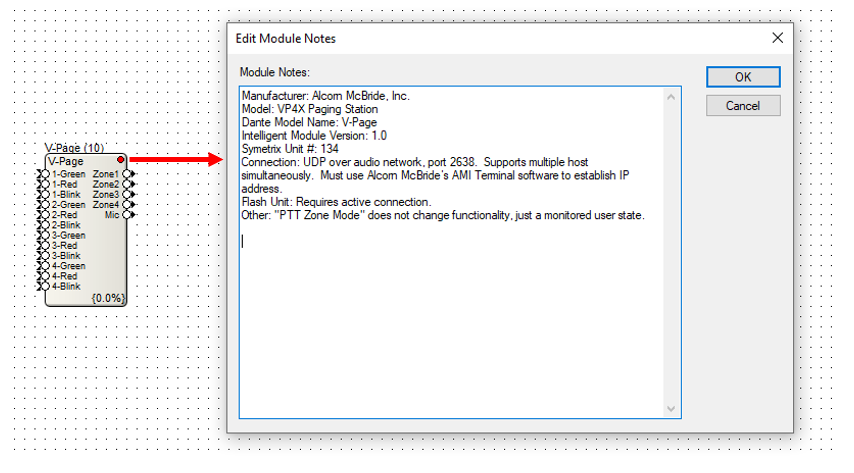
Intelligent ModuleTM Notes - Click the red dot in the upper right corner of the Intelligent ModuleTM to access the notes. Because each device may have different requirements for functionality, the information in these notes can be very important. For instance, with the V-Page, the notes state that Alcorn-McBride’s AMI Terminal software is required to find the unit’s control IP address.
The GUI of any Intelligent ModuleTM can be opened by double-clicking the module:
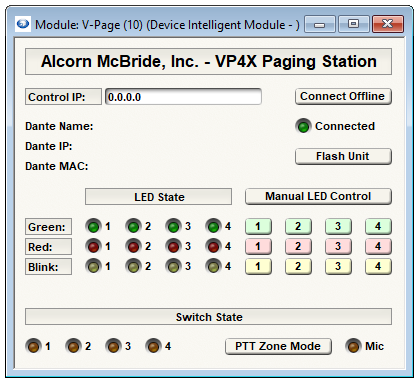
The header of each Intelligent ModuleTM will share many common elements, including:
-
- Control IP - This is the control IP address of the third-party device. If this field is showing in the GUI, then it must be manually populated for the Intelligent ModuleTM to communicate with the device. This can typically be found via the third-party manufacturer’s software, or an IP scan.
-
Dante Name - Auto-populated when hardware is located in Site View.
-
Dante IP - Auto-populated when hardware is located in Site View.
-
Dante MAC - Auto-populated when hardware is located in Site View.
-
Connect Offline - Click this button to have Composer connect to the device offline. The Control IP is required, as well as making Composer aware of which of the computer’s network interfaces to use for communication to the device. SeeSetting Intelligent ModuleTM Optionssection for more information.
-
Connected LED - Illuminates when connected, whether online or offline.
-
Flash Unit - Flashes the device’s physical LEDs to assist in visual identification.
The remaining GUI elements will vary depending on the third-party device being controlled. Generally, most if not all control elements that are viewable (e.g. buttons and faders) are able to be set up to be remote controlled by the normal means.
Design Example of Alcorn-Mcbride V-Page with buttons set up for Momentary action:
Design Example of Alcorn-Mcbride V-Page with buttons set up for Latching action:
Using Intelligent ModulesTMwith Third-Party Non-Dante Devices
Supported Third-Party Non-Dante Devices with Intelligent ModulesTM
Third-Party Non-Dante Intelligent ModuleTM Anatomy
Summary
New Third-party non-Dante device support is available using Intelligent ModulesTM in Composer. As support for new devices are added, the new Intelligent ModulesTM will be made available on the Symetrix web site for import into Composer. This allows for adding support for Third-party devices without having to install a new version of Composer.
Supported Third-Party Non-Dante Devices with Intelligent ModulesTM
On first release, Composer will provide modules by manufacturer and model for the following Dante devices
Visionary (VSI) E4100 Decoder
Visionary (VSI) D4100 Decoder (4, 16 and 32 source versions)
Powersoft Mezzo Amplifiers
Installing Composer 7.3 will automatically import these devices and place them in the "Imported Modules" branch of the Tool Kit. Any other modules may be imported into a site file by importing them into the Intelligent Modules->Imported Modules item in the Design View tool kit:
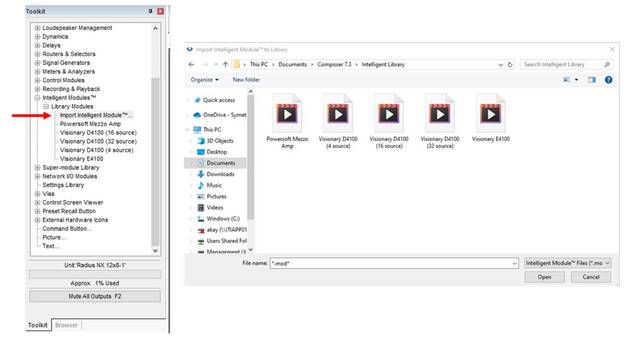
Third-Party Non-Dante Intelligent ModuleTMAnatomy
The outside of the Intelligent ModuleTM may or may not have input and output nodes, depending on the particulars of the device it’s tied to. Note that these nodes are control signals, not audio.
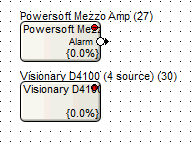
Click the red dot in the upper right corner of the Intelligent ModuleTM to access the notes. Because each device may have different requirements for functionality, the information in these notes can be very important.
The GUI of any Intelligent ModuleTM can be opened by double-clicking the module:
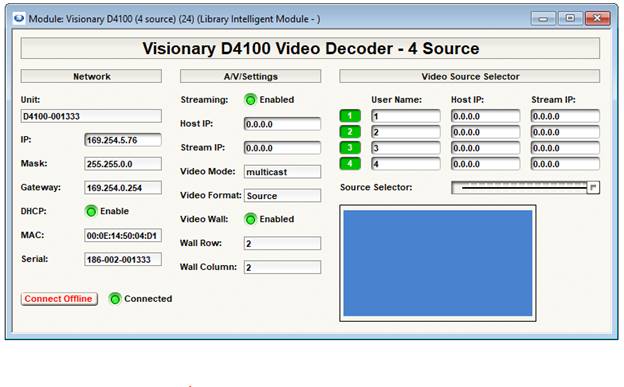
The header of each Intelligent ModuleTM will share some common elements, including:
-
- Control IP - This is the control IP address of the third-party device. This field must be manually populated for the Intelligent ModuleTM to communicate with the device. This can typically be found via the third-party manufacturer’s software, or an IP scan.
-
Connect Offline - Click this button to have Composer connect to the device offline. The Control IP is required, as well as making Composer aware of which of the computer’s network interfaces to use for communication to the device. SeeSetting Intelligent ModuleTM Optionssection for more information.
-
Connected LED - Illuminates when connected, whether online or offline.
The remaining GUI elements will vary depending on the third-party device being controlled. Generally speaking, most if not all control elements that are viewable (e.g. buttons and faders) are able to be set up to be remote controlled by the normal means.
Using Intelligent ModulesTMwith Symetrix Dante-Enabled Analog I/O Expanders
Symetrix Dante-Enabled Analog I/O Expanders Intelligent ModuleTM Anatomy
Site View
Using Intelligent ModulesTM along with Symetrix Dante-enabled Analog I/O Expanders offers a much-improved means for controlling these devices than in days past. All features of the units can now be controlled exactly like the input and output settings of a DSP, with preset and remote control of all parameters.
Double-click or drag a Symetrix Dante-enabled Analog I/O Expander from the “Symetrix Dante-enabled Analog I/O Expanders” section of tree in Toolkit:
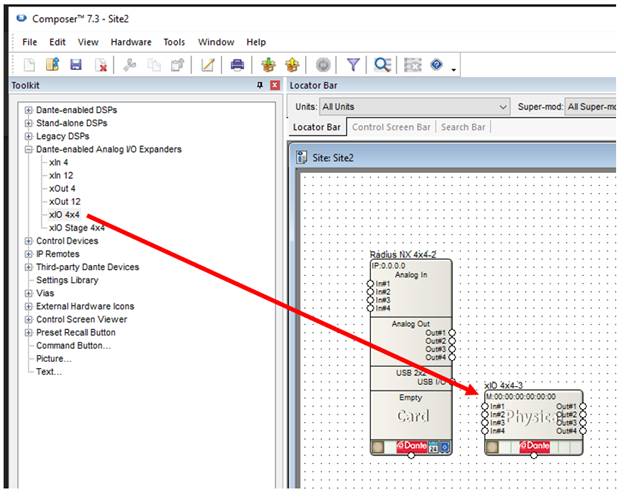
Access the Unit Properties by right-clicking the module and selecting “Unit Properties”.
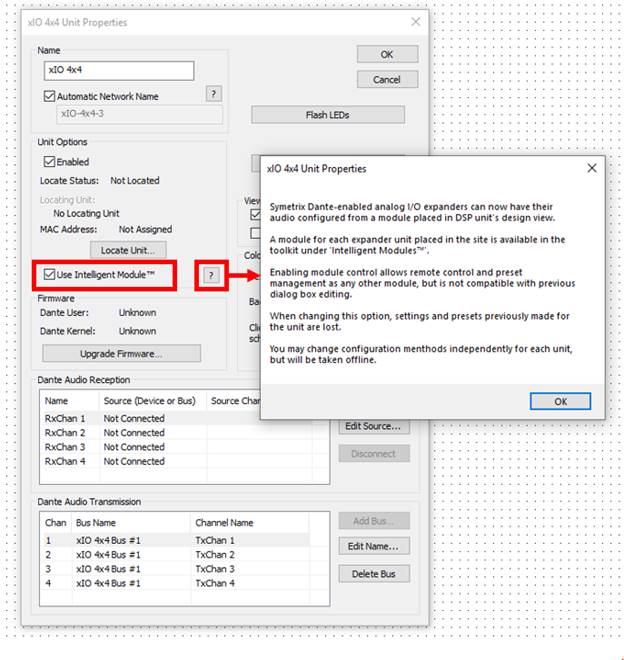
Notice the “Use Intelligent ModuleTM” checkbox. This box will be checked when dragging in a new Dante-enabled I/O Expander module from the Toolkit. When this box is checked, the Intelligent ModuleTM itself will be available in the Design View of any DSP in the site file. This is explained in the following section on Design View.
Note that when opening a pre-Composer 7.3 site file that already contains Dante-enabled I/O Expanders, the Intelligent ModulesTM checkbox will be checked.
Click the "?" button for an overview of Intelligent ModulesTM.
Other detailed information of the Unit Properties window may be found on the appropriate Symetrix Dante-enabled I/O Expander help page.
Design View
As mentioned in the prior section, once a Symetrix Dante-enabled Analog I/O Expander is brought into Site View, the actual Intelligent ModuleTM becomes available in the Design View. It can be found in the Toolkit under Intelligent ModulesTM/Dante Device Modules.
Double-click or drag the Intelligent ModuleTM into the Design View:
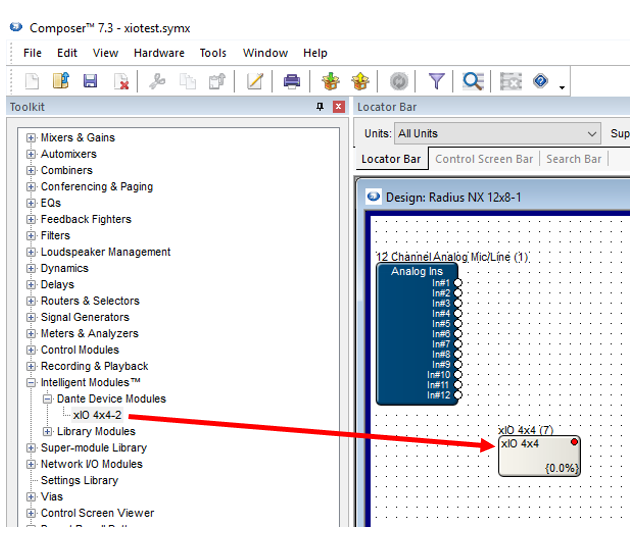
Symetrix Dante-Enabled Analog I/O Expanders Intelligent ModuleTM Anatomy
The outside of the Intelligent ModuleTM for the Symetrix Dante-enabled Analog I/O Expanders doesn’t have any input or output nodes for control – all control is handled in the GUI.
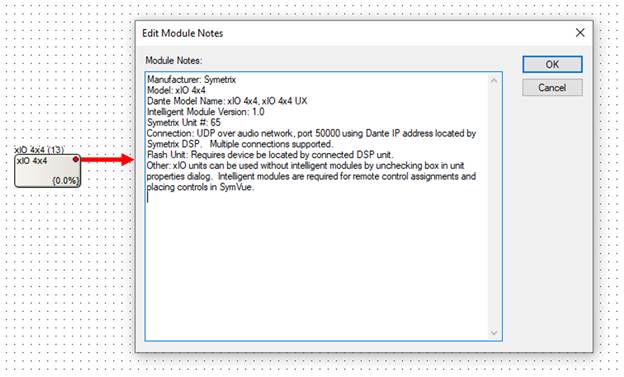
Intelligent ModuleTM Notes:
Click the red dot in the upper right corner of the Intelligent ModuleTM to access useful notes.
The GUI of the Intelligent ModuleTM can be opened by double-clicking the module:
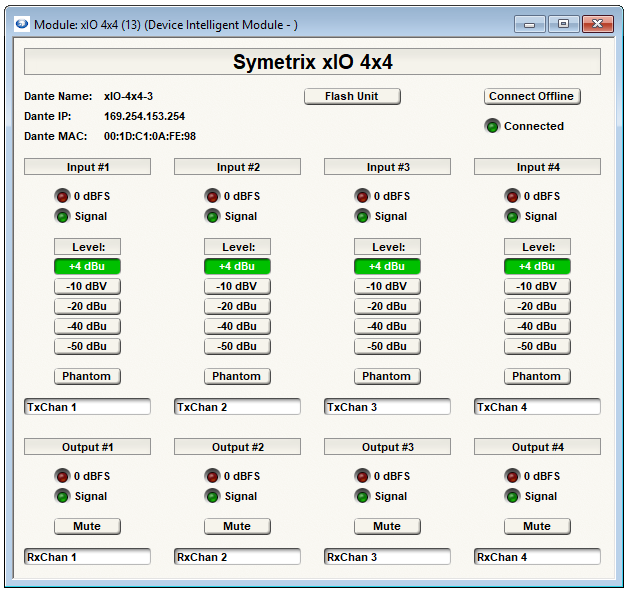
The header of each Intelligent ModuleTM shares many common elements, including:
-
- Dante Name - Auto-populated when hardware is located in Site View.
-
Dante IP - Auto-populated when hardware is located in Site View.
-
Dante MAC - Auto-populated when hardware is located in Site View.
-
Connect Offline - Click this button to have Composer connect to the device offline. The Control IP is required, as well as making Composer aware of which of the computer’s network interfaces to use for communication to the device. See the Setting Intelligent ModuleTM Options section for more information.
-
Connected LED - Illuminates when connected, whether online or offline.
-
Flash Unit - Flashes the device’s physical LEDs to assist in visual identification.
The remaining GUI elements will vary depending on the device being controlled. All control elements that are viewable (e.g. buttons and faders) can be set up to be remote controlled by the normal means.
Setting Intelligent ModuleTM Options
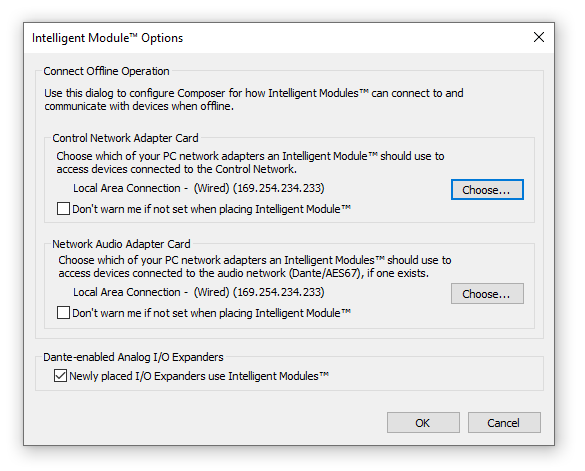
As mentioned above, when dragging a Supported Third-Party Dante Device’s Intelligent ModuleTM into the Design View, the below Warning dialog regarding offline operation will be displayed. In short, Composer will use the computer’s network interface(s) to communicate with the device directly without the need to be online or have a located DSP.
To configure the offline settings, open the Application Preferences from the Tools menu of Composer, and click “Adjust Intelligent ModuleTM Options”.
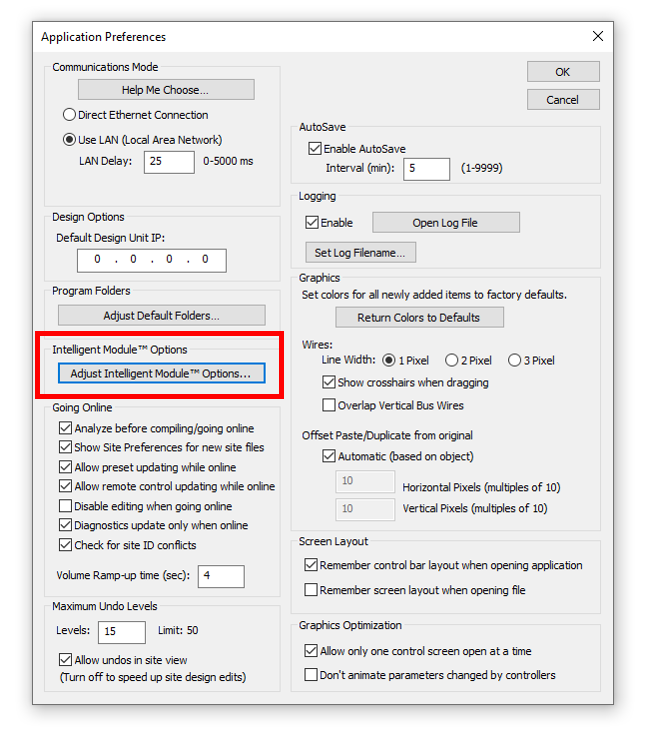
For the Control Network Adapter Card, click “Choose…” and select the network adapter that is connected to the Control Network.
For the Network Audio Adapter Card, click “Choose…” and select the network adapter that is connected to the Dante Network.