Super Matrix(Radius NX and Server D100 Only)
Super Matrix Crosspoint Options
Overview
A Super Matrix implements an M by N mix of its inputs to its outputs. In Composer, custom matrices can be configured with up to 128 mono inputs by 128 mono outputs (or 64 stereo by 64 stereo) for the Radius NX, and up to 400 mono by 400 mono (or 200 stereo by 200 stereo) for the Server D100.
For every output, there are M input controls that allow any of the M inputs to contribute to that output. Repeat this N times. Stated another way, at every mix node (intersection of an input line with an output line) there is a level control and a connect button.
*For information on setting up matrices in controls screens click here.
Place Custom Super Matrix
To add the Super Matrix to the design, double click "Custom..." in the Toolkit under "Super Matrix". Depending on the selected hardware, the corresponding "Place Super Matrix" window will pop up:
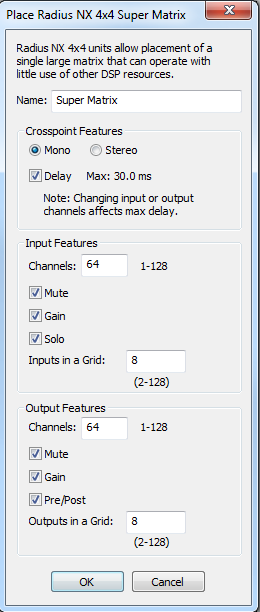
Name - Type the name of the Super Matrix module here.
Mono/Stereo - Select whether the mixer will be mono or stereo.
Delay - Enables crosspoint delay, with a maximum of 72 input or output channels on the Radius NX, and up to 128 input or output channels on the Server D100.
Input Channel Features
Channels- Select the number of input channels for the matrix: 1–128 mono or 1–64 stereo for the Radius NX, and 1–400 mono or 1–200 stereo for the Server D100.
Mute -Check this box to include mute buttons for the input channels in the matrix.
Gain -Check this box to include gain controls for the input channels in the matrix.
Solo- Check this box to include solo controls for the input channels in the matrix.
Inputs in a Grid -Select the number of input channels per grid for the matrix: 1–128 mono or 1–64 stereo for the Radius NX, and 1–400 mono or 1–200 stereo for the Server D100.
Pan -Check this box to include Pan buttons for the input channels in the matrix. This is only available when the input channels are stereo.
Crosspoint Features
Connect -Check this box to include connect points for the crosspoint in the matrix.
Gain -Check this box to include gain controls for the crosspoint in the matrix.
Output Features
Channels -Select the number of output channels for the matrix: 1–128 mono or 1–64 stereo for the Radius NX, and 1–400 mono or 1–200 stereo for the Server D100.
Mute -Check this box to include mute buttons for the output channels in the matrix.
Gain -Check this box to include gain controls for the output channels in the matrix.
Pre/Post- Check this box to include pre/post controls for the output channels in the matrix.
Outputs in a Grid -Select the number of output channels per grid for the matrix: 1–128 mono or 1–64 stereo for the Radius NX, and 1–400 mono or 1–200 stereo for the Server D100.
Module View
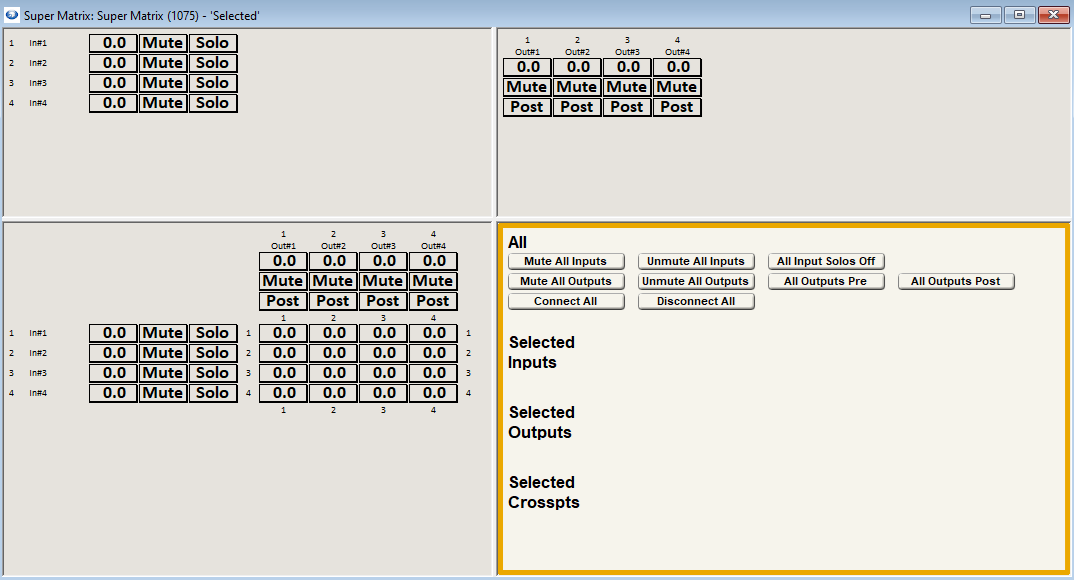
The Super Matrix module view can have one, two, or four independent panes. Each pane view can be customized to display one of several different modes. These modes include; Overview, Crosspoints, Inputs, Outputs, Remote, Presets, Selected, and user saved views. All but Selected mode has an independent zoom level from the rest of Composer. Pane sizes can be adjusted by dragging the splitting handle between the panes. Only one pane is active at a time, denoted by an color highlight. All keyboard commands go to the active pane. The Navigator, described below, also affects the active pane.
View Modes and Controls
Overview
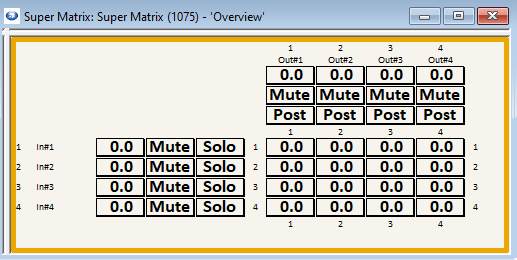
Overview mode provides access to all controls of the Super Matrix in a single pane; inputs, outputs, and crosspoints.
Input Controls
Mute, Gain and Solo can be enabled/disabled in the Place Super Matrix dialog.
 * Channel Label - User editable field to label the input channel. Click to edit the labels.
 ** Gain - Press and hold the button. Move the mouse up/right to raise the input gain and down/left to lower it.
Mute - This is a latched button that toggles to red when the channel is muted.
Solo - This latched button that toggles to flashing yellow when the channel is soloed.
 Pan - Press and hold the button. Move the mouse left to pan the input left (L) and right to pan the input gain right (R). The default position is Center (C). This is only available when the input channels are stereo.
Output Controls
Mute, Gain and Pre/Post can be enabled/disabled in the Place Super Matrix dialog.
 Channel Label - User editable field to label the output channel. Click to edit the labels.
** Gain - Press and hold the button. Move the mouse up/right to raise the output gain and down/left to lower it.
Mute - This is a latched button that toggles to red when the channel is muted.
Pre/Post - This is a latched button that toggles purple when the channel is Pre. This determines whether the source of the output is affected before or after the input fader.
Crosspoint Controls
Gain - Press and hold the button. Move the mouse up/right to raise the submix gain and down/left to lower it. To change the level of multiple channels, hold the Alt key and click on the either the In# or Out# of the channel and the column or row will highlight the text red. Move the mouse up/right to raise the submix gains and down/left to lower them.
 ** Connect Buttons - Selecting these latched buttons will highlight the button green and connect the row's input channel to the corresponding column's output channel.
 Delay *- Using either the right-click option or keyboard shortcut Alt+D, the crosspoint gains will now display the delay. *Press and hold the button. Move the mouse up/right to raise the submix delay and down/left to lower it.
Crosspoints
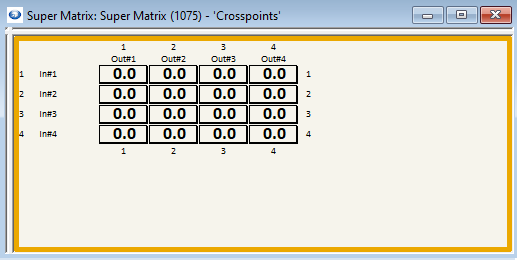
Crosspoints mode shows only the crosspoint controls.
Crosspoint Controls
Gain - Press and hold the button. Move the mouse up/right to raise the submix gain and down/left to lower it. To change the level of multiple channels, hold the Alt key and click on the either the In# or Out# of the channel and the column or row will highlight the text red. Move the mouse up/right to raise the submix gains and down/left to lower them.
Connect Buttons - Selecting these latched buttons will highlight the button green and connect the row's input channel to the corresponding column's output channel.
** Delay *- Using either the right-click option or keyboard shortcut Alt+D, the crosspoint gains will now display the delay. *Press and hold the button. Move the mouse up/right to raise the submix delay and down/left to lower it.
Inputs
Inputs mode shows only the input controls.
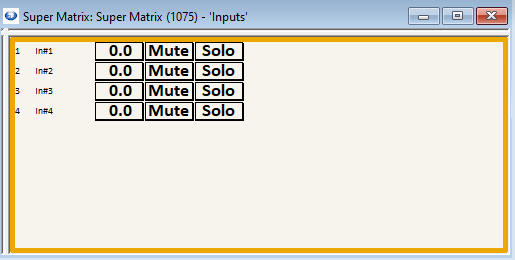
Input Controls
Mute, Gain and Solo can be enabled/disabled in the Place Super Matrix dialog.
- * Channel Label - User editable field to label the input channel. Click to edit the labels.
** Gain - Press and hold the button. Move the mouse up/right to raise the input gain and down/left to lower it.
Mute - This is a latched button that toggles to red when the channel is muted.
Solo - This latched button that toggles to flashing yellow when the channel is soloed.
Outputs
Outputs mode shows only the output controls.
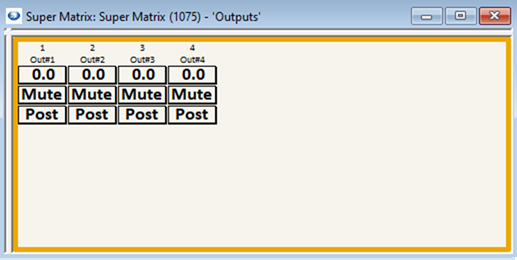
Output Controls
Mute, Gain and Pre/Post can be enabled/disabled in the Place Super Matrix dialog.
Channel Label - User editable field to label the output channel. Click to edit the labels.
** Gain - Press and hold the button. Move the mouse up/right to raise the output gain and down/left to lower it.
Mute - This is a latched button that toggles to red when the channel is muted.
Pre/Post - This is a latched button that toggles purple when the channel is Pre. This determines whether the source of the output is affected before or after the input fader.
Remote
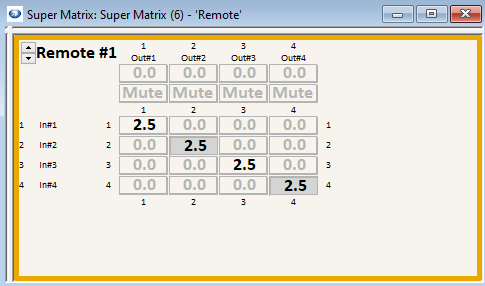
Remote mode displays the overview layout showing all controls that have been assigned remote control numbers. If there are no controls assigned a control number, they will be greyed out.
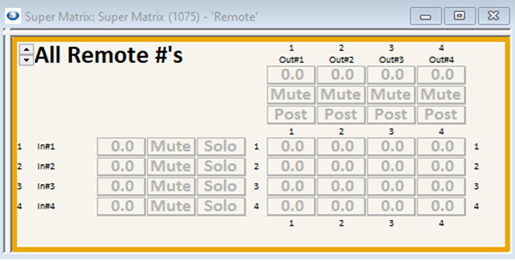
Clicking on the arrows in the upper left of the window will change which control number is being displayed. Alternately, clicking on the 'All Remote #'s' will open a dialog to manually enter the desired remote control number.
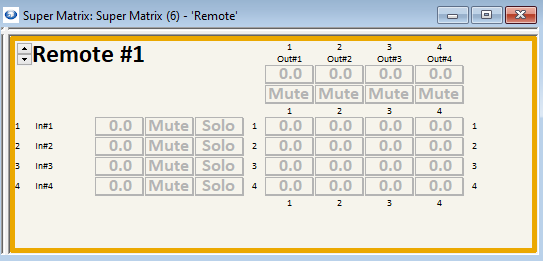
When displaying a single remote control number, clicking on a control will assign that number to the control. For crosspoints, a click will assign the connect button and Ctrl+click will assign the submix gain. To link controls, multiple controls can be assigned the same number.
Presets
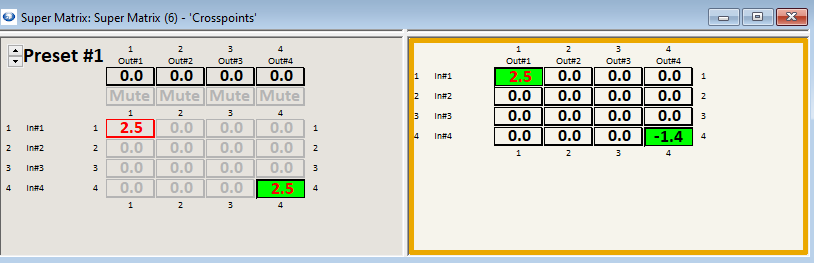
Presets mode displays the overview layout showing all controls that have been assigned to presets. If there are no controls assigned to a preset, they will be greyed out.
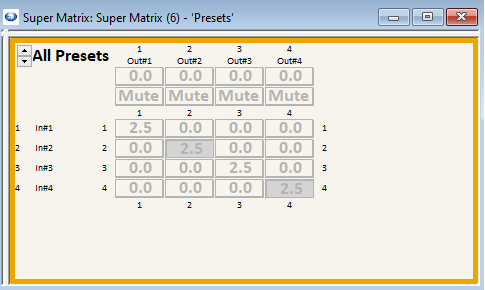
Clicking on the arrows in the upper left of the window will change which preset is being displayed. Alternately, clicking on the 'All Presets' will open a dialog to manually enter the desired preset.
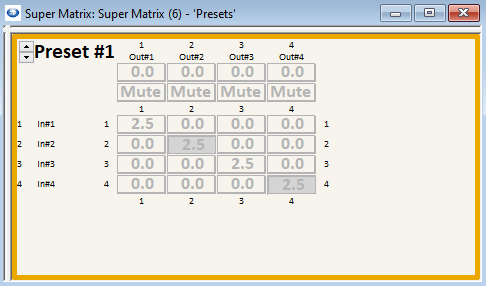
When displaying a single preset number, clicking on a control will assign the current values for that control to the preset number. For crosspoints, a click will assign the current connect button state and Ctrl+click will assign the current submix gain value. Dragging with the left mouse button clicked, all controls covered will change their state of inclusion in the preset to match the first control clicked.
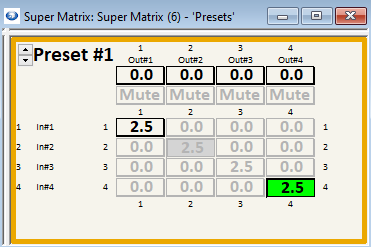
The value shown is the preset value if the control is included in the preset, otherwise it is the current state.
Selected
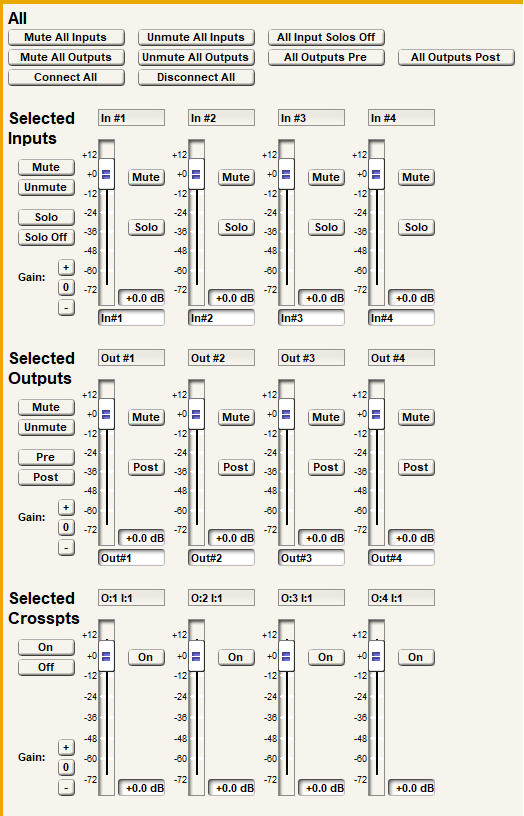
Selected mode allows just the controls selected in Overview, Crosspoints, Inputs, and Outputs modes to be viewed using standard controls used in older modules. Up to 32 inputs, outputs, and crosspoints can be displayed at a time. Controls on the left of the first fader affect only the selected controls in that group. Controls underneath the faders affect all controls in the Super Matrix for that type, e.g. the Mute All Inputs button will mute all inputs of the Super Matrix even if only a few are selected.
Inputs
Group and Global Controls
Mute Button (left of the first fader) - Mutes all selected inputs. Cannot be exported to SymVue.
Unmute Button- Unmutes all selected inputs.Cannot be exported to SymVue.
Solo Button (left of the first fader)- Turns Solo on for all selected inputs.Cannot be exported to SymVue.
Solo Off Button- Turns Solo off for all selected inputs.Cannot be exported to SymVue.
Gain ± Buttons - Nudges the gains of all selected inputs by ±3.0 dB. Cannot be exported to SymVue.
Mute All Inputs Button - Mutes all inputs in the Super Matrix. *Cannot be exported to SymVue.*
*Unmute All Inputs* ** Button - Unmutes all inputs in the Super Matrix. Cannot be exported to SymVue.**
*All Input Solos Off* ** Button - Turns all Solos off in the Super Matrix. Cannot be exported to SymVue.**
Individual Input Controls
Gain Fader - Increases or decreases the inputs gain. You can specify a precise gain value by clicking the text box at the lower right of the fader and entering the desired value in dB.
Mute Button - Mutes the channel.
Solo Button - Solos the channel by muting any non soloed channel.
Channel Label - *User editable field to label the input channel.*
Outputs
Group and Global Controls
Mute Button (left of the first fader) - Mutes all selected outputs. Cannot be exported to SymVue.
Unmute Button- Unmutes all selected outputs.Cannot be exported to SymVue.
Pre Button (left of the first fader)- Sets the source of selected outputs to be affected before the input fader.Cannot be exported to SymVue.
Post Button (left of the first fader)- Sets the source of selected outputs to be affected after the input fader.Cannot be exported to SymVue.
Gain ± Buttons - Nudges the gains of all selected outputs by ±3.0 dB. Cannot be exported to SymVue.
Mute All Outputs Button - Mutes all outputs in the Super Matrix. *Cannot be exported to SymVue.*
*Unmute All Outputs* ** Button - Unmutes all outputs in the Super Matrix. Cannot be exported to SymVue.**
*All Outputs Pre* ** Button - Sets the source of all the outputs in the Super Matrix to be affected before the input faders. Cannot be exported to SymVue.**
*All Outputs Post Button* - Sets the source of all the outputs in the Super Matrix to be affected after the input faders. Cannot be exported to SymVue.**
Individual Output Controls
Gain Fader - Increases or decreases the outputs gain. You can specify a precise gain value by clicking the text box at the lower right of the fader and entering the desired value in dB.
Mute Button - Mutes the channel.
Pre/Post Button - Toggles whether the source of the output is affected before or after the input fader.
Channel Label - *User editable field to label the input channel.*
Crosspoints
Group and Global Controls
On Button- Connects all the selected crosspoints.Cannot be exported to SymVue.
Off Button- Disconnects all the selected crosspoints.Cannot be exported to SymVue.
Delay ± Buttons - Nudges the submix delay of all the selected crosspoints by ±1.00 ms. Cannot be exported to SymVue.
Gain ± Buttons- Nudges the submix gains of all the selected crosspoints by ±3.0 dB.Cannot be exported to SymVue.
*Connect All Button-* Connects all of the inputs to all of the outputs in the Super Matrix. Cannot be exported to SymVue.**
Disconnect All Button- Disconnects all of the inputs from all of the outputs in the Super Matrix. Cannot be exported to SymVue.
Individual Crosspoint Controls
Gain Fader - Increases or decreases the submix gain. You can specify a precise gain value by clicking the text box at the lower right of the fader and entering the desired value in dB.
Delay readout- Specify a precise delay time by clicking in the text box and entering the desired value in ms.
On Button- Toggles whether the crosspoint is connected or disconnected.
Navigator
The navigator allows for convenient navigation of the Super Matrix.
The yellow navigation box indicates the current location in the Super Matrix for the selected Pane. It can be dragged using the mouse or used to reflect the current location after scrolling through the Super Matrix grid.
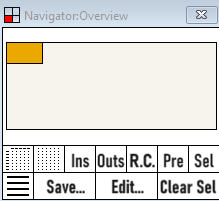
The navigator list shortcuts for different Super Matrix view modes.
The top row of buttons below the navigation box act as filters to refine the Super Matrix view.
Overview (Indicated as a grid of dots with headers) - Shows all input/output channels with their associated parameters and crosspoints.
Crosspoints (Indicated as a grid of dots) - Shows only the crosspoints
Inputs (Ins) - Shows only the inputs
Outputs (Outs) - Shows only the outputs
Remote (R.C.) - Shows an overview of the Super Matrix with highlighted buttons that have been associated with a remote control.
Presets (Pre) - Shows an overview of the Super Matrix with highlighted buttons that have been associated with a preset.
Selected (Sel) - Shows detailed control and configuration of all selected inputs/outputs and crosspoints.
The bottom row of buttons below the navigation box provide management of custom Matrix User views.
User Views (Indicated as a horizontal lines) - Allows select and recall of previously configured user views.
Save... - Allows saving of the current view as a new User View.
Edit... - Allows editing of previously created User Views.
Clear Selected - Deselects any currently selected inputs/outputs or crosspoints.
User Views
User views allow programmers to save, recall, and configure different views of the Super Matrix. These views allow for quick access to groups of channels that are frequently used. User views can be created and edited from the right click menu or from the navigator window.
Save New User Matrix View
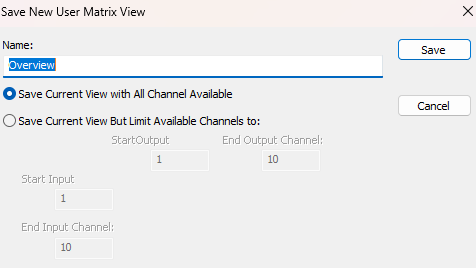
Name –This is the name of the view that will appear in the User Views list.
Save Current View with All Channel Available –Saves the Super Matrix view as it currently appears.
Save Curent View but Limit Available Channels to: - Saves the Super Matrix view and allows you to specify what channels you would like to show in that view.
Start Output -Indicates what output channel the user view will begin at.
End Output Channel -Indicates what output channel the user view will end at.
Start Input -Indicates what input channel the user view will begin at.
End Input Channel -Indicates what input channel the user view will end at.
Edit User Matrix Views
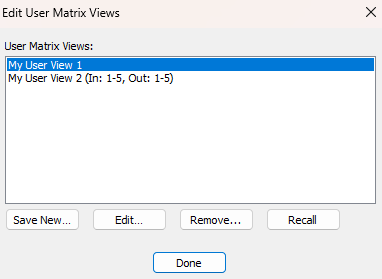
Save New –Allows you to save a new user view based on the selected user view.
Edit –Allows you to make changes like name and shown inputs/outputs to the selected user view.
Remove –Deletes the selected user view.
Recall –Recalls the selected user view.
Super Matrix Input Options
These options can be shown by slow clicking on an input control or right clicking and choosing "Edit Input Values...".
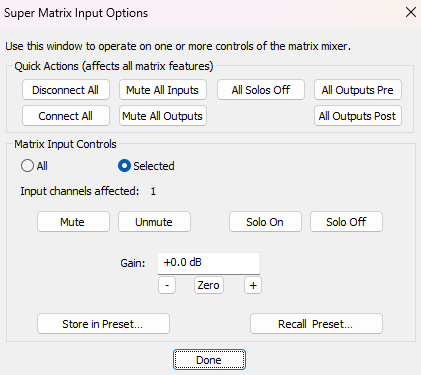
Quick Actions
*Disconnect All* - ** This momentary button disconnects all of the inputs from all of the outputs.**
Connect All - This momentary button connects all of the inputs to all of the outputs.
Mute All Inputs - This momentary button mutes every input.
Mute All Outputs -** This momentary button mutes every output.
All Solos Off- This momentary button turns Solo off for every input.
All Outputs Pre- This momentary button turns all outputs to Pre.
All Outputs Post- This momentary button turns all outputs to Post.
Input Controls
All/Selected - Choose which inputs are affected:
All -Affects all inputs.
Selected -Affects only the input channels selected.* *
Inputs - Lists the number of inputs that are being affected.
Mute - This is a momentary button that mutes the input channels.
Unmute - This is a momentary button that unmutes the input channels.
Solo On- This is a momentary button that turns the selected input channel(s) solo on.
Solo Off- This is a momentary button that turns the selected input channel(s) solo off.
Gain - This is a user editable field to manually enter the desired gain setting. 'Various' will be displayed if multiple input channels have different gain settings and a warning will pop-up to confirm changing multiple channels to one setting.
- - Lowers the gain by 3 dB decrements.
Zero -Sets the gain to 0 dB.
+ -Increases the gain by 3 dB increments.
Store in Preset... - Press this button to store settings in a preset.
Recall Preset... - Press this button to select a preset to recall.
Super Matrix Output Options
These options can be shown by slow clicking on an output control or right clicking and choosing "Edit Output Values...".
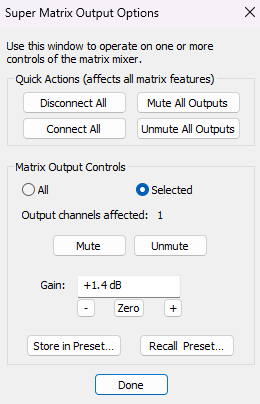
Quick Actions
*Disconnect All* - ** This momentary button disconnects all of the inputs from all of the outputs.**
Connect All - This momentary button connects all of the inputs to all of the outputs.
Mute All Inputs - This momentary button mutes every input.
Mute All Outputs -** This momentary button mutes every output.
All Solos Off- This momentary button turns Solo off for every input.
All Outputs Pre- This momentary button turns all outputs to Pre.
All Outputs Post- This momentary button turns all outputs to Post.
Matrix Output Controls
All/Selected -Choose which outputs are affected:
All -Affects all outputs.
Selected -Affects only the output channels selected.* *
Outputs - Lists the number of outputs that are being affected.
Mute - This is a momentary button that mutes the output channels.
Unmute - This is a momentary button that unmutes the output channels.
Pre- This is a momentary button that changes the output channel(s) to Pre.
Post -This is a momentary button that changes the output channel(s) to Post.
Gain - This is a user editable field to manually enter the desired gain setting. 'Various' will be displayed if multiple output channels have different gain settings and a warning will pop-up to confirm changing multiple channels to one setting.
- - Lowers the gain by 3 dB decrements.
Zero -Sets the gain to 0 dB.
+ -Increases the gain by 3 dB increments.
Store in Preset... - Press this button to store settings in a preset.
Recall Preset... - Press this button to select a preset to recall.
Super Matrix Crosspoint Options
These options can be shown by slow clicking on a crosspoint control or right clicking and choosing "Edit Crosspoint Values...".
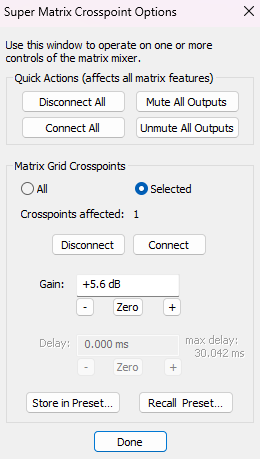
Quick Actions
Disconnect All - This momentary button disconnects all of the inputs from all of the outputs.
Connect All - This momentary button connects all of the inputs to all of the outputs.
Mute All Outputs - This momentary button mutes every output.
Unmute All Outputs - This momentary button unmutes every output.
Crosspoint Controls
All/Selected -Choose which crosspoints are affected:
All -Affects all crosspoints.
Selected -Affects only the crosspoint channels selected.
Crosspoints - Lists the number of crosspoints that are being affected.
Disconnect - This is a momentary button that disconnects the crosspoints.
Connect - This is a momentary button that connects the crosspoints.
Gain - This is a user editable field to manually enter the desired submix gain setting. 'Various' will be displayed if multiple crosspoints have different gain settings and a warning will pop-up to confirm changing multiple channels to one setting.
- - Lowers the gain by 3 dB decrements.
Zero -Sets the gain to 0 dB.
+ -Increases the gain by 3 dB increments.
Delay - This is a user editable field to manually enter the desired submix delay setting. 'Various' will be displayed if multiple crosspoints have different delay settings and a warning will pop-up to confirm changing multiple channels to one setting.
- - Lowers the gain by 1 ms decrements.
Zero -Sets the gain to 0 ms.
+ -Increases the gain by 1 ms increments.
Store in Preset... - Press this button to store settings in a preset.
Recall Preset... - Press this button to select a preset to recall.
Assigning Control Numbers
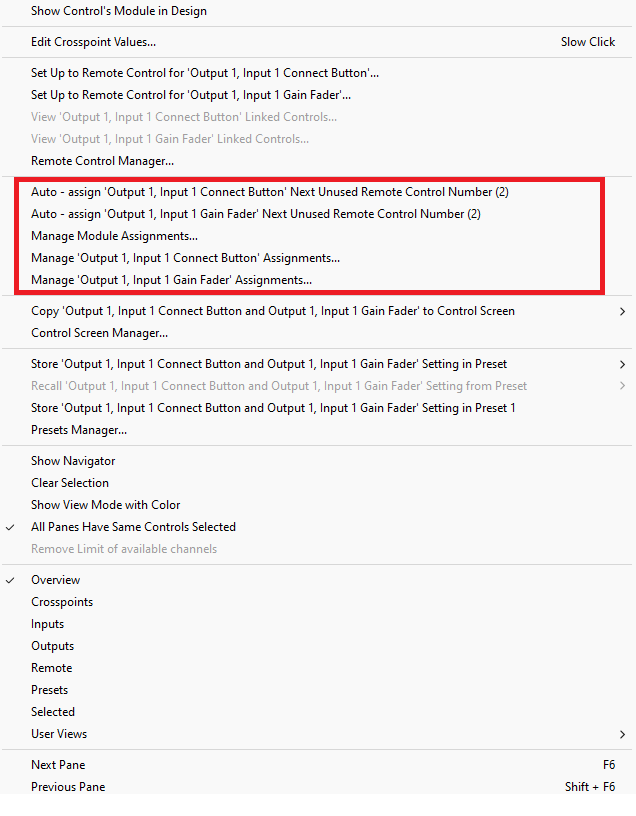
Inside of the Matrix Mixer Module, you have the option to either automatically or manually assign sequential control numbers to the input, output, or crosspoint groups. By selecting "Auto-assign Next Unused Remote Control Number (#)" you will automatically assign the numbers listed in the parentheses. If you select "Manage Assignments..." you can manually select the group of sequential numbers you would like to assign. For more information on Assigning Parameters for Control, click here.
Differences in Radius NX and Server D100
Super Matrix modules are hardware-specific due to differences in supported channel counts and internal architecture. As a result, Super Matrix modules created for the Radius NX are not compatible with the Server D100, and vice versa. Composer treats each version of the Super Matrix as a distinct module type. Modules cannot be copied or compiled between devices with different matrix capacities.