Priority Selectors
This module chooses one of its many inputs to route to its single output. The choice of the input is controlled dynamically by the level, On button, and the priority of each input. It can be thought of as a smart input selector that routes the active input with the highest priority to the output. It is intended to be used primarily in paging applications, where higher-priority pages can override lower-priority pages and background music. The On button is present for each input, so the user can choose if an input is on or off independently of its level.
Note: This type of function is also sometimes referred to as a 'priority mixer', but we felt 'selector' is a better term since only one input is sent to the output. The only mixing that goes on is during a brief cross-fade when the input source is changed.
The rules for choosing which input is routed through to the output are as follows:
- If only one input is on (above the threshold and enabled), it is routed through to the output.
- If more than one input is on, the highest priority input is selected (priority 10 is the highest).
- If two or more channels are at the same priority, then the first one on wins.
- If two or more channels are at the same priority and came on at the same time, then the lowest channel number wins (e.g. input #1 overrides input #3).
In summary, the criteria for selecting the input are (in order); highest priority, first on, and lowest channel number.
The threshold setting can be disabled completely. In this case, all inputs are assumed to be above the threshold and only the On buttons determine which are active. This can be thought of as "logic mode" instead of "level mode". The typical use of logic mode involves changing the On buttons dynamically in response to various control events, for example, push to talk.
A hold time setting is also provided. This prevents an input from being de-selected just because it dips below the threshold for a brief period. An input must be below the threshold for the hold time before it is considered off and another equal or lesser priority input can override it. Note that higher priority inputs interrupts lower priorities immediately regardless of the hold time settings. The hold time only applies to lower priority inputs being selected. As an example, assume a page is coming in on input #1 at a priority (10). Also assume background music is present on input #4 at priority 1. If the priority 10 page has a few pauses while the speaker takes a breath, etc., you would not want the lower priority background music to briefly come in during these pauses. In this way, the hold time can prevent 'chattering' or very fast switching between sources.
When the input source is changed, a cross-fade is used to ensure a smooth transition. When a higher priority input overrides a lower priority input, a fast cross-fader is used (attack time). When a higher-priority input goes off and a lower-priority input takes over, a slower cross-fade is used (release time). this slower release cross-fade provides a smooth transition if background music is used as a low priority source. These cross-fades are not user-adjustable.
Versions with 4, 8, 12 and 16 inputs are available. Mono and stereo versions of each size are also available. The stereo module operates on channel pairs, routing both inputs to the stereo output.
Both mono and stereo versions have the following controls:
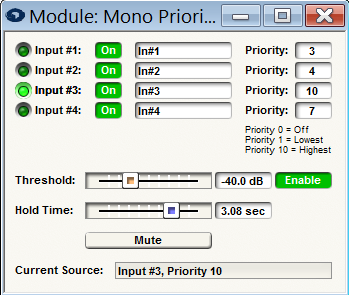
- Priority (text entry). One entry for each input or input pair is provided. This sets the priority of the input. A value of (10) is the highest priority while (1) is the lowest priority. A value of (0) will permanently disable the input so that it will never be selected even if it is the only input that is on. This would be equivalent to the input always being below the threshold. It's a good practice for the priority to be adjusted during set-up and not changed dynamically during operation.
- On LED. These LEDs light when a particular channel is active, i.e. being routed to the output.
- On Button. One button for each input, or input pair is provided. If this is turned off that input will never be routed through to the output. If effectively disable that channel, acting as if it's priority is (0).
- Threshold. Sets the peak level in dBFS that an input signal must exceed to be considered on. The module uses a peak-sensing algorithm, so the specified threshold is the peak level. For stereo modules, if the peak value of either channel exceeds the threshold, the input is considered on. Be sure to set the threshold above the noise floor of the inputs. Adjust using the slider, or click in the text entry box to specify a numerical value.
- Threshold Enable. Enables the threshold setting to activate the module. If disabled, the priority rules still apply, but each channel is considered above the nonexistent threshold.
- Hold Time. Sets the time in milliseconds that input must be below the threshold before being considered off. Set the hold time to a value slightly larger than the longest pause you want to allow during a page. See the additional discussion on applications of this parameter above. Adjust using the slider or click in the text entry box to specify a numerical value.
- Mute Button. Pressing this button mutes the module output.
A space is provided to name the inputs. Click in the box adjacent to the Priority label and enter a name. The name entered will also appear on the module's input labels. For the stereo module, a single name is provided for the stereo pair and L and R are appended as appropriate on the module's labels.
The module provides a display of the currently selected input and its priority. This display is only valid when online.
Two control signal outputs are provided to indicate the current operation of the module. The 'Prior' output indicates the priority of the currently selected input. A control signal value of 100% corresponds to priority (10), 90% to priority (9), etc. If no signal is selected the output will be zero. The Num output indicates the channel number of the currently selected input. The range from 0 to 100% is divided up evenly between the inputs. When no input is selected, a value of zero is output. This control could be directly used to control a multiplexer or an input selector of the same size.
Technical note: The control signal outputs (and GUI display) switch at the moment the cross-fade first begins.