W Series Remote Programming
W1
Overview
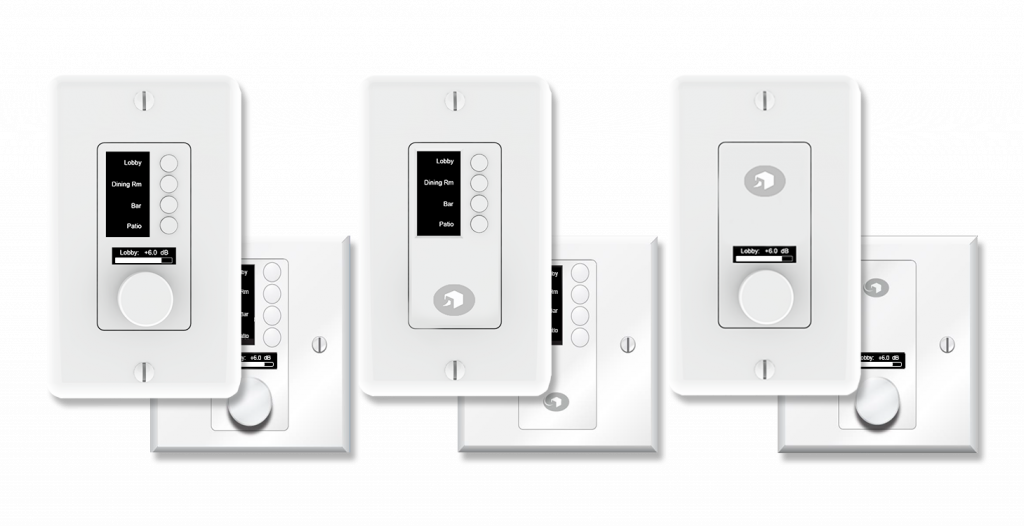
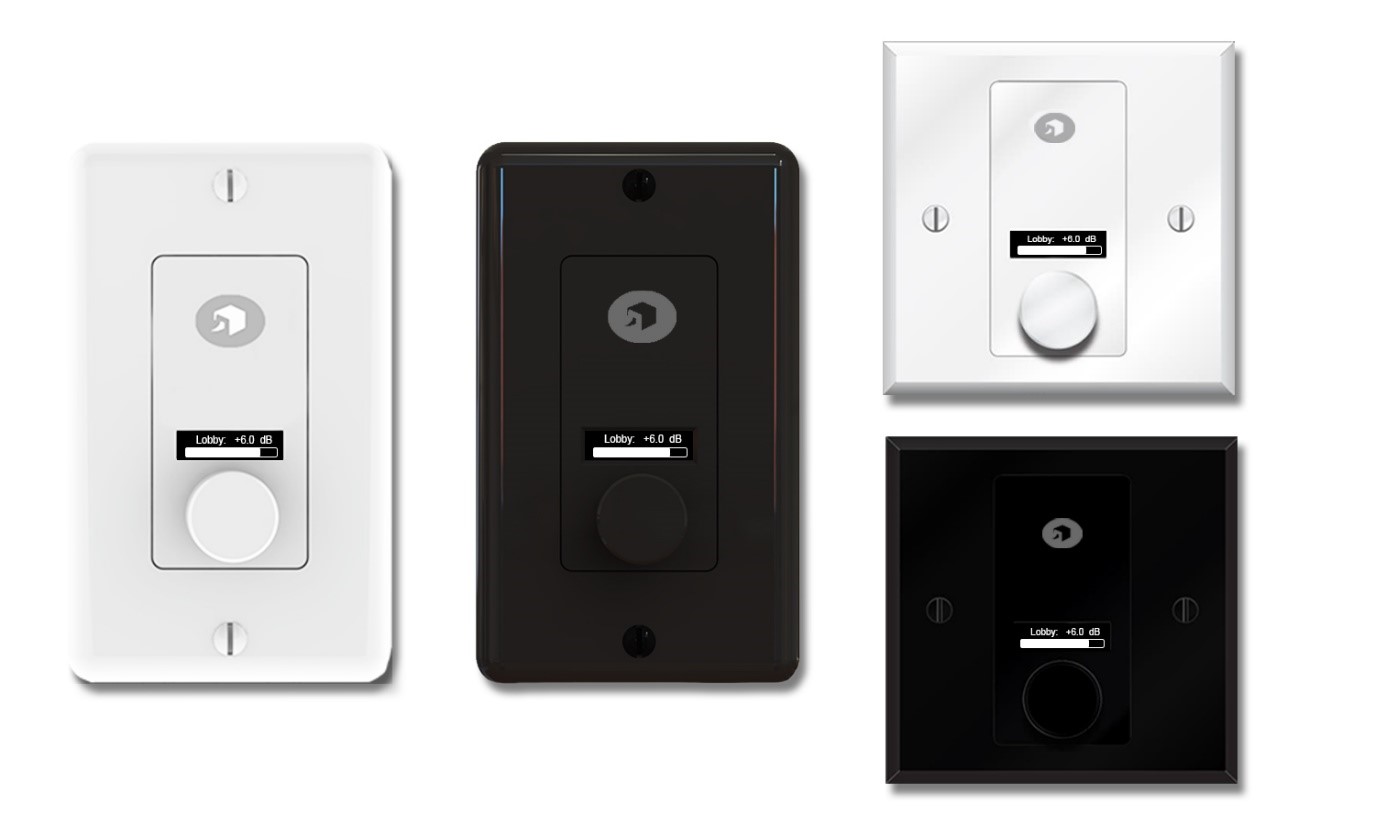
The W1 remote features a push-button rotary encoder that provides the choice of controlling 1 to 8 parameters in the Symetrix DSP hardware. The high contrast OLED screen provides user feedback, clearly showing a parameter state or relative volume level.
Front
Rear
Programming
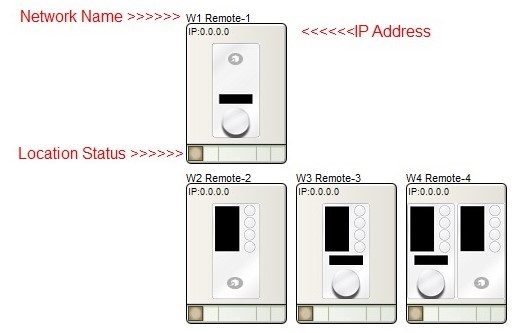
A Symetrix W1 IP remote can be added to the Site View.
Updating Online
While online, the user can make changes to the menu and unit design for W series remotes. A new option in the Application Preferences dialog will control if changes should be pushed automatically when they are changed.
If this feature is enabled, there will be a 1 second delay before all units with changes will start to update. The process happens quickly (a second or two per unit).
If this feature is not enabled, and the site is on-line, it will be taken off-line.
Properties Window
Selecting one or more W series remotes in Site view with the properties window open shows properties for that selection. Extensive properties are shown for a single unit. In addition to the “Site Design” and “Unit Properties” sections, W series remote specific properties are shown. These include Brightness, Idle Mode settings, Sleep Mode settings and the mode configuration settings available from the Edit WX Settings dialog from the Unit Properties dialog.
Also shown are the configured menu properties. Unassigned menus are just shown as unassigned. All menus can be configured from the properties window once a parameter has been assigned to a menu.
By default, the idle and sleep properties are collapsed into their sections to simplify display. Expanding and collapsing of sections is remembered within a session where relevant.
When multiple W series remotes of the same type are selected, all the unit properties are still presented except menu properties are limited to the assigned/unassigned state.
If all units selected are not W series remotes, properties are limited as with all units to just basic information common to all.
TheSimulatorfeature is accessible by right-clicking on the unit module and choosing “Open”. The simulate function presents an accurate software representation of the W Series remote allowing you to preview the programming.
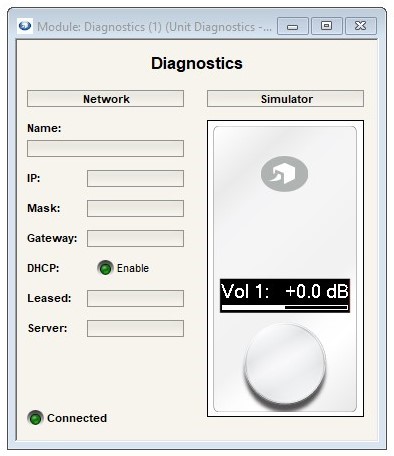
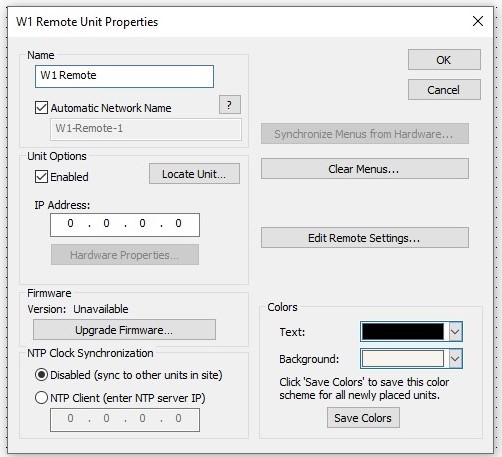
All the following features, except for the Location Status, are managed in the Unit Properties dialog. To access the Unit Properties, right-click on the unit module in the Site View and choose “Unit Properties”, or just double-click on the Unit. Only one unit properties may be open at a time.
-
Name (Descriptive)- It is recommended to assign a unique unit name for each unit in the design based on the unit's purpose or location. Composer will always append a unique numeric identifier to this name. The units descriptive name can contain any characters and be any length. The descriptive name will convert automatically to ‘Wx-Remote-(x)’ with x being the number of Wx’s added to site file.
-
Automatic Network Name- When Automatic Network Name is checked, the network name is auto-generated from the unit names. Network names cannot contain special characters or spaces and must be unique. The automatic network name will be made to meet the following criteria:
-
-
- Starts with characters ‘A-Z’ or ‘a-z’
-
Contains only the characters ‘A-Z’, ‘a-z’, 0-9 and ‘-‘, and be of a length from 1-31 characters
-
Furthermore, the name will be truncated so that a unique enumerator can be appended to the name and still fit within the 31-character limit.
Unit Options
-
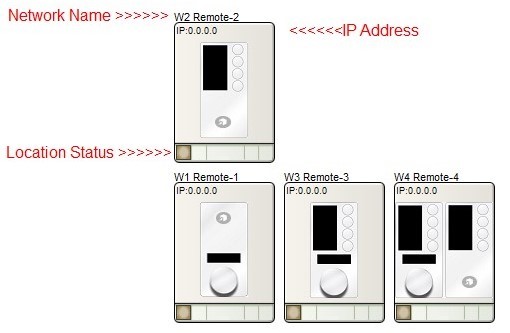
Enabled check box- When the enabled box is checked, the unit must be physically present on the network for a push of the site file to the hardware. When the enabled box is unchecked, a X will appear on the unit module in the Site View, and the unit will not be required to be physically present for the Push of the site file. IP Address - If the unit is assigned to a static IP address, it can enter in the IP Address field and if the unit can be located on the network at this address, a green check indicating the unit has been located should appear in the lower left corner of the unit module on the Site View. If the unit’s IP address is unknown, run the location process and the IP address field will be filled in once the unit has located and link to the unit module on the Site View.
-
Locate Unit (button) -The locate Unit button launches the Locate Hardware Dialog allowing you to match units in your Site File to physical units on the network. [Link to Locate hardware dialog in help]
-
Hardware Properties- When the unit is located, this button opens the Hardware Properties dialog.
-
Firmware– Displays the current firmware version once located. The Upgrade Firmware button launches the Upgrade Firmware/Hardware process. [Link to Upgrade Firmware/Software dialog in help]
-
NTP Clock Synchronization- The unit’s internal clock has two modes of operation: Disabled means the unit will attempt to sync it's time to other units in the site. If it is unable to do so, the unit’s clock is free running and internally derived. NTP Client allows the unit to sync to an NTP server and receive network time.
-
Synchronize Menus from Hardware- This dialog allows the user to synchronize or “Pull” menus from the W Series remote hardware to Composer.
-
Clear Menus– This button will clear any programming from the remote.
-
Security– To enable security, change the Wake Security setting in the unit properties in the side panel in Composer to “True”. The ‘Wake Security PIN” menu will appear and allow customization of a 4 number PIN to be entered by the user.
-
Edit Remote Settings– This dialog is separated into sections:
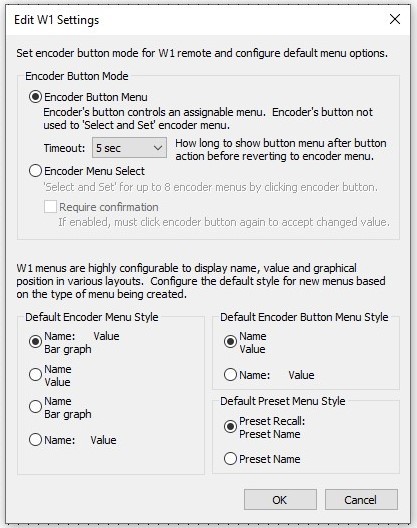
Encoder Button Mode
-
Encoder Button Menu- This mode on the W1 allows the programmer to choose to use the Encoder button as a separate button menu. The timeout tells the unit how much inactivity to wait before returning to display the state of the encoder menu.
-
Encoder Menu Select– This mode allows the programmer to use the encoder button as a ‘Select and Set’ for up to 8 encoder menus and can move from assignment to assignment by clicking the button and adjusting the value as needed.
-
The “Require Confirmation” checkbox tells the unit to require a click of the encoder button before sending a value change. The menu will show a “*” in the display to indicate there is an unsent changed value.
-
Default Encoder Menu Style– This setting controls the defaults styles for the “Name”, “Value” and “Bar Graph” properties when assigning a new encoder menu in the W1, such as for faders or sliders.
-
Default Encoder Button Menu Style– This setting controls the defaults styles for the “Name”, “Value” and “Bar Graph” properties when assigning a new encoder button menu in the W1, such as for a latching or momentary button.
-
Default Preset Menu Style– This setting controls the defaults styles for the “Name”, “Value” and “Bar Graph” properties when assigning an encoder button menu in the W1 to a preset.
-
Colors– This will allow custom colorization of the text and background of the W Series remote unit representation in the
site file only. It does not affect the real Wx in any way.
Properties
Configuration of the remote menus is done from the simulator properties. These are dynamic and will change depending on the assigned controls (see Assigning_Parameters_for_Control.htm).
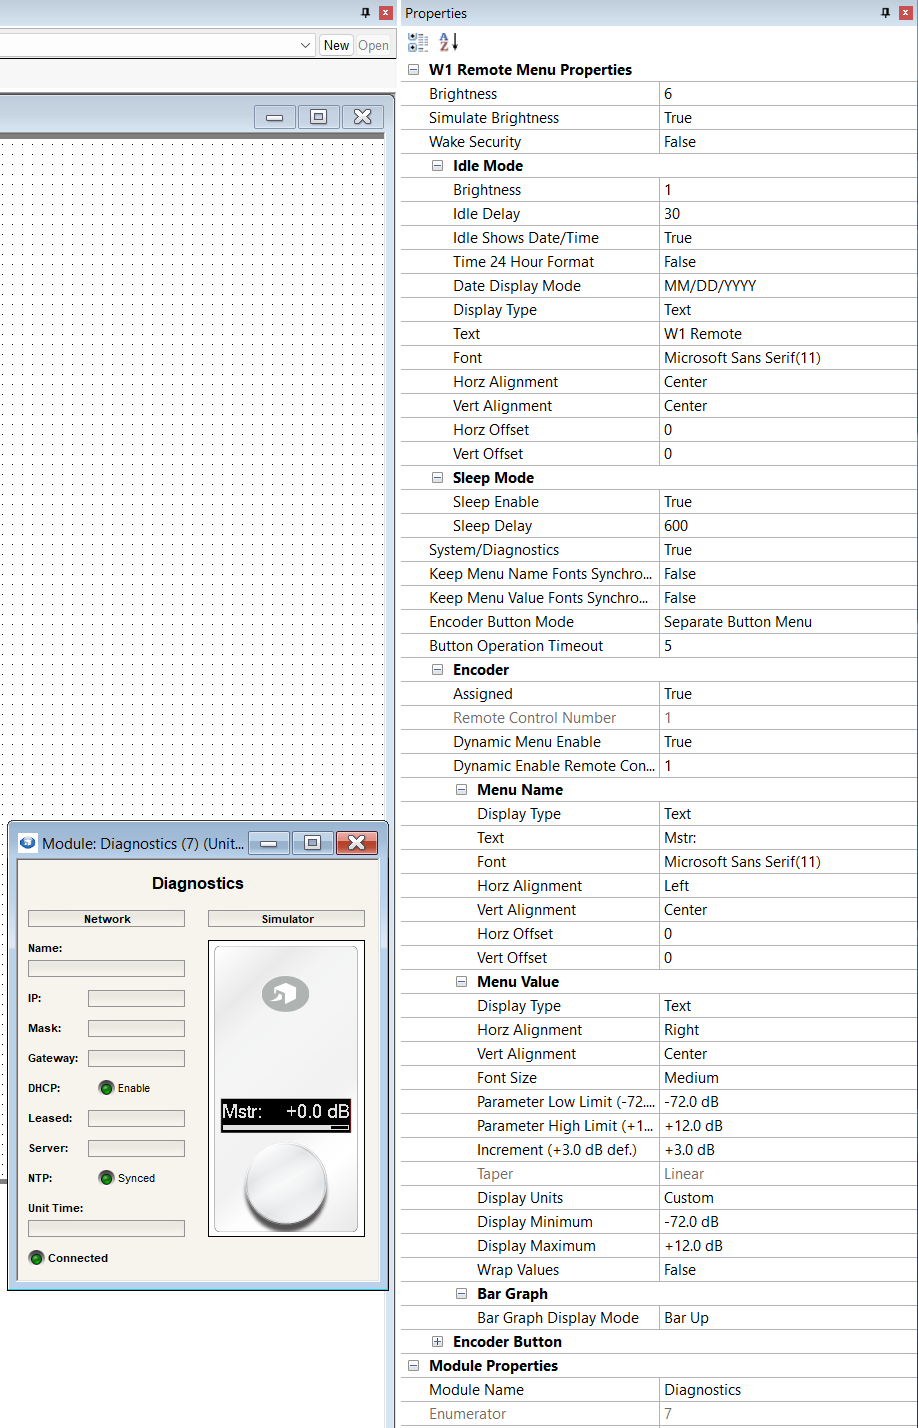
Many features are self explanatory. Here are a few that aren't.
-
Dynamic Menus - When enabled, a control number can assigned. When this control number is set above 50%, the W series menu will be shown. When the control number is set below 50%, the menu will be hidden/disabled. Disabled menus aren’t only invisible, they also will not accept changes from button presses or encoder turns. This is useful for hiding showing menus based on other conditions such as room combine state. . Dynamic Menus are available for all menu types, button, encoder, set and select encoder, encoder button, and preset button menus. Set and select encoder menus have separate dynamic menu enable for the selector button, and the resultant encoder menu. Disabling just the button will prevent the encoder menu from being displayed if it isn’t already. But if the encoder menu is displayed because it is the default menu or was visible before the button became disabled, it will continue to be displayed and be operational. Likewise, if only the encoder menu is disabled, the button will still operate and show a blank menu. Assigning an already assigned Wx menu using the Set Up Remote Control dialog automatically resets the dynamic menu enable feature, changing the enable to false and its remote control number to 1.
-
- The W-Series simulator will implement the feature while offline or online. A disabled menu shows the text “\
” as the value for the remote-control number for the Dynamic enable feature goes below or above 50%. The right click menu for the simulator has a new menu option “Show disabled Dynamic Menus” which is on by default. When on, a disabled menu will show with the text “\ ” like the showing of unassigned menus. When off, the simulator behaves like the actual W-Series, showing a blank menu for a currently displayed menu that is disabled, and not allowing the user to select the menu. 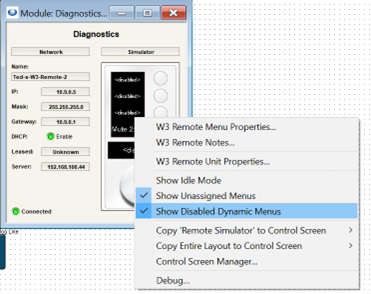
- The W-Series simulator will implement the feature while offline or online. A disabled menu shows the text “\
-
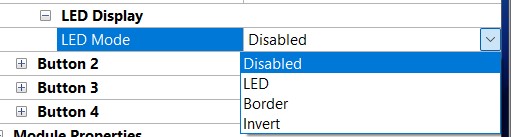
LED Mode - W-Series button and encoder button menus have the option to show a simulated LED on the right side of the display. This option is especially useful for radio buttons as the text does not usually change with changing selection. Each button can be separately programmed, even the individual buttons of a radio button array.Four indication options are available:
-
- Disabled - No indicator LED is shown.
-
LED - Shows a simulated LED on the right side of the display
-
Border - Border mode draws a single pixel wide border around the text when on.
-
Invert - Invert mode inverts the entirety of the graphics space for the button consuming no pixels.
W2
Overview
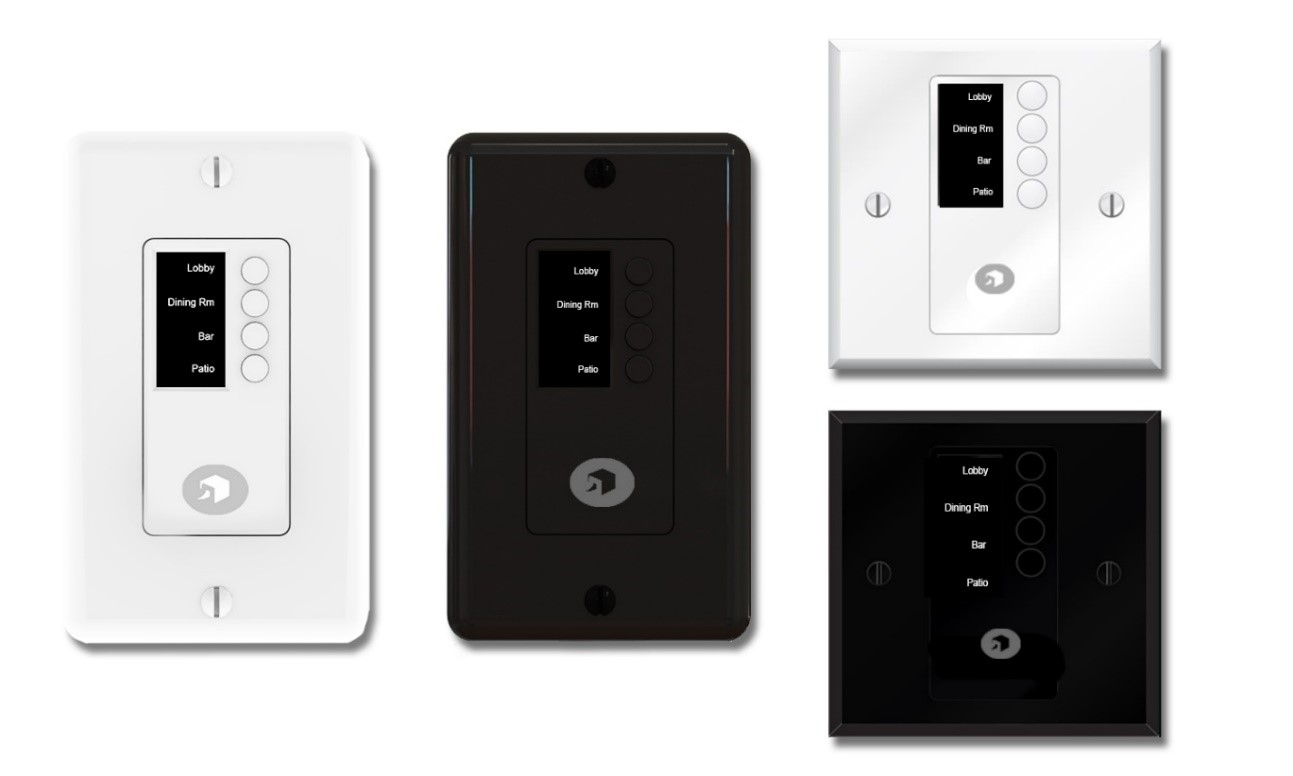
The W2 remote features 4 push buttons that are programmable as momentary, latched or radio buttons. The W2 provides simple control over mutes, source selection and preset triggering. An OLED display provides user feedback.
Front
Rear
Programming
A Symetrix W2 IP remote can be added to the Site View.
Updating Online** **
While online, the user can make changes to the menu and unit design for W series remotes. A new option in the Application Preferences dialog will control if changes should be pushed automatically when they are changed.
If this feature is enabled, there will be a 1 second delay before all units with changes will start to update. The process happens quickly (a second or two per unit).
If this feature is not enabled, and the site is on-line, it will be taken off-line.
Properties Window
Selecting one or more W series remotes in Site view with the properties window open shows properties for that selection. Extensive properties are shown for a single unit. In addition to the “Site Design” and “Unit Properties” sections, W series remote specific properties are shown. These include Brightness, Idle Mode settings, Sleep Mode settings and the mode configuration settings available from the Edit WX Settings dialog from the Unit Properties dialog.
Also shown are the configured menu properties. Unassigned menus are just shown as unassigned. All menus can be configured from the properties window once a parameter has been assigned to a menu.
By default, the idle and sleep properties are collapsed into their sections to simplify display. Expanding and collapsing of sections is remembered within a session where relevant.
When multiple W series remotes of the same type are selected, all the unit properties are still presented except menu properties are limited to the assigned/unassigned state.
If all units selected are not W series remotes, properties are limited as with all units to just basic information common to all.
TheSimulatorfeature is accessible by right-clicking on the unit module and choosing “Open”. The simulate function presents an accurate software representation of the W Series remote allowing you to preview the programming.
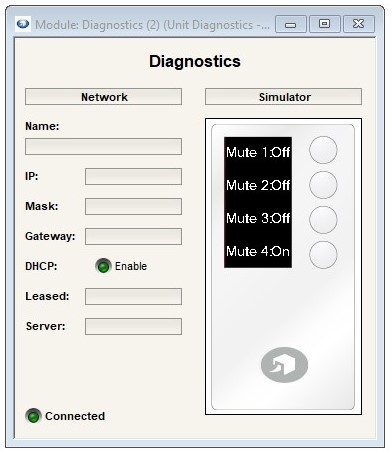
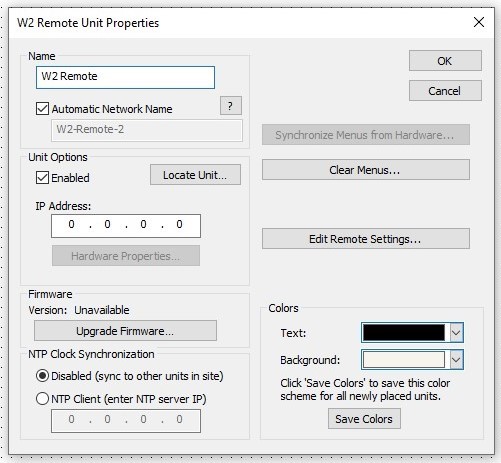
All the following features, except for the Location Status, are managed in the Unit Properties dialog. To access the Unit Properties, right-click on the unit module in the Site View and choose “Unit Properties”, or just double-click on the Unit. Only one unit properties may be open at a time.
-
Name (Descriptive)- It is recommended to assign a unique unit name for each unit in the design based on the unit's purpose or location. Composer will always append a unique numeric identifier to this name. The units descriptive name can contain any characters and be any length. The descriptive name will convert automatically to ‘Wx-Remote-(x)’ with x being the number of Wx’s added to site file.
-
Automatic Network Name- When Automatic Network Name is checked, the network name is auto-generated from the unit names. Network names cannot contain special characters or spaces and must be unique. The automatic network name will be made to meet the following criteria:
-
-
- Starts with characters ‘A-Z’ or ‘a-z’
-
Contains only the characters ‘A-Z’, ‘a-z’, 0-9 and ‘-‘, and be of a length from 1-31 characters
-
Furthermore, the name will be truncated so that a unique enumerator can be appended to the name and still fit within the 31-character limit.
Unit Options
-
Enabled check box- When the enabled box is checked, the unit must be physically present on the network for a push of the site file to the hardware. When the enabled box is unchecked, a X will appear on the unit module in the Site View, and the unit will not be required to be physically present for the Push of the site file. IP Address - If the unit is assigned to a static IP address, it can enter in the IP Address field and if the unit can be located on the network at this address, a green check indicating the unit has been located should appear in the lower left corner of the unit module on the Site View. If the unit’s IP address is unknown, run the location process and the IP address field will be filled in once the unit has located and link to the unit module on the Site View.
-
Locate Unit (button) -The locate Unit button launches the Locate Hardware Dialog allowing you to match units in your Site File to physical units on the network. [Link to Locate hardware dialog in help]
-
Hardware Properties- When the unit is located, this button opens the Hardware Properties dialog.
-
Firmware– Displays the current firmware version once located. The Upgrade Firmware button launches the Upgrade Firmware/Hardware process. [Link to Upgrade Firmware/Software dialog in help]
-
NTP Clock Synchronization- The unit’s internal clock has two modes of operation: Disabled means the unit will attempt to sync it's time to other units in the site. If it is unable to do so, the unit’s clock is free running and internally derived. NTP Client allows the unit to sync to an NTP server and receive network time.
-
Synchronize Menus from Hardware- This dialog allows the user to synchronize or “Pull” menus from the W Series remote hardware to Composer.
-
Clear Menus– This button will clear any programming from the remote.
-
Security– To enable security, change the Wake Security setting in the unit properties in the side panel in Composer to “True”. The ‘Wake Security PIN” menu will appear and allow customization of a 4 number PIN to be entered by the user.
-
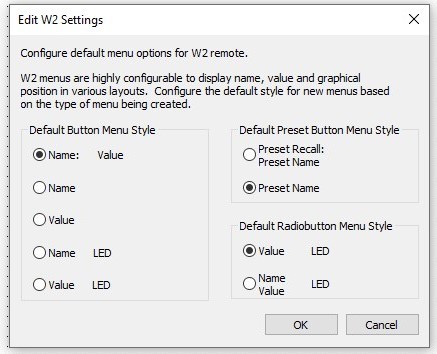
Edit Remote Settings– This dialog is separated into sections:
-
-Default Button Menu Style– This menu gives control over graphical layout and display properties for items such as ‘Name’ and ‘Value’ for the button's menu readout.
-
Default Preset Button Menu Style– This menu allows the programmer to choose the graphical layout and display style for the button properties for items such as ‘Name’ and ‘Value’ when used for Presets readout.
-
Default Radio button Menu Style– This menu allows the programmer to choose the graphical layout and display style for the W2 button properties for items such as ‘Name’ and ‘Value’ when used for Radio buttons readout.
-
Colors– This will allow custom colorization of the text and background of the W Series remote unit representation in the
site file only. It does not affect the real Wx in any way.
Properties
Configuration of the remote menus is done from the simulator properties. These are dynamic and will change depending on the assigned controls (see Assigning_Parameters_for_Control.htm).
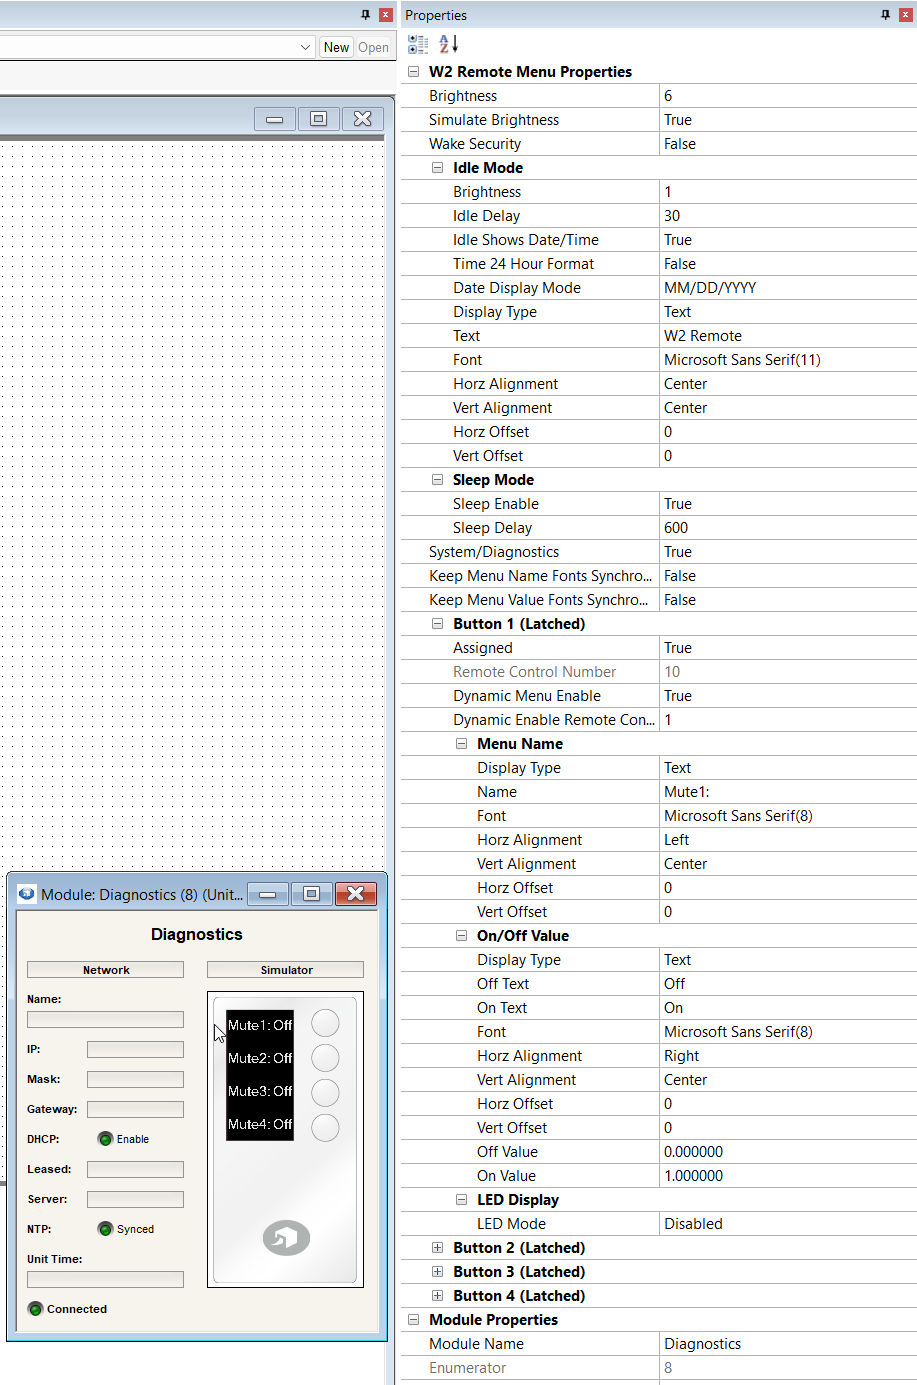
Many features are self explanatory. Here are a few that aren't.
-
Dynamic Menus - When enabled, a control number can assigned. When this control number is set above 50%, the W series menu will be shown. When the control number is set below 50%, the menu will be hidden/disabled. Disabled menus aren’t only invisible, they also will not accept changes from button presses or encoder turns. This is useful for hiding showing menus based on other conditions such as room combine state. . Dynamic Menus are available for all menu types, button, encoder, set and select encoder, encoder button, and preset button menus. Set and select encoder menus have separate dynamic menu enable for the selector button, and the resultant encoder menu. Disabling just the button will prevent the encoder menu from being displayed if it isn’t already. But if the encoder menu is displayed because it is the default menu or was visible before the button became disabled, it will continue to be displayed and be operational. Likewise, if only the encoder menu is disabled, the button will still operate and show a blank menu. Assigning an already assigned Wx menu using the Set Up Remote Control dialog automatically resets the dynamic menu enable feature, changing the enable to false and its remote control number to 1.
-
- The W-Series simulator will implement the feature while offline or online. A disabled menu shows the text “\
” as the value for the remote-control number for the Dynamic enable feature goes below or above 50%. The right click menu for the simulator has a new menu option “Show disabled Dynamic Menus” which is on by default. When on, a disabled menu will show with the text “\ ” like the showing of unassigned menus. When off, the simulator behaves like the actual W-Series, showing a blank menu for a currently displayed menu that is disabled, and not allowing the user to select the menu.
- The W-Series simulator will implement the feature while offline or online. A disabled menu shows the text “\
-
LED Mode - W-Series button and encoder button menus have the option to show a simulated LED on the right side of the display. This option is especially useful for radio buttons as the text does not usually change with changing selection. Each button can be separately programmed, even the individual buttons of a radio button array.Four indication options are available:
-
- Disabled - No indicator LED is shown.
-
LED - Shows a simulated LED on the right side of the display
-
Border - Border mode draws a single pixel wide border around the text when on.
-
Invert - Invert mode inverts the entirety of the graphics space for the button consuming no pixels.
W3
Overview
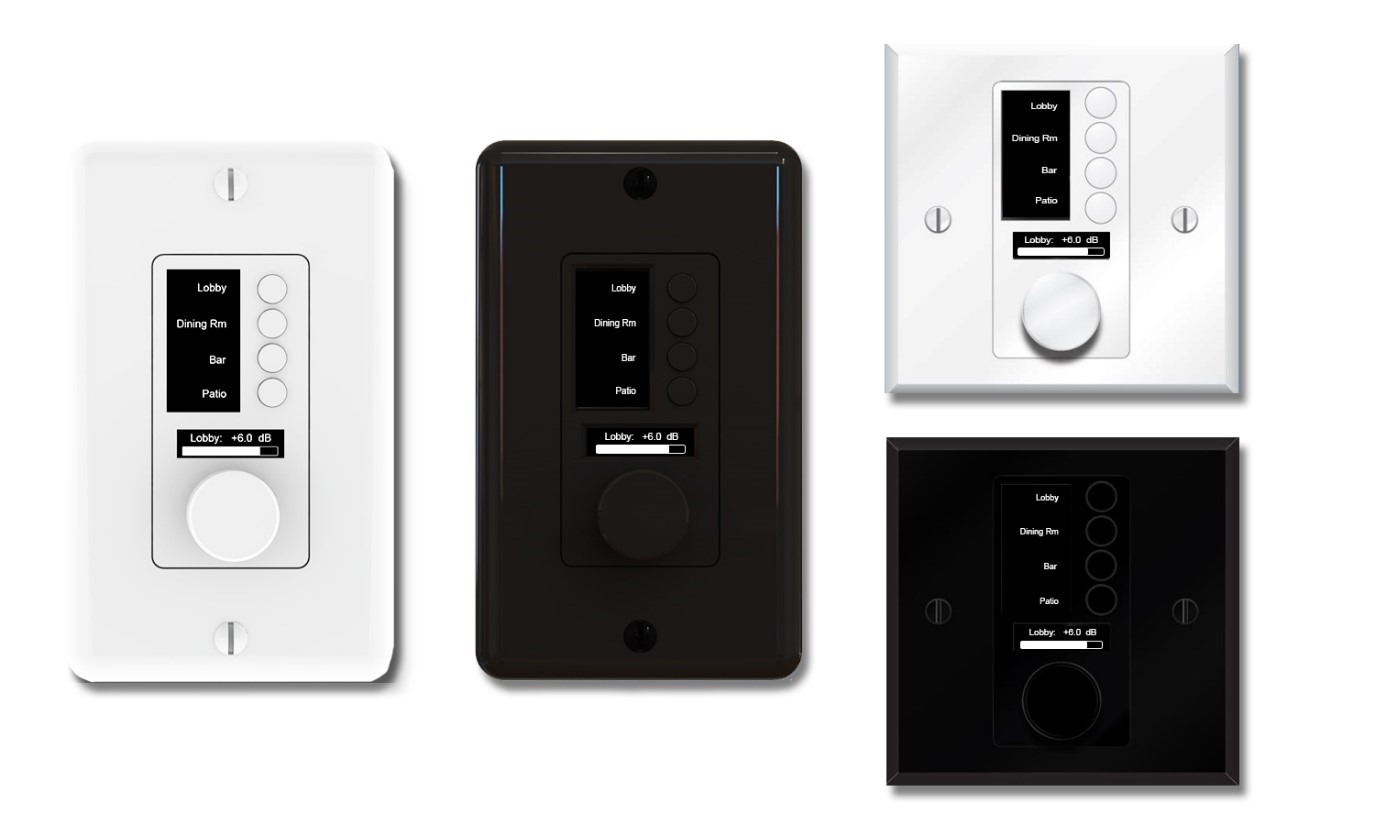
The W3 remote features 4 push buttons that are programmable as momentary, latched or radio buttons, and a push-button rotary encoder that provides control of 1 to 8 parameters in the Symetrix DSP hardware. The W3 provides simple control over mutes, source selection and preset triggering, as well as volume control. The OLED screen provides user feedback, clearly showing a parameter state or relative volume level.
Front
Rear
Programming
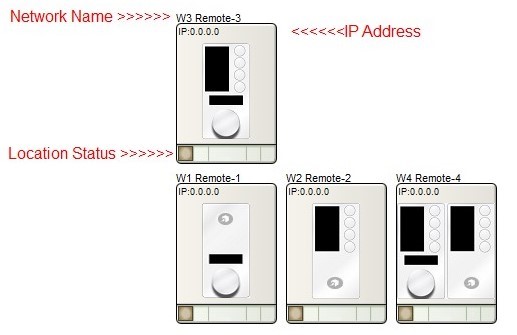
A Symetrix W3 IP remote can be added to the Site View.
Updating Online** **
While online, the user can make changes to the menu and unit design for W series remotes. A new option in the Application Preferences dialog will control if changes should be pushed automatically when they are changed.
If this feature is enabled, there will be a 1 second delay before all units with changes will start to update. The process happens quickly (a second or two per unit).
If this feature is not enabled, and the site is on-line, it will be taken off-line.
Properties Window
Selecting one or more W series remotes in Site view with the properties window open shows properties for that selection. Extensive properties are shown for a single unit. In addition to the “Site Design” and “Unit Properties” sections, W series remote specific properties are shown. These include Brightness, Idle Mode settings, Sleep Mode settings and the mode configuration settings available from the Edit WX Settings dialog from the Unit Properties dialog.
Also shown are the configured menu properties. Unassigned menus are just shown as unassigned. All menus can be configured from the properties window once a parameter has been assigned to a menu.
By default, the idle and sleep properties are collapsed into their sections to simplify display. Expanding and collapsing of sections is remembered within a session where relevant.
When multiple W series remotes of the same type are selected, all the unit properties are still presented except menu properties are limited to the assigned/unassigned state.
If all units selected are not W series remotes, properties are limited as with all units to just basic information common to all.
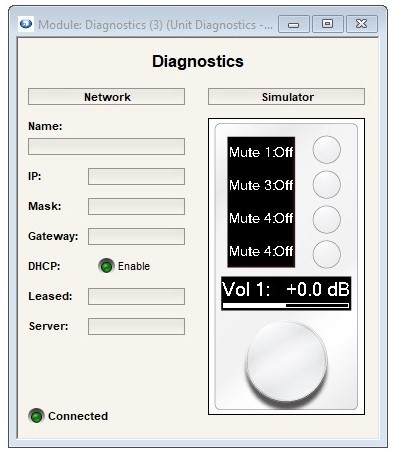
TheSimulatorfeature is accessible by right-clicking on the unit module and choosing “Open”. The simulate function presents an accurate software representation of the W Series remote allowing you to preview the programming.
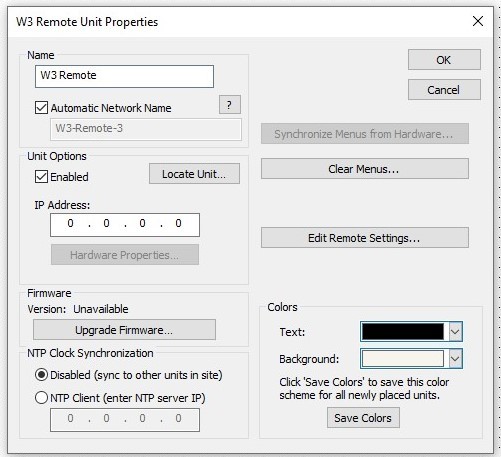
All the following features, except for the Location Status, are managed in the Unit Properties dialog. To access the Unit Properties, right-click on the unit module in the Site View and choose “Unit Properties”, or just double-click on the Unit. Only one unit properties may be open at a time.
-
Name (Descriptive)- It is recommended to assign a unique unit name for each unit in the design based on the unit's purpose or location. Composer will always append a unique numeric identifier to this name. The units descriptive name can contain any characters and be any length. The descriptive name will convert automatically to ‘Wx-Remote-(x)’ with x being the number of Wx’s added to site file.
-
Automatic Network Name- When Automatic Network Name is checked, the network name is auto-generated from the unit names. Network names cannot contain special characters or spaces and must be unique. The automatic network name will be made to meet the following criteria:
-
-
- Starts with characters ‘A-Z’ or ‘a-z’
-
Contains only the characters ‘A-Z’, ‘a-z’, 0-9 and ‘-‘, and be of a length from 1-31 characters
-
Furthermore, the name will be truncated so that a unique enumerator can be appended to the name and still fit within the 31-character limit.
Unit Options
-
Enabled check box- When the enabled box is checked, the unit must be physically present on the network for a push of the site file to the hardware. When the enabled box is unchecked, a X will appear on the unit module in the Site View, and the unit will not be required to be physically present for the Push of the site file. IP Address - If the unit is assigned to a static IP address, it can enter in the IP Address field and if the unit can be located on the network at this address, a green check indicating the unit has been located should appear in the lower left corner of the unit module on the Site View. If the unit’s IP address is unknown, run the location process and the IP address field will be filled in once the unit has located and link to the unit module on the Site View.
-
Locate Unit (button) -The locate Unit button launches the Locate Hardware Dialog allowing you to match units in your Site File to physical units on the network. [Link to Locate hardware dialog in help]
-
Hardware Properties- When the unit is located, this button opens the Hardware Properties dialog.
-
Firmware– Displays the current firmware version once located. The Upgrade Firmware button launches the Upgrade Firmware/Hardware process. [Link to Upgrade Firmware/Software dialog in help]
-
NTP Clock Synchronization- The unit’s internal clock has two modes of operation: Disabled means the unit will attempt to sync it's time to other units in the site. If it is unable to do so, the unit’s clock is free running and internally derived. NTP Client allows the unit to sync to an NTP server and receive network time.
-
Synchronize Menus from Hardware- This dialog allows the user to synchronize or “Pull” menus from the W Series remote hardware to Composer.
-
Clear Menus– This button will clear any programming from the remote.
-
Security– To enable security, change the Wake Security setting in the unit properties in the side panel in Composer to “True”. The ‘Wake Security PIN” menu will appear and allow customization of a 4 number PIN to be entered by the user.
-
Edit Remote Settings– This dialog is separated into sections:
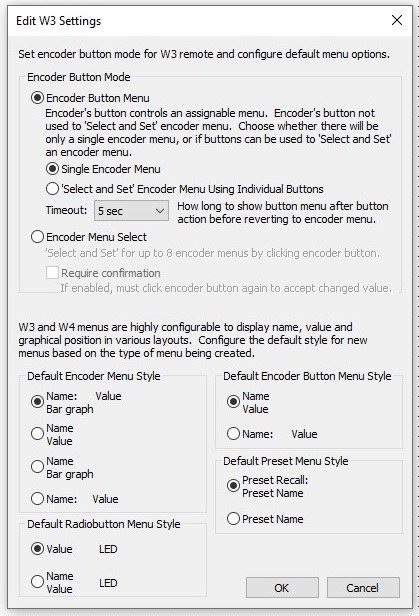
Encoder Button Mode
- -Encoder Button Menu- This mode on the W1 allows the programmer to choose to use the Encoder button as a separate button menu. The timeout tells the unit how much inactivity to wait before returning to display the state of the encoder menu.
- Encoder Menu Select– This mode allows the programmer to use the encoder button as a ‘Select and Set’ for up to 8 encoder menus and can move from assignment to assignment by clicking the button and adjusting the value as needed.
- The “Require Confirmation” check boxtells the unit to require a click of the encoder button before sending a value change. The menu will show a “*” in the display to indicate there is an unsent changed value.
- Default Encoder Menu Style– This menu gives control over graphical layout and display properties for items such as ‘Name’ and ‘Value’ if encoder is used for faders or sliders.
- Default Radio button Menu Style– This menu allows the programmer to choose the graphical layout and display style for the W3 button properties for items such as ‘Name’ and ‘Value’ when used for Radio buttons readout.
- Default Encoder Button Menu Style– This menu allows the programmer to choose the graphical layout and display style for the W3 Encoder readout properties for items such as ‘Name’ and ‘Value’ if encoder is used for buttons
-
Default Preset Menu Style– This menu allows the programmer to choose the graphical layout and display style for the W3 encoder when using it to control Presets
-
Colors– This will allow custom colorization of the text and background of the W Series remote unit representation in the
site file only. It does not affect the real Wx in any way.
Properties
Configuration of the remote menus is done from the simulator properties. These are dynamic and will change depending on the assigned controls (see Assigning_Parameters_for_Control.htm).
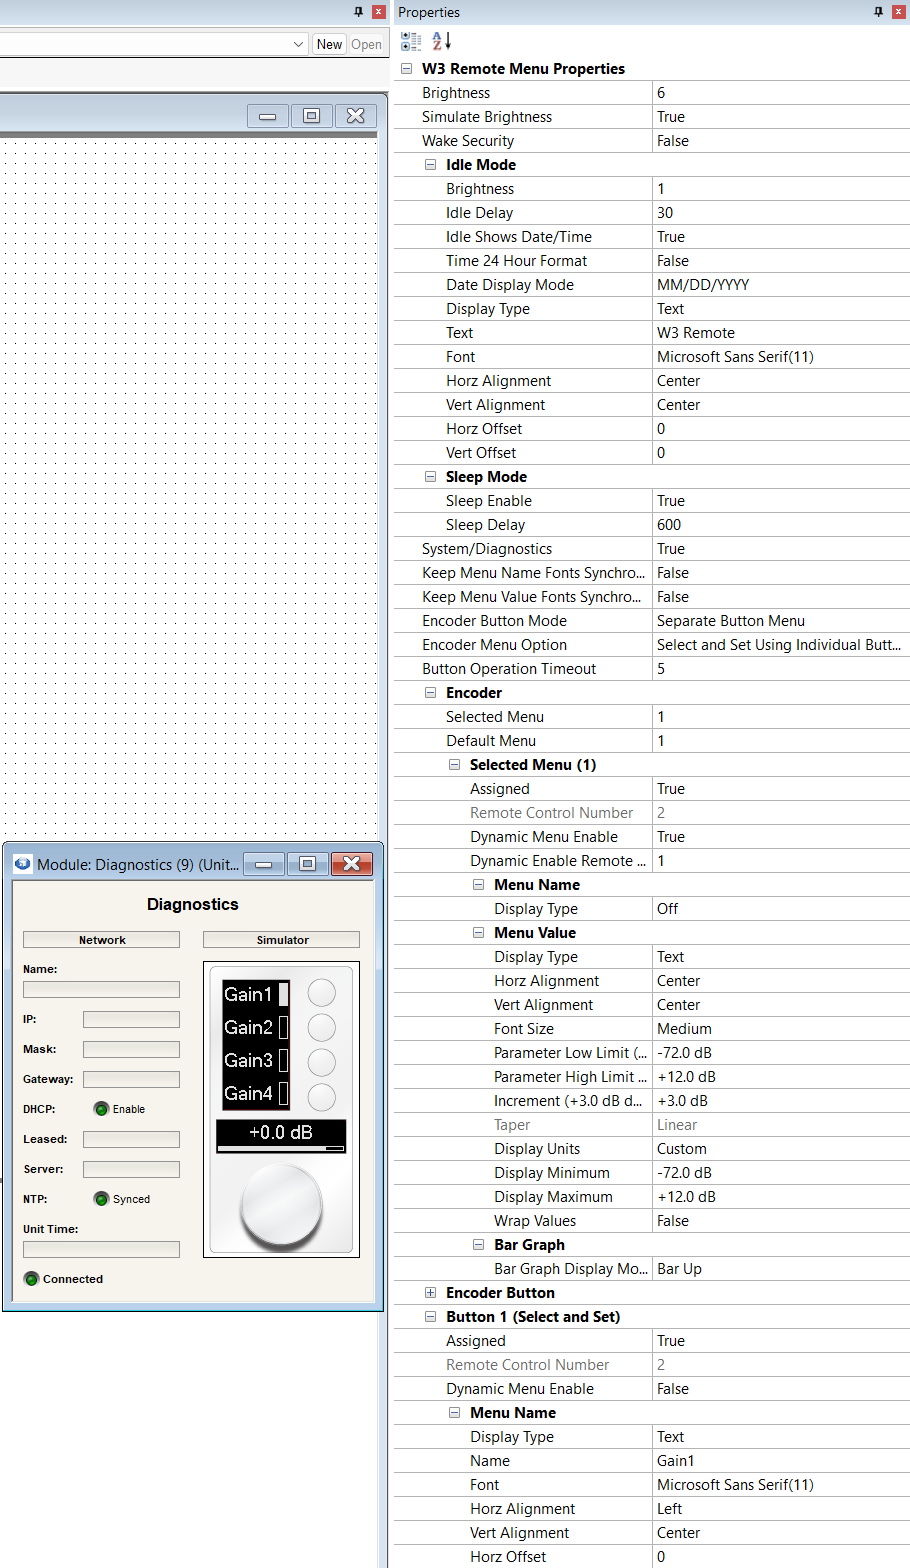
Many features are self explanatory. Here are a few that aren't.
-
Dynamic Menus - When enabled, a control number can assigned. When this control number is set above 50%, the W series menu will be shown. When the control number is set below 50%, the menu will be hidden/disabled. Disabled menus aren’t only invisible, they also will not accept changes from button presses or encoder turns. This is useful for hiding showing menus based on other conditions such as room combine state. . Dynamic Menus are available for all menu types, button, encoder, set and select encoder, encoder button, and preset button menus. Set and select encoder menus have separate dynamic menu enable for the selector button, and the resultant encoder menu. Disabling just the button will prevent the encoder menu from being displayed if it isn’t already. But if the encoder menu is displayed because it is the default menu or was visible before the button became disabled, it will continue to be displayed and be operational. Likewise, if only the encoder menu is disabled, the button will still operate and show a blank menu. Assigning an already assigned Wx menu using the Set Up Remote Control dialog automatically resets the dynamic menu enable feature, changing the enable to false and its remote control number to 1.
-
- The W-Series simulator will implement the feature while offline or online. A disabled menu shows the text “\
” as the value for the remote-control number for the Dynamic enable feature goes below or above 50%. The right click menu for the simulator has a new menu option “Show disabled Dynamic Menus” which is on by default. When on, a disabled menu will show with the text “\ ” like the showing of unassigned menus. When off, the simulator behaves like the actual W-Series, showing a blank menu for a currently displayed menu that is disabled, and not allowing the user to select the menu.
- The W-Series simulator will implement the feature while offline or online. A disabled menu shows the text “\
-
LED Mode - W-Series button and encoder button menus have the option to show a simulated LED on the right side of the display. This option is especially useful for radio buttons as the text does not usually change with changing selection. Each button can be separately programmed, even the individual buttons of a radio button array.Four indication options are available:
-
- Disabled - No indicator LED is shown.
-
LED - Shows a simulated LED on the right side of the display
-
Border - Border mode draws a single pixel wide border around the text when on.
-
Invert - Invert mode inverts the entirety of the graphics space for the button consuming no pixels.
W4
Overview
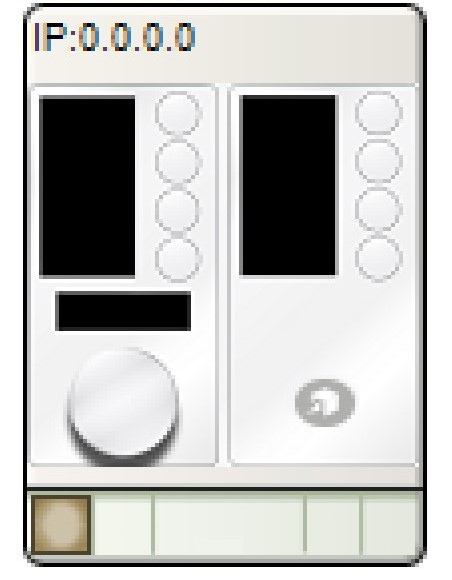
The W4 remote control wall panel features 8 push-button switches that are programmable as momentary, latched or radio buttons, and a push-button rotary encoder that provides a choice of control of 1 through 8 parameters in the Symetrix DSP hardware. The W4 provides simple control over mutes, source selection and preset triggering, as well as volume control. The OLED screens provide user feedback, clearly showing a parameter state or relative volume level.
Front
Rear
Programming
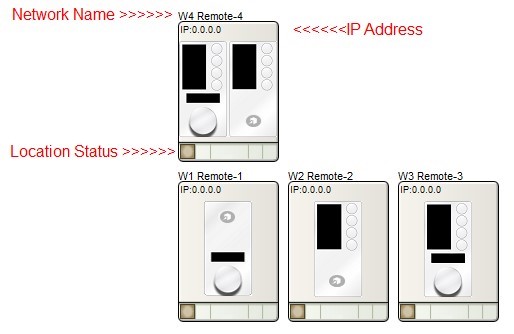
A Symetrix W4 IP remote can be added to the Site View.
Updating Online
While online, the user can make changes to the menu and unit design for W series remotes. A new option in the Application Preferences dialog will control if changes should be pushed automatically when they are changed.
If this feature is enabled, there will be a 1 second delay before all units with changes will start to update. The process happens quickly (a second or two per unit).
If this feature is not enabled, and the site is on-line, it will be taken off-line.
Properties Window
Selecting one or more W series remotes in Site view with the properties window open shows properties for that selection. Extensive properties are shown for a single unit. In addition to the “Site Design” and “Unit Properties” sections, W series remote specific properties are shown. These include Brightness, Idle Mode settings, Sleep Mode settings and the mode configuration settings available from the Edit WX Settings dialog from the Unit Properties dialog.
Also shown are the configured menu properties. Unassigned menus are just shown as unassigned. All menus can be configured from the properties window once a parameter has been assigned to a menu.
By default, the idle and sleep properties are collapsed into their sections to simplify display. Expanding and collapsing of sections is remembered within a session where relevant.
When multiple W series remotes of the same type are selected, all the unit properties are still presented except menu properties are limited to the assigned/unassigned state.
If all units selected are not W series remotes, properties are limited as with all units to just basic information common to all.
TheSimulatorfeature is accessible by right-clicking on the unit module and choosing “Open”. The simulate function presents an accurate software representation of the W Series remote allowing you to preview the programming.
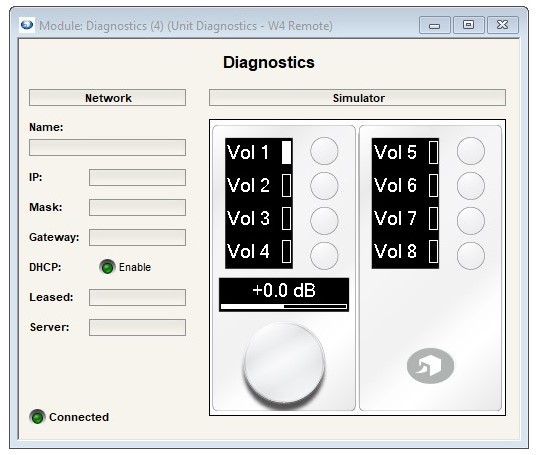
All the following features, except for the Location Status, are managed in the Unit Properties dialog. To access the Unit Properties, right-click on the unit module in the Site View and choose “Unit Properties”, or just double-click on the Unit. Only one unit properties may be open at a time.
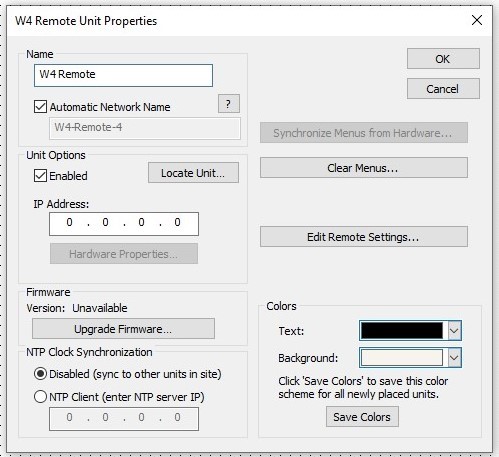
-
Name (Descriptive)- It is recommended to assign a unique unit name for each unit in the design based on the unit's purpose or location. Composer will always append a unique numeric identifier to this name. The units descriptive name can contain any characters and be any length. The descriptive name will convert automatically to ‘Wx-Remote-(x)’ with x being the number of Wx’s added to site file.
-
Automatic Network Name- When Automatic Network Name is checked, the network name is auto-generated from the unit names. Network names cannot contain special characters or spaces and must be unique. The automatic network name will be made to meet the following criteria:
-
-
- Starts with characters ‘A-Z’ or ‘a-z’
-
Contains only the characters ‘A-Z’, ‘a-z’, 0-9 and ‘-‘, and be of a length from 1-31 characters
-
Furthermore, the name will be truncated so that a unique enumerator can be appended to the name and still fit within the 31-character limit.
Unit Options
-
Enabled check box- When the enabled box is checked, the unit must be physically present on the network for a push of the site file to the hardware. When the enabled box is unchecked, a X will appear on the unit module in the Site View, and the unit will not be required to be physically present for the Push of the site file. IP Address - If the unit is assigned to a static IP address, it can enter in the IP Address field and if the unit can be located on the network at this address, a green check indicating the unit has been located should appear in the lower left corner of the unit module on the Site View. If the unit’s IP address is unknown, run the location process and the IP address field will be filled in once the unit has located and link to the unit module on the Site View.
-
Locate Unit (button) -The locate Unit button launches the Locate Hardware Dialog allowing you to match units in your Site File to physical units on the network. [Link to Locate hardware dialog in help]
-
Hardware Properties- When the unit is located, this button opens the Hardware Properties dialog.
-
Firmware– Displays the current firmware version once located. The Upgrade Firmware button launches the Upgrade Firmware/Hardware process. [Link to Upgrade Firmware/Software dialog in help]
-
NTP Clock Synchronization- The unit’s internal clock has two modes of operation: Disabled means the unit will attempt to sync it's time to other units in the site. If it is unable to do so, the unit’s clock is free running and internally derived. NTP Client allows the unit to sync to an NTP server and receive network time.
-
Synchronize Menus from Hardware- This dialog allows the user to synchronize or “Pull” menus from the W Series remote hardware to Composer.
-
Clear Menus– This button will clear any programming from the remote.
-
Security– To enable security, change the Wake Security setting in the unit properties in the side panel in Composer to “True”. The ‘Wake Security PIN” menu will appear and allow customization of a 4 number PIN to be entered by the user.
-
Edit Remote Settings– This dialog is separated into sections:
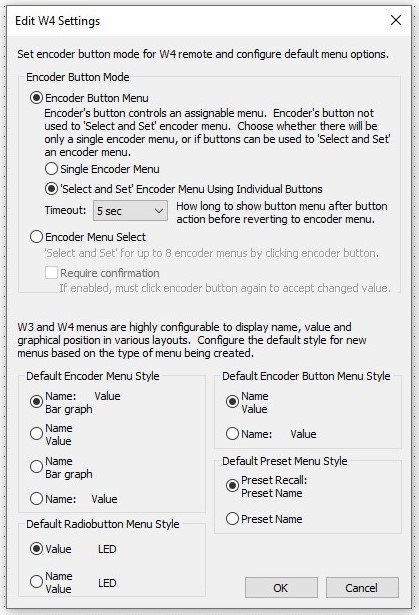
Encoder Button Mode
-
Encoder Button Menu- This mode on the W1 allows the programmer to choose to use the Encoder button as a separate button menu. The timeout tells the unit how much inactivity to wait before returning to display the state of the encoder menu.
-
Encoder Menu Select– This mode allows the programmer to use the encoder button as a ‘Select and Set’ for up to 8 encoder menus and can move from assignment to assignment by clicking the button and adjusting the value as needed.
-
The “Require Confirmation” check boxtells the unit to require a click of the encoder button before sending a value change. The menu will show a “*” in the display to indicate there is an unsent changed value.
-
Default Encoder Menu Style– This menu gives control over graphical layout and display properties for items such as ‘Name’ and ‘Value’ if encoder is used for faders or sliders.
-
Default Radio button Menu Style– This menu allows the programmer to choose the graphical layout and display style for the W4 button properties for items such as ‘Name’ and ‘Value’ when used for Radio buttons readout.
-
Default Encoder Button Menu Style– This menu allows the programmer to choose the graphical layout and display style for the W4 Encoder readout properties for items such as ‘Name’ and ‘Value’ if encoder is used for buttons
-
Default Preset Menu Style– This menu allows the programmer to choose the graphical layout and display style for the W4 encoder when using it to control Presets
- Colors– This will allow custom colorization of the text and background of the W Series remote unit representation in the
site file only. It does not affect the real Wx in any way.
Properties
Configuration of the remote menus is done from the simulator properties. These are dynamic and will change depending on the assigned controls (see Assigning_Parameters_for_Control.htm).
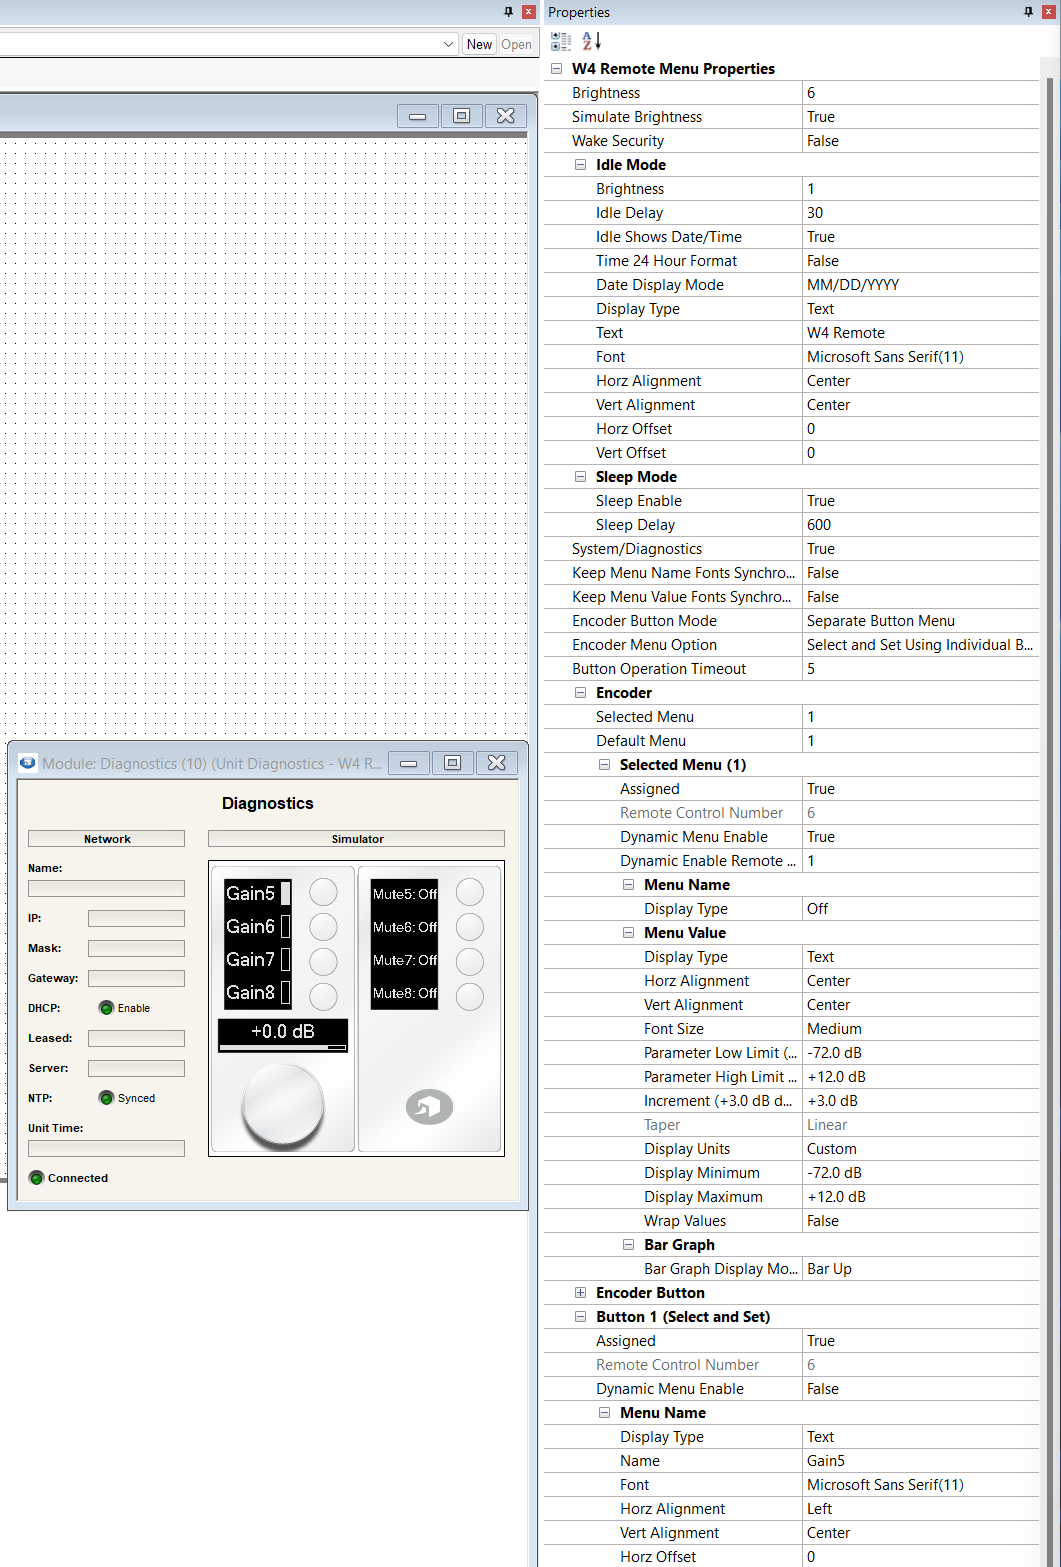
Many features are self explanatory. Here are a few that aren't.
-
Dynamic Menus - When enabled, a control number can assigned. When this control number is set above 50%, the W series menu will be shown. When the control number is set below 50%, the menu will be hidden/disabled. Disabled menus aren’t only invisible, they also will not accept changes from button presses or encoder turns. This is useful for hiding showing menus based on other conditions such as room combine state. . Dynamic Menus are available for all menu types, button, encoder, set and select encoder, encoder button, and preset button menus. Set and select encoder menus have separate dynamic menu enable for the selector button, and the resultant encoder menu. Disabling just the button will prevent the encoder menu from being displayed if it isn’t already. But if the encoder menu is displayed because it is the default menu or was visible before the button became disabled, it will continue to be displayed and be operational. Likewise, if only the encoder menu is disabled, the button will still operate and show a blank menu. Assigning an already assigned Wx menu using the Set Up Remote Control dialog automatically resets the dynamic menu enable feature, changing the enable to false and its remote control number to 1.
-
- The W-Series simulator will implement the feature while offline or online. A disabled menu shows the text “\
” as the value for the remote-control number for the Dynamic enable feature goes below or above 50%. The right click menu for the simulator has a new menu option “Show disabled Dynamic Menus” which is on by default. When on, a disabled menu will show with the text “\ ” like the showing of unassigned menus. When off, the simulator behaves like the actual W-Series, showing a blank menu for a currently displayed menu that is disabled, and not allowing the user to select the menu.
- The W-Series simulator will implement the feature while offline or online. A disabled menu shows the text “\
-
LED Mode - W-Series button and encoder button menus have the option to show a simulated LED on the right side of the display. This option is especially useful for radio buttons as the text does not usually change with changing selection. Each button can be separately programmed, even the individual buttons of a radio button array.Four indication options are available:
-
- Disabled - No indicator LED is shown.
-
LED - Shows a simulated LED on the right side of the display
-
Border - Border mode draws a single pixel wide border around the text when on.
-
Invert - Invert mode inverts the entirety of the graphics space for the button consuming no pixels.
Burn In Protection
All W Series feature a burn in protection feature. If left in idle for more than 1 hour, the screen(s) will invert the colors changing black to white and white to black. This will repeat back and fourth every hour. Adjusting a front panel control will return the screen to normal operation. This protects the screen from displaying the same contents indefinitely and can prevent burn in, prolonging the life of the screen. This behavior will not be seen if Sleep mode is used. Sleep mode is enabled by default and is recommended for all installations.