SymVue Export Wizard
Exporting to Symetrix Touchscreens
The SymVue Export Wizard allows configuration and creation of the .svx file, which can then be launched to control a system.
SymVue utilizes Composer's Control Screen development tools to design SymVue panels. Creating SymVue panels from Composer Control Screens requires the completion of the SymVue Export Wizard. It guides the user through the decisions necessary to complete the export process.
Accessing the Export Wizard
The wizard is accessed by right-clicking on a Control Screen background and choosing "Export to SymVue" or from the Control Screen Manager. The "Export to SymVue" menu item is also available from a Control Screen’s System menu. This wizard is modal, not allowing other processes to occur in Composer until the wizard is completed or cancelled.
Wizard Pages
The export process consists of a series of pages that lead you through the various configuration options. The wizard must be completed and no export is performed until you complete the final page.
Select Back or Next to navigate between wizard pages. If you select Cancel, you will be prompted to save the changes made the wizard so far. If you say Yes, the completed settings will become the new defaults for future wizard sessions; otherwise the changes will be lost. Once the wizard is completed by selecting Finish, all settings automatically become the defaults for future wizard sessions.
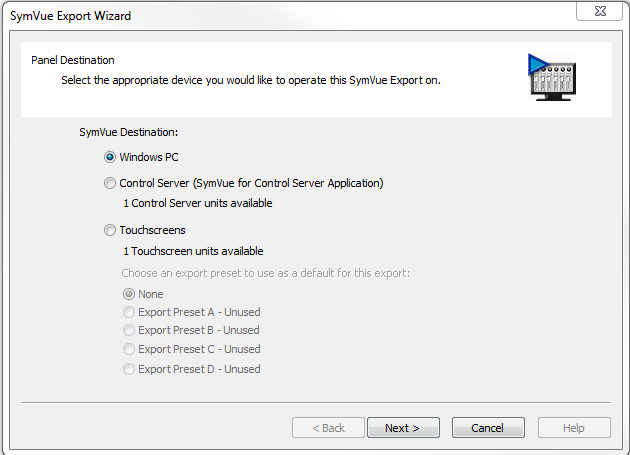 The Export Wizard consists of multiple pages, each one configuring various components of SymVue.
The first page asks for the destination of the export, either a Windows PC running the stand alone SymVue program, a Control Server licensed with the SymVue for Web app, or a Symetrix Touchscreen device. Symetrix Touchscreens can be saved in preset groups, configured on the last export page when exporting to touchscreen devices.
Exporting to Windows PC
Page 1 - Panel Selection
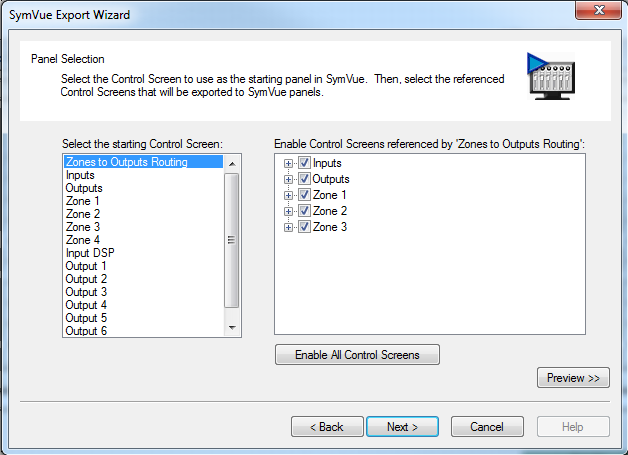 The Panel Selection Page allows you to choose which Control Screen will be used for the starting panel in SymVue. If the wizard is initiated from a particular Control Screen, that Control Screen will automatically become pre-selected for the starting panel, but can be changed in the wizard. If the wizard is initiated from the Control Screen Manager, the previously selected Control Screen from a completed wizard session will be retained. If the wizard has never been completed before, the first Control Screen will be pre-selected.
Access between Control Screens in Composer is done using Control Screen Viewer buttons. These buttons will export to their equivalent SymVue navigation buttons.
The tree control displays a tree of all Control Screens that are accessed from the Control Screen chosen for the starting panel. Every panel in the tree has a check box next to it allowing you to disallow export of that Control Screen (and therefore by extension any other Control Screens solely accessed from it). The check state for each Control Screen will be preserved between each use of the wizard. All Control Screens default to allowing export (checked).
A preview button allows the user to see their SymVue design which includes the changes made on this page of the Export Wizard. The preview window will be on top of all other windows. Closing it will allow you to return to the Export Wizard.
Page 2 - Panel Security
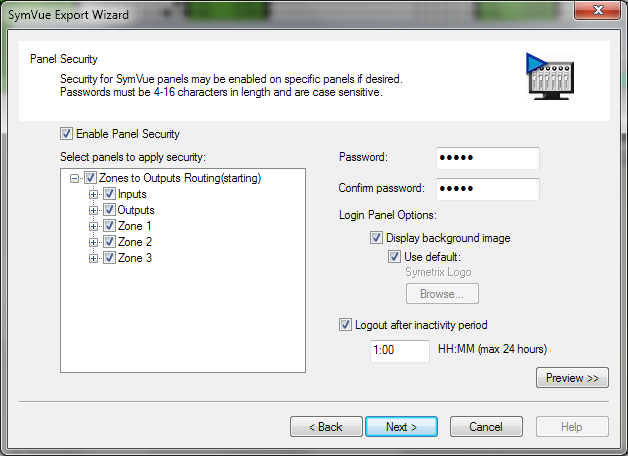 The Panel Security Page allows you to enable Panel Security and select which Control Screens, when exported to SymVue, will require a password to access. The tree control will contain a hierarchy of Control Screens selected for export in the first page of the wizard. Only those Control Screens that have been chosen for export will be displayed in the tree control. A checkbox next to each Control Screen in the tree allows enabling/disabling password protection for that Control Screen. When checked, a password will be required to access that Control Screen.
A master checkbox allows enabling/disabling password protection for all exported Control Screens. If disabled, all controls on the Panel Security page will be grayed out. If any Control Screens are selected to be exported to password protected SymVue panels, the right side of the screen provides setting options. A password can be entered and must be re-entered for confirmation. The only limitation on the passwords is that they be a minimum of 4 alpha-numeric or special characters.
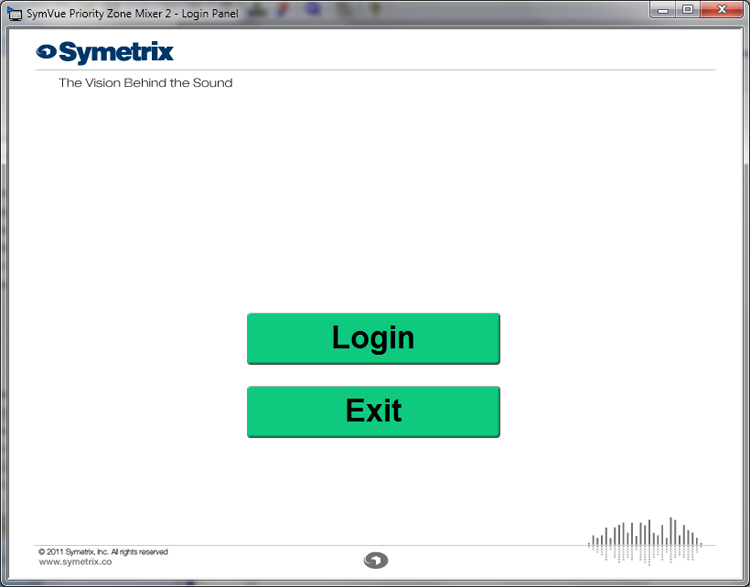
During SymVue export, a Login panel is configured that will appear when you try to navigate to a password-protected panel where the administrator password has not yet been entered. Unlike all other SymVue panels, this panel is not represented by a Control Screen in Composer. Instead, it is fabricated at export time from data supplied in the SymVue Export Wizard.
When the login panel appears, the operator can enter the password using the on-screen or attached keyboard. If the password is a match, navigation continues to the requested page. If it does not, navigation returns to the panel displayed prior to the Login panel.
If password protection is enabled, then you may select an image file to be placed on the login screen or use the default Symetrix Logo. If no bitmap is chosen, a blank gray panel with a Login button will be used.
Default Login Panel
SymVue can automatically logout after a specified period of inactivity. The duration of the inactivity can be set from 1 minute to 24 hours. Enter the time using "hours:minutes" format, e.g. "1:30" for an hour and a half.
A preview button allows the user to see their SymVue design which includes the changes made on this page of the Export Wizard. The preview window will be on top of all other windows. Closing it will allow you to return to the Export Wizard.
Page 3 - Panel Configuration
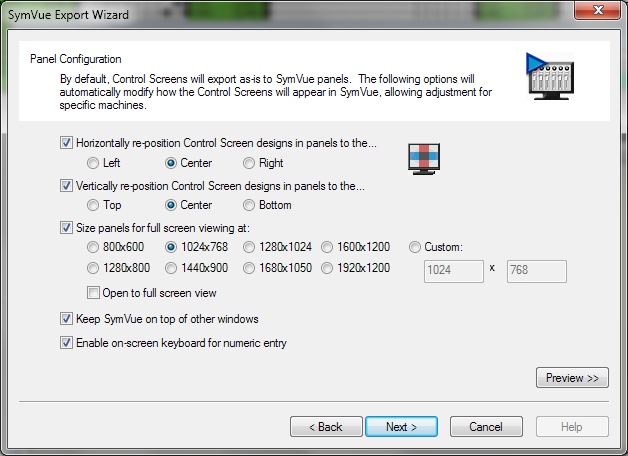 This page determines how the Control Screens will be presented as SymVue panels, specifying positioning for the controls, panel sizing and opening options. When exported, the controls can be justified to any edge or they can remain in their original Control Screen positions. The default setting is to leave all controls as they appear in Composer Control Screens. Note that in all cases, the relative positioning of the individual controls is not affected. In other words, all controls on a panel are positioned as a group.
Control Screens can be clipped or expanded to specific panel sizes. If a control does not wholly fit on an exported panel, it will not be displayed at all. A warning message will be displayed upon finishing the Export Wizard if there were controls that did not export either because they would not fit or your export contained controls that are not able to be exported. See Controls That Cannot Be Exported to SymVue for a list of controls that cannot be exported.
The exported SymVue file can open in full screen mode, hiding any window title bar, frame, and the Windows Start menu frame by checking Open to full screen view. Pressing the Escape key will cancel full screen mode. If the panel is smaller than the actual monitor resolution, the panel will be placed in the upper left corner and a white background will fill the rest of the space.
Checking "Keep SymVue on top of other windows" ensures that SymVue is always visible.
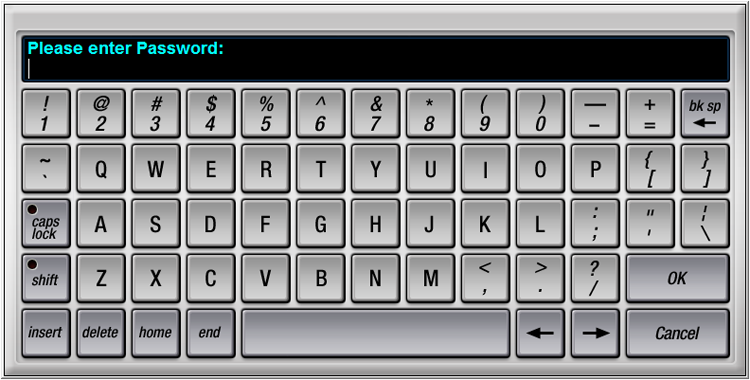
An on-screen keyboard can be used for numeric or password entry. This is especially useful if SymVue will be run on a touch panel and no other keyboard is available.
On-screen Keyboard
A preview button allows the user to see their SymVue design which includes the changes made on this page of the Export Wizard. The preview window will be on top of all other windows. Closing it will allow you to return to the Export Wizard.
Page 4 - Hardware Connection
The Hardware Connection page is used to instruct SymVue on how to locate the Symetrix units in the current design. Choose one of two methods:
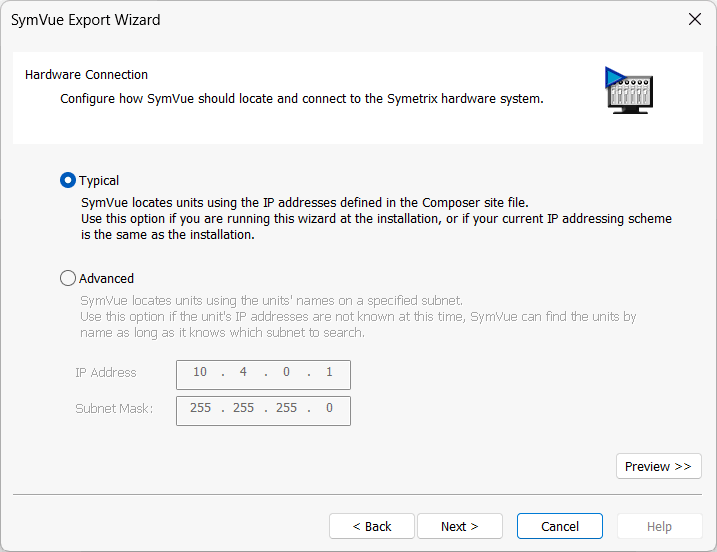
- The first option relies on the IP address set in the Site File to be the one SymVue will use when it runs the .svx file created by this wizard. This is the most-straight-forward way of connecting, but requires that the IP addresses will be the same when SymVue is run. When working on-site, this is the best choice.
- The second option is required only if the Symetrix units are not on the same subnet as the SymVue PC, and the IP addresses of the Symetrix units are not known when the SymVue export is performed. When working off-site, this option may be required. This option searches for Symetrix units by name on the specified network. Set the IP Address Base to the lowest address of the given network (usually ending in .1). Set the Mask field to match the Subnet Mask of devices on that network. If you are unsure of this, you can use the IP address and mask of a PC connected to the target network. It is good practice to give each unit a unique name when using this method. This is done by right-clicking a unit in Composer and choosing Unit Properties.
A preview button allows the user to see their SymVue design which includes the changes made on this page of the Export Wizard. The preview window will be on top of all other windows. Closing it will allow you to return to the Export Wizard.
Page 5 - Export Options
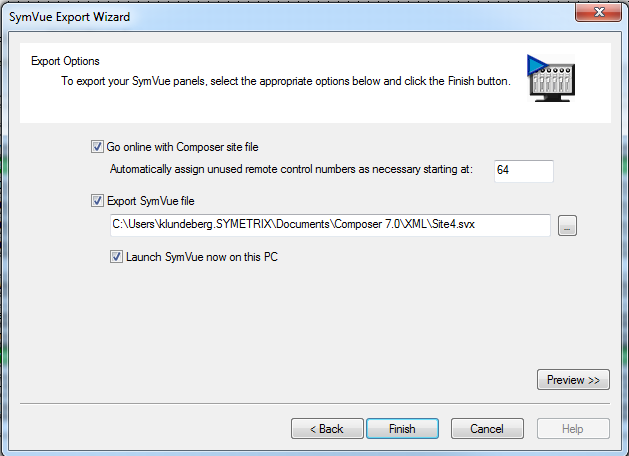 The Export Options page determines where the SymVue panel will be saved. The destination can be any local or network-accessible drive.
Checking "Go online with Composer site file" will perform a full Site File (F4) download when finishing the wizard.
Any controls on exported Control Screens that are not assigned to control numbers in Composer will be automatically assigned as necessary starting with the control number of choice in the field following.
The SymVue file will be exported to the directory shown in the file path shown under the "Export SymVue file" checkbox. A "..." browse button allows you to select the local or network accessible location for the exported SymVue file. Checking "Launch SymVue now on this PC" will open the exported SymVue file on the local PC immediately after finishing the Wizard.
A preview button allows the user to see their SymVue design which includes the changes made on this page of the Export Wizard. The preview window will be on top of all other windows. Closing it will allow you to return to the Export Wizard.
Exporting to Control Server
Page 1 - Panel Selection
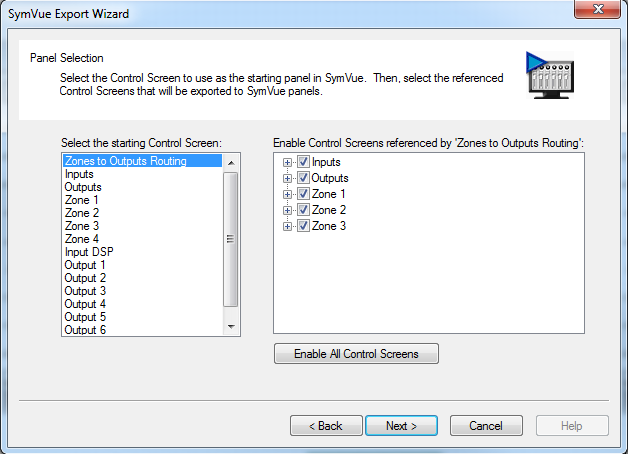 The Panel Selection Page allows you to choose which Control Screen will be used for the starting panel in SymVue. If the wizard is initiated from a particular Control Screen, that Control Screen will automatically become pre-selected for the starting panel, but can be changed in the wizard. If the wizard is initiated from the Control Screen Manager, the previously selected Control Screen from a completed wizard session will be retained. If the wizard has never been completed before, the first Control Screen will be pre-selected.
Page 2 - Hardware Connection
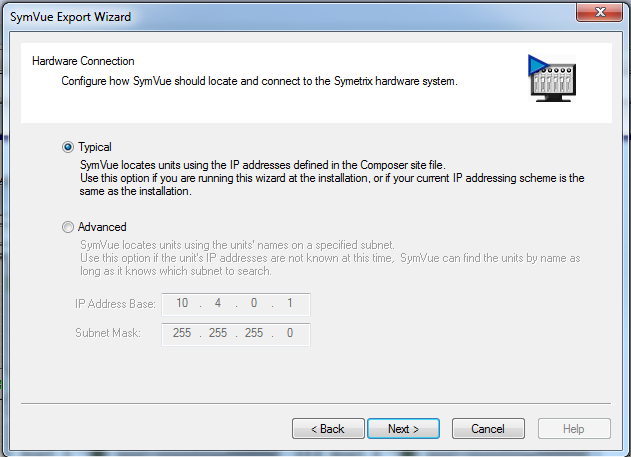 The Hardware Connection page is used to instruct SymVue on how to locate the Symetrix units in the current design. Choose one of two methods:
-
The first option relies on the IP address set in the Site File to be the one SymVue will use when it runs the .svx file created by this wizard. This is the most-straight-forward way of connecting, but requires that the IP addresses will be the same when SymVue is run. When working on-site, this is the best choice.
-
The second option is required only if the Symetrix units are not on the same subnet as the SymVue PC, and the IP addresses of the Symetrix units are not known when the SymVue export is performed. When working off-site, this option may be required. This option searches for Symetrix units by name on the specified network. Set the IP Address Base to the lowest address of the given network (usually ending in .1). Set the Mask field to match the Subnet Mask of devices on that network. If you are unsure of this, you can use the IP address and mask of a PC connected to the target network. It is good practice to give each unit a unique name when using this method. This is done by right-clicking a unit in Composer and choosing Unit Properties.
Page 3 - Export Options
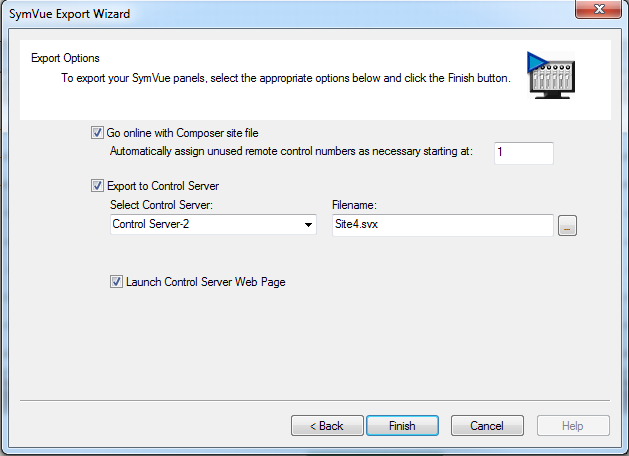 The Export Options page determines which Control Server the SymVue panel will be saved. The destination can be any located Control Servers in the site file.
Checking "Go online with Composer site file" will perform a full Site File (F4) download when finishing the wizard.
Any controls on exported Control Screens that are not assigned to control numbers in Composer will be automatically assigned as necessary starting with the control number of choice in the field following.
The SymVue file will be exported to the Control Server shown in the dropdown under the "Export to Control Server" checkbox. The "..." browse button allows you to manage the .svx files already exported to the selected Control Server. Checking "Launch Control Server Web Page" will open the default web browser to Control Server's IP address.
Exporting to Symetrix Touchscreens
Page 1 - Panel Selection
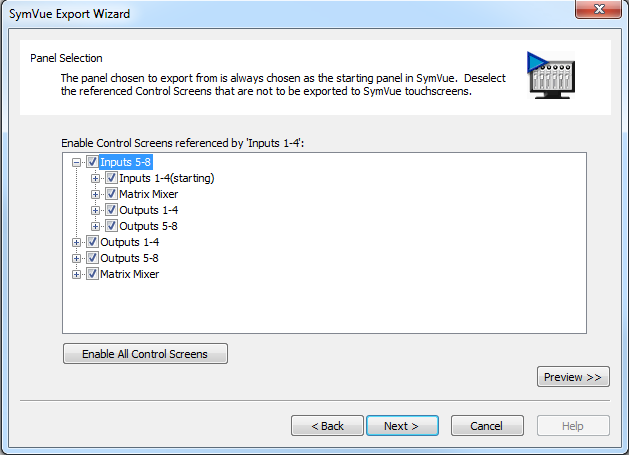 The Panel Selection Page allows you to choose which Control Screen will be used for the starting panel in SymVue. If the wizard is initiated from a particular Control Screen, that Control Screen will automatically become pre-selected for the starting panel, but can be changed in the wizard. If the wizard is initiated from the Control Screen Manager, the previously selected Control Screen from a completed wizard session will be retained. If the wizard has never been completed before, the first Control Screen will be pre-selected.
Page 2 - Hardware Connection
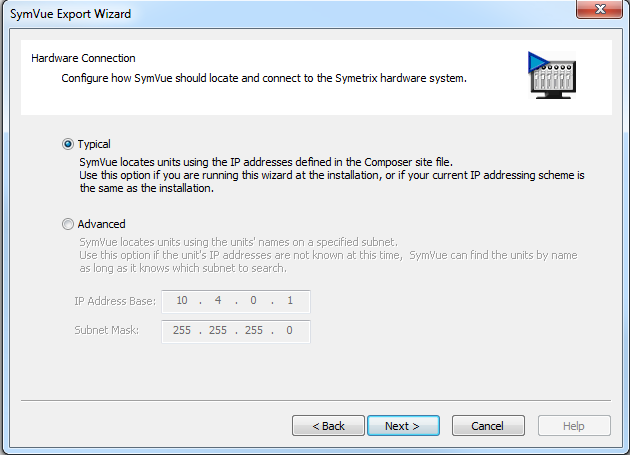 The Hardware Connection page is used to instruct SymVue on how to locate the Symetrix units in the current design. Choose one of two methods:
-
The first option relies on the IP address set in the Site File to be the one SymVue will use when it runs the .svx file created by this wizard. This is the most-straight-forward way of connecting, but requires that the IP addresses will be the same when SymVue is run. When working on-site, this is the best choice.
-
The second option is required only if the Symetrix units are not on the same subnet as the SymVue PC, and the IP addresses of the Symetrix units are not known when the SymVue export is performed. When working off-site, this option may be required. This option searches for Symetrix units by name on the specified network. Set the IP Address Base to the lowest address of the given network (usually ending in .1). Set the Mask field to match the Subnet Mask of devices on that network. If you are unsure of this, you can use the IP address and mask of a PC connected to the target network. It is good practice to give each unit a unique name when using this method. This is done by right-clicking a unit in Composer and choosing Unit Properties.
Page 3 - Export Options
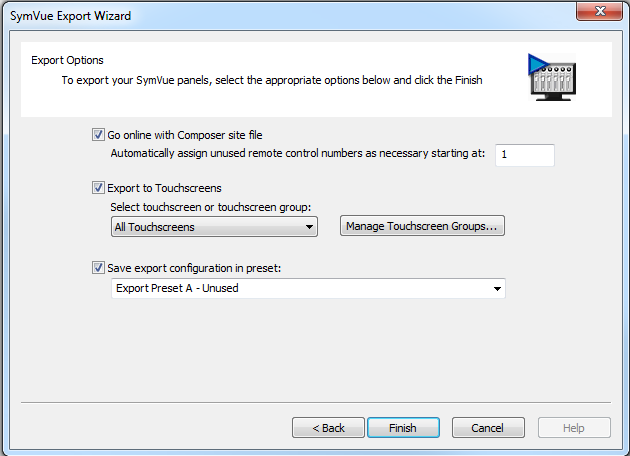 The Export Options page determines which Touchscreen(s) the SymVue panel will be saved. The destination can be any located Touchscreen(s) in the site file.
Checking "Go online with Composer site file" will perform a full Site File (F4) download when finishing the wizard.
Any controls on exported Control Screens that are not assigned to control numbers in Composer will be automatically assigned as necessary starting with the control number of choice in the field following.
The SymVue file will be exported to the touchscreen or touchscreen group shown in the dropdown under the "Export to Touchscreens" checkbox. The "Manage Touchscreen Groups..." button allows you to manage different groups of touchscreens from the available touchscreens within the site. Checking "Save export configuration in preset:" allows the selected touchscreen or touchscreen group chosen to be saved in one of the four available Export Presets.
Manage Touchscreen Groups
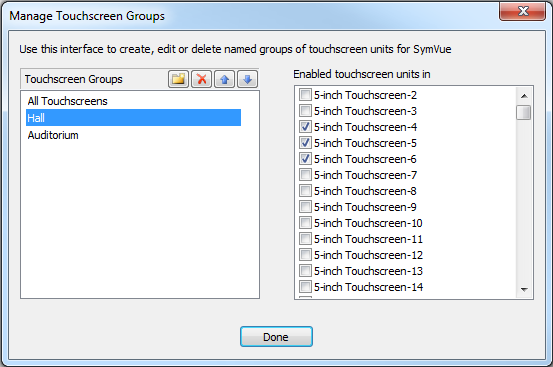 The Manage Touchscreen Groups dialog allows for the management of different touchscreen groups. The All Touchscreens group will always remain at the top and can not get deleted, but can be renamed. There is no limit to the number of touchscreen groups that can be created, but there is a limit of 128 touchscreens that can be added to a single group.
 Creates a new touchscreen group.
 Deletes the selected touchscreen group.
 Moves the selected touchscreen group up or down in the list of groups.