Media Manager
Menu
Radius NX allows media recording and playback from an attached USB drive. Server D100 allows media playback from the built in Solid State Media Drive. The Media Manager provides a way to manager the media on the drives.
Accessing Media Manager
Media Manager Buttons
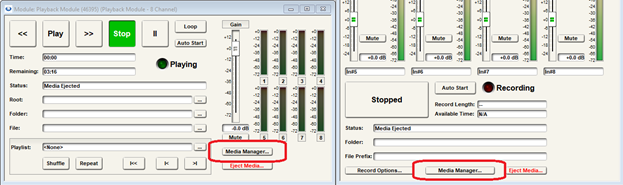
The “Media Manager…” button, located on the bottom of every Playback and Recording (left and right examples, respectively) module placed into Composer, opens a Web based utility to manage the contents of the media on a drive of a located unit.
Direct IP Entry
Entering the host DSP's Ethernet IP directly into your web browser allows access without pressing the “Media Manager…” buttons. Use the following syntax (example IP shown - replace with appropriate IP address):
http://192.168 100.100/mediamanager.html
Login Page
Default is: Username = Admin / Password = Password
New Username and Password may be set by user within the Recording Module’s ‘Record Options’.
Media Manager Page
After logging in, the user is presented with the main page of the Media Manager, which include Files and Playlists manage buttons, individual File edit/control buttons, Folder Hierarchy Navigation buttons, the Name list (current media) and the Menu button. ‘Files’ is default view. When either are selected, available controls and media lists change to match.
At top of page is the current unit name of the host DSP, followed by a vertical line and Media Manager.

Files
The Files section allows for creation and management of audio files. Only .wav audio are supported in the Media Manager
Controls- Available controls are Reload, Go Up, Add, Download, Edit, Delete, Play/Pause and Select.

· Reload – Pressing button reloads list and shows any changes made to Files or Playlists
· Go Up a Folder – Navigates back to previous folder on the drive. Does not function on root.
· Add – Opens dialog where you may Upload File(s), Create Folder or Add playlist
o ‘Upload Files’ opens a dialog where you may choose Parent folder where upload will be placed, and a ‘Choose Files’ button that allows you to search computer for files to upload.
o ‘Create Folder’ opens New Folder dialog where you may set the Location of new folder and its name.
o ‘Add to Playlist’ gives you the option to add the currently selected audio file, to an existing or new playlist. If no media is selected, this option is unavailable.
· Download Selected Audio Files– Downloads currently selected media file. If no media is selected, this option is unavailable.
· Edit Selected Item(s) – If a single file is selected, you may edit both the file name and location. If multiple files are selected, only the location is editable.
· Delete Selected Item(s) – Deletes the selected items after presenting a warning dialog where you may select ‘No’, and delete action is canceled, or ‘Yes’ which removes the files completely.
· Play/Pause – Pressing ‘Play’ streams the currently selected file(s) via the web browser. Icon changes to either play or pause icon depending on play state of file.
· Select – Select a contiguous range of items from your last selection. This button is unavailable until an item is selected, then will remember the last selection made through multiple select actions.
Folder Hierarchy– Located directly to the right of the File controls, these buttons allow the user to instantly return to any previous folder level. Every step deeper into the folder hierarchy of the drive adds another button. By default, the first button available is always ‘USB/’ (Radius NX) or "ROOT/" (Server D100) until you begin navigating to your media. For example:

Name
Shows both the folder hierarchy and media files currently on the drive. This section is populated by default with the ‘root’ or top level of drive. As you navigate deeper, the list changes to currently reflect folder location. Folder names and files may be differentiated by the .wav extension.
Each individual folder and file have a ‘selection’ box that may be checked separately for selection purposes. Alternately, ALL files or folders may be selected in the current view at once, by selecting the box beside ‘Name’.
Playlists
The Playlist section allows for creation and management of playlists.
Controls- Available controls are Reload, Go Up, Add, Edit, Delete and Select.

All controls and folder hierarchy buttons function identically to the Files section (see above), with the following differences/omissions:
· Edit – Edits the name of a single playlist. Not available if multiple playlists selected.
· Remove – This removes the selected files from the playlist. Does NOT delete files.
· Download – Unavailable for playlists.
· Play/Pause – Unavailable for playlists
Name
Shows list of created playlists. The location is confined to (drive)/Playlists/ and cannot be changed.
Each individual playlist has a ‘selection’ box that may be checked separately for selection purposes. Alternately, ALL playlists may be selected in the current view at once, by selecting the box beside ‘Name’.
Playlist Editing
Once a playlist is selected and its contents are visible, new controls become available when the selection boxes are checked; Move to Top, Move Up, Move Down and Move to Bottom.

· Move to Top – Moves selected file to top of list
· Move Up – Moves selected file up one row
· Move Down - Moves selected file down one row
· Move to Bottom - Moves selected file to bottom of list
Alternately, clicking on the file directly opens a submenu that mirrors the above controls, and two additional options:
· Duplicate – Duplicate the selected file into the current playlist
· Remove – Removes files from playlist.
Menu
Menu button allows for navigation to other functions and ARC-WEB access for the DSP, as well as a Logout function that only affects the Media Manager access.
Adding Files and Creating Playlists
To start adding files to the Server D100 or Radius NX, first create a folder to contain your audio tracks.
Click the + symbol and select Create folder.
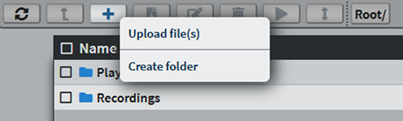
The location of the folder can be left to ‘USB/’ (Radius NX) or "ROOT/" (Server D100).
Name your folder and click Save.
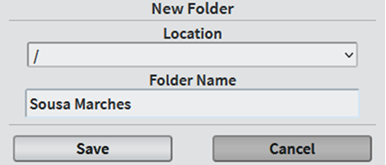
Click the folder name to enter that folder.
Click the + button and select Upload file(s).
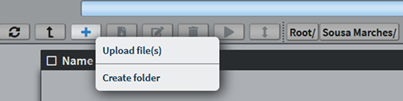
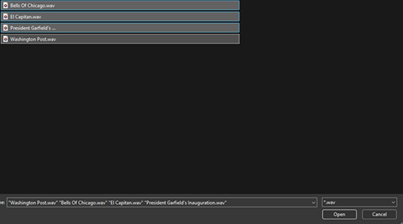
This will open a file navigation screen on your computer, navigate to the appropriate WAV files. Select the files to upload and click open.
Click the Upload button in the Media Manager window.
To add the files to a playlist, select the recently uploaded files and click the + button and select Add to playlist.
If no playlists have been created, you will be prompted to create one. If there is an existing playlist you will have the option to select the playlist or create a new one.
After selecting the playlist to add the track to, the files will be accessible in the playlist from the Playback Module.