Creating and Using Custom Intelligent Modules
Symetrix provides many Intelligent Modules for 3rd party hardware that can be used in your designs. Using these are described in Built In Intelligent Modules. But what if you need to control a device for which Symetrix hasn’t created an Intelligent Module? Or you want some custom control logic that can’t be easily done with the control modules? Or you need to control another Symetrix Device using a separate Site file. This and more can be achieved with Custom Intelligent Modules.
At a high level, Intelligent Modules are comprised of a custom Control View and a Script written in Lua. The user interacts with the controls to trigger functionality in the Script. The Intelligent Module can also interact with other Modules in a design through input and output Control pins. Finally, the script can communicate with a third-party piece of hardware allowing a user to monitor and control that hardware.
Importantly, just like any other module, the controls on an Intelligent Module can be assigned remote control numbers and can be added to any Control Screen and thus a SymVue device like a T5. In many ways, this tight level of integration allows these third-party devices to act and behave as if they were built just for Composer.
And while creating Intelligent Modules require some additional skill and expertise, they are designed so that any Composer user can utilize them.
Using vs Creating
As noted above, creating Intelligent Modules requires knowledge in Lua scripting as well as potentially an understanding of how TCP or UDP networking works. We’ve tried to provide as much information as possible in this documentation to help anyone develop Intelligent Modules. But for some of you, you will simply want to use Intelligent Module developed by others and won’t be tackling creating them yourselves at this time. If that sounds like you, you should instead read this page about how to use them which skips everything you don’t need to know about making them in Using Custom Intelligent Modules.
Two Types
There are two main types of Intelligent Modules: Stand Alone Intelligent Module and Intelligent Module Associated with User Library Dante Devices.
Stand Alone
Stand Alone Intelligent Modules are used to add additional controls, manipulate control signals and solve complex logic problems, all of which are difficult or impossible with other mechanisms within Composer.
Composer already has a huge number of Control Modules for building full featured logic and control mechanisms. But sometimes, working with individual Control Modules can be cumbersome because it requires so many Modules and connections. For example, if you look at many of the Super-modules that come bundled with Composer, you ‘ll see just how advanced these can get.
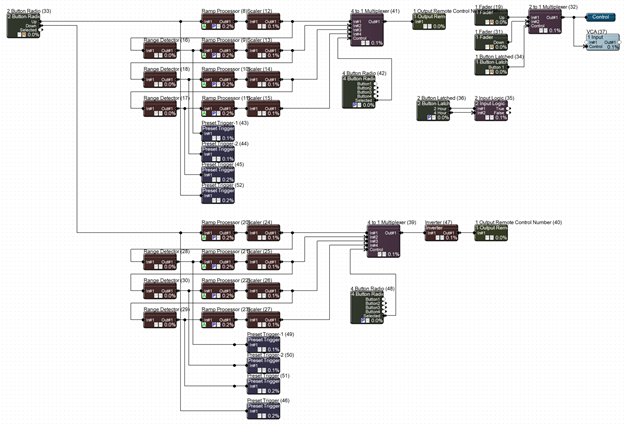
We’ve even seen some from users with hundreds of Control Modules and connections. Often, the same result can be achieved with much simpler Lua script within an Intelligent Module. And the Lua script is also more flexible and easier to change, while the Control Module based solutions often are fragile, making them hard to change. This solution may also free up DSP resources for other uses.
Another use of Stand Alone Intelligent Modules is to communicate with Non Dante devices that have an open TCP or UDP API. This could be hardware like a video switcher, projector or lighting control. A user interface can be created for the Intelligent Module that allows control of the device from Composer and SymView.
Associated with User Library Dante Devices
The most common use of an Intelligent Module is to allow control of a Dante device within Composer using a native user interface. This could be a paging station, Dante Microphone or Dante Loudspeaker to name a few.
The Intelligent Modules provided with Composer provide a good example of this. For example, you can add a device like the Alcorn McBride V-Page to your Site, and then add the Intelligent Module to the Design, resulting in a user interface to control and monitor the hardware settings on the unit.
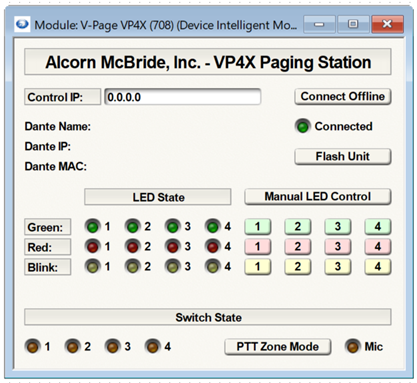
But there are many other devices on the market that do not have a Custom Intelligent Module from Symetrix. If there is a piece of hardware you absolutely need to control from your Symetrix DSP, and the device has an open TCP or UDP API, a Custom Intelligent Module can be created to add support the device.
This is similar to creating an Intelligent Module to control a non Dante device, but these Intelligent Modules get to take advantage of special features because they are connected to a Dante Device in the Composer User Library.
Makeup of Intelligent Modules
There are four main components that need to be created when authoring an Intelligent Module:
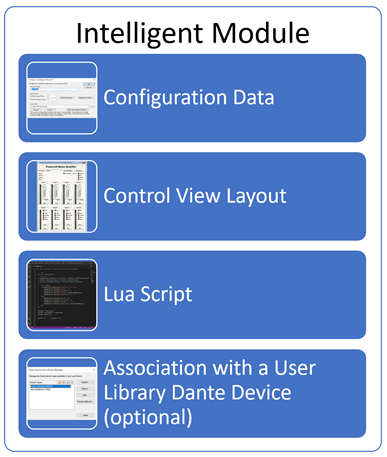
Configuration Data
The Configuration Data includes the name of the module, the number and names of the control input and output pins and the external Lua script location. This is entered from a dedicated window when first creating the module, and once created can be further edited from the Properties panel. This is described in detail in the Creating a New Intelligent Module section.
Control View Layout
Intelligent Modules have a Control View to add all the necessary controls including sliders, readouts, LEDs and other similar controls. The user will interact with these controls to configure the Intelligent Module, just as with any other built in module. As noted above, the power in these controls is that they can be linked to other controls using Control Numbers and placed on Control Screens for use in SymVue.
Creating Control Views will be described below in the context of the workflow, but there is also a dedicated document describing each control that can be added and the customization properties for the control. See the Intelligent Module Control View Layout page.
Lua Script
All Intelligent Modules have an associated Lua script. This script determines the functionality of the Intelligent Module. It defines how the controls on the module’s Control View, the input and output control pins, and potentially the data coming and going from the associated third-party device all interact.
The script is written in Lua. Lua has a standard library which defines its core functionality, but one of the strengths of Lua, and why it is very popular for uses like this, is that it can be extended adding custom functionality. As such, Symetrix has created a set of custom Lua API (Application Programming Interface) extensions that provide functionality specifically needed for interacting with Intelligent Modules.
Creating, writing, debugging and using scripts is a large subject. This document will start by walking through the basics of how scripts are created and used. But there is dedicated documentation describing each part of the Symetrix API extensions and how to use them.
The Lua script is created outside of Composer using any text editor and imported into your Intelligent Module to run in Composer and on your device.
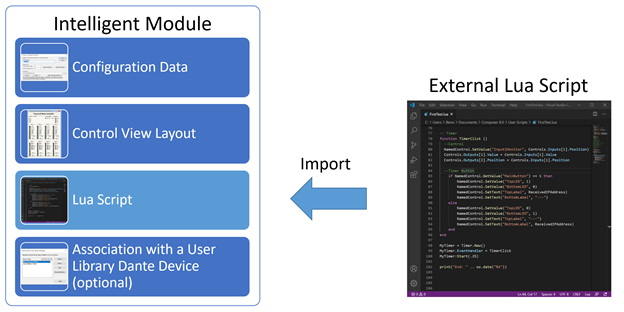
Let’s repeat that; you will be writing a script outside of Composer and then importing it into your Site each time the script changes and you want to the see the results. While this process is quite simple and automatic with lots of benefits. We’ll cover this workflow shortly.
Association with a User Library Dante Device (optional)
As described above, there are two types of Intelligent Modules. Those that are associated with a Dante Device in your User Library will need extra information to make the connection. This is done using the Dante Device User Library Manager. This additional configuration, will allow you to take advantage of extra capabilities when scripting.
This process will be described in detail below, but for now, it’s important to understand that under the hood these are two different types of Intelligent Modules, with different capabilities and creation workflows.
Creation Workflow - Stand Alone Intelligent Modules
The following sections describe the complete workflow of creating a Stand Alone Custom Intelligent Module. We’ll cover creating a User Library Intelligent Module next. These sections are designed to walk you through the Intelligent Module creation steps from beginning to end and are written for you to follow along.
Note that for this workflow walkthrough, we will use Visual Studio Code as the Text Editor, which affects some of the screenshots you will see. See the Intelligent Module Options section to learn more about choosing and configuring your external editor.
Create a New Intelligent Module
Starting with a new offline Site file, the first step is to add a new Intelligent Module to your Design. From the Toolkit, under Intelligent Module>User Modules, double click or drag a “New Intelligent Module” into the Design.
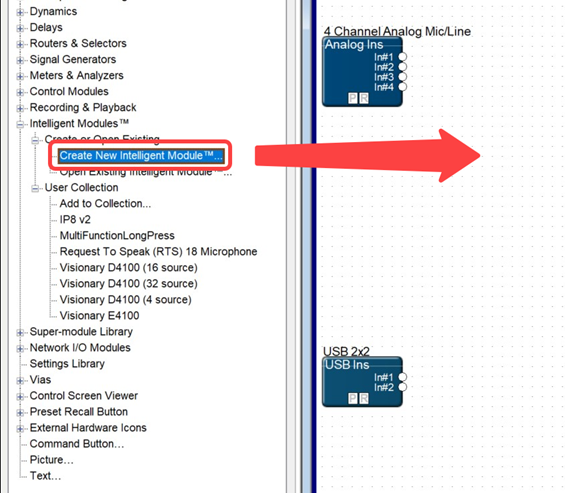
A pop up will appear to Configure Intelligent Module.
Configure Intelligent Module Window
After adding a New Intelligent Module to your Design, you will be presented with the Configure Intelligent Module window.
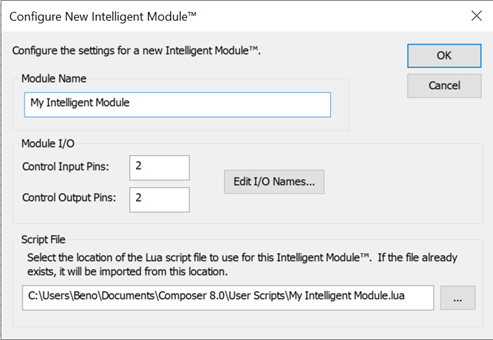
This window allows you to configure the following settings:
-
Module Name - Enter a name for your Intelligent Module. This will be used to identify your module in your Design.
-
Module I/O - This section allows you to enter the number of Control Input and Control Output Pins you need for your module. These will be available on the module in Design View and can be connected to another module’s control I/O. Some modules may not need inputs and/or outputs in which case you can set either or both to zero. The maximum allowed for each is 32.
Once your Intelligent Module has the number of control pins that are needed, you can provide them logical names from the “Edit I/O Names…” button. A window will appear:
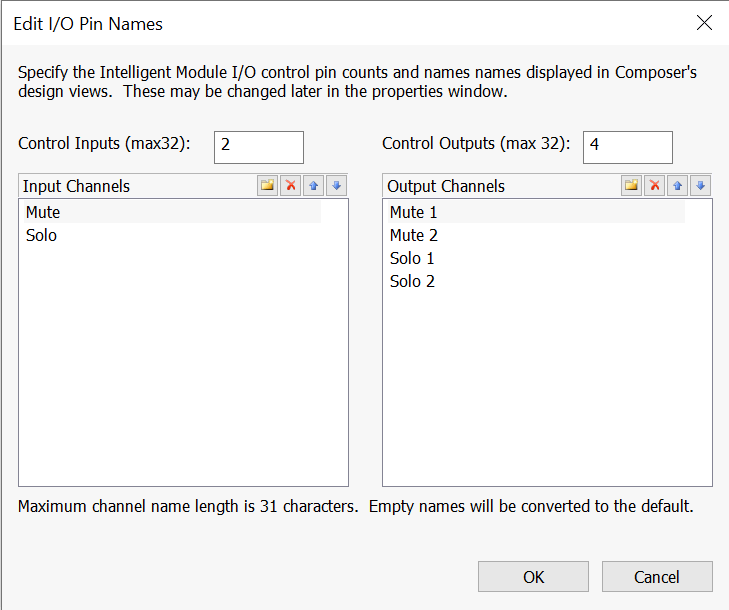
Here again you can change the number of inputs or outputs and give them each a custom name by double clicking a name in the list to edit. The arrows allow you to reorder them on your module. As you can see in the example, you can have a different number of inputs and outputs and give them all descriptive names.
- Script File - As noted above, every intelligent module has an external Lua script file associated with it. This is where you make that association. You can choose to create a new script (this is usually what will be done when creating a new Intelligent Module) or use an existing script. Use the “…” button to either choose a location for your new script or to locate the existing script on your computer. In either case, for the best performance, we recommend you use a location on your local computer, and not a network location.
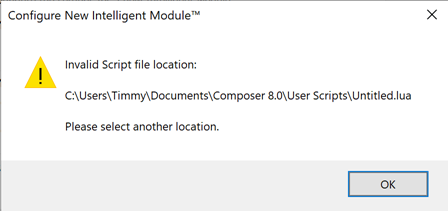
This location will be validated before exiting. If it is not available, you will be prompted to fix it.
Click OK to complete Intelligent Module Configuration. Here is the resulting module from this example:
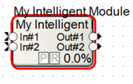
That’s it; you are now ready to move on and design your Intelligent Module Control Layout and create your script. These same settings can be reconfigured at any time from the Intelligent Module properties described later. Now, its time to design the Control View.
Control View Layout
Double clicking on the Intelligent Module will show its Control View.
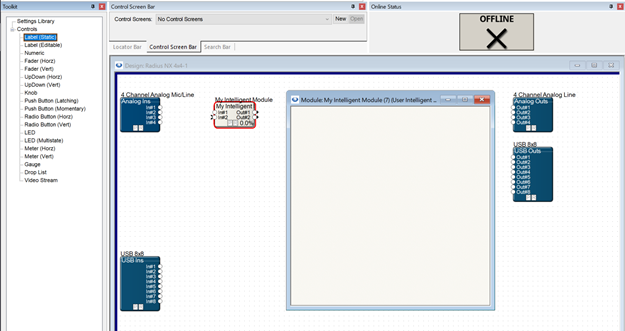
With an Intelligent Module Control View open and active, notice the Toolkit changes to show you a completely new set of options. These Controls can be added to your Control View and arranged as needed.
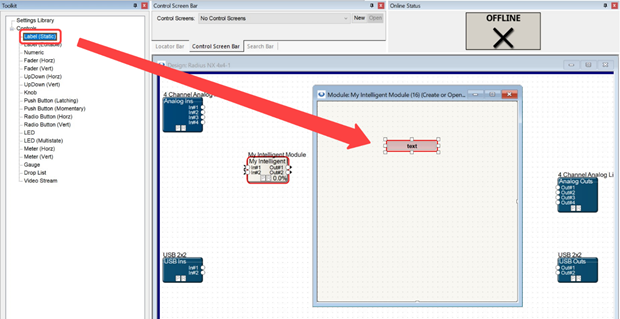
For this walkthrough, let’s first add a Label by dragging “Label (Static)” from the Controls section of the Toolkit.
Let’s also add a meter by dragging “Meter (Horiz)” from the Controls section of the Toolkit.
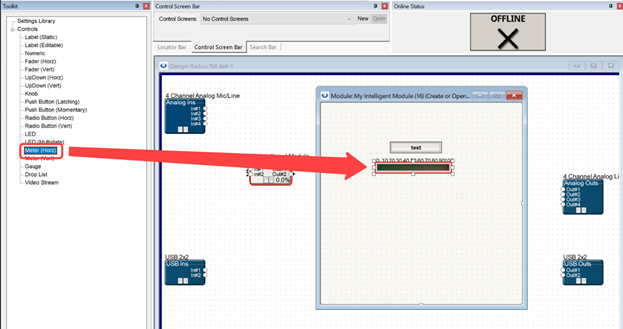
Arrange them into a pleasing layout.
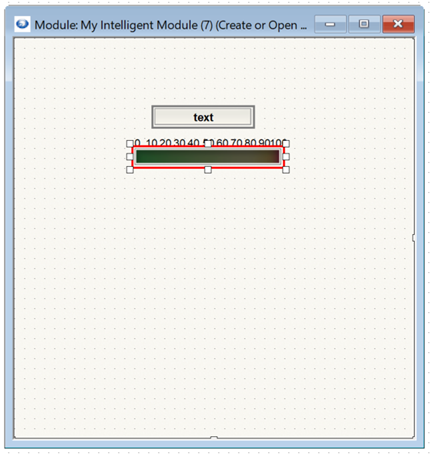
Once added each control can be configured using the properties panel. The design process and the properties for each control are covered in detail on its own dedicated page: Intelligent Module Control View Layout.
That’s all we need to do for now; we’ll use these later in the walkthrough.
Script Development
Most of your time creating a Custom Intelligent Module will be spent creating, testing and debugging the Lua script.
To interact with the script, you will use commands from the Intelligent Module Right Click menu. This menu is described in its entirety in a dedication section below, but the basics will be covered here.
First, you need to open the script and the Debug Output File. Do this by choosing “Open External Script and Debug Output files..” from the right click menu.
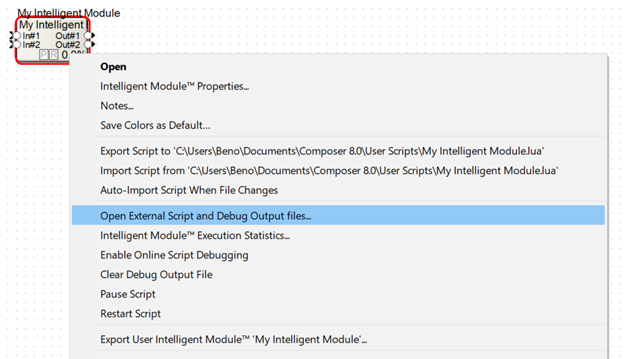
This will open two files in your text editor (again, for this walkthrough we are using Visual Studio Code): the Script and the Debug Output File.
Since this is the first time you are trying to open these files, Composer will create them automatically in the location you specified during the initial Intelligent Module Configuration.
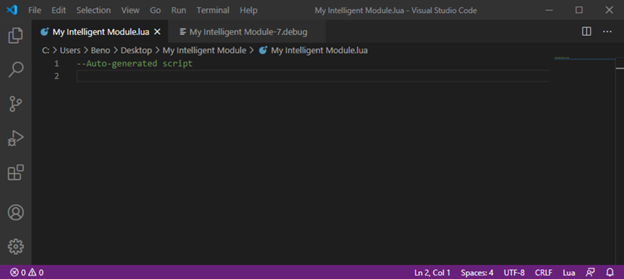
In the screenshot above you can see two tabs. The Lua script called “My Intelligent Module.lua” and the debug output file. Both are named automatically based on your Intelligent Module name, with the Debug Output File given the same name as the script plus the enumerator from the Intelligent Module; in this case it is called “My Intelligent Module-7.debug”.
The Debug Output File is written to by composer when your script is run. Composer automatically writes some things to it like errors, while you can also manually write text to it as needed. Commonly, you will print things like the results or intermediate states of variables and notifications of what parts of a script are running, as you are developing your script. This file is for you the developer; the user won’t see its contents.
It can be helpful to see both the script and Debug Output File simultaneously, so we recommend dragging your Debug Output File to the side to create a two column view (you can also drag it down to make a two row view).
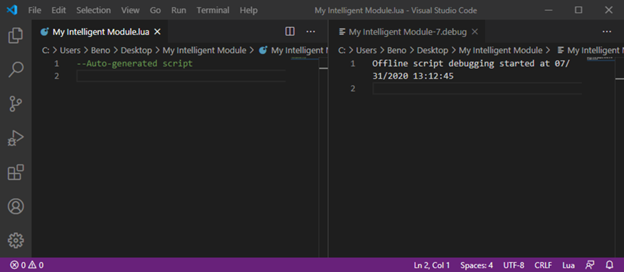
You’ll notice the script begins with some text “--Auto-generate script”. This is a comment and is there by default on scripts created by Composer. The debug file will also have some auto generated text that looks something like this: “Offline script debugging started at 07/31/2020 13:12:45”. It describes whether the script is running offline or online, and the date and time the script execution began. This helpful information is often needed when creating and debugging a script, so it is provided automatically.
Let’s replace the autogenerated text with something to make sure our script is working and to generate some text in the Debug Output File. Add the line below and then save the script.
print("Hello, World!")
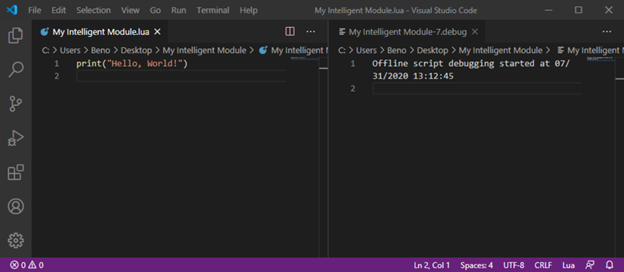
Great. We’ve added a command to print “Hello, World!”, but we don’t see anything in the Debug Output File to the right. That is because we have not imported our script into our Site file. As noted, Composer always uses its internal copy of the script file when running the Intelligent Module, so you must import your external copy whenever there are changes.
To import the external script for Composer to use, and to see the results in the Debug Output File, choose “Import Script from \
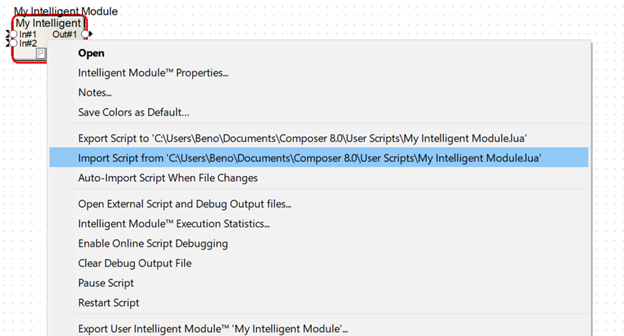
Importing causes composer to run the script, so if you now look back at Visual Studio Code, you will see the words “Hello, World!” in the Debug Output File.
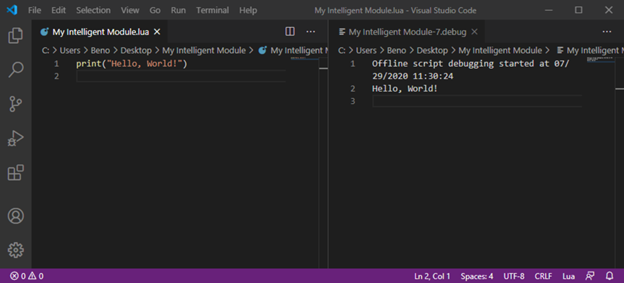
Now that you have established that everything is working, you can continue to write your script. Remember, refer to the documentation for lots more information about writing a Lua Script and the special Symetrix Extensions you will use.
Since you will be looping between writing, importing and reading the debug output file, there is an option that automates the import step. Enable “Auto-Import Script When File Changes” from the Intelligent Module right click menu.
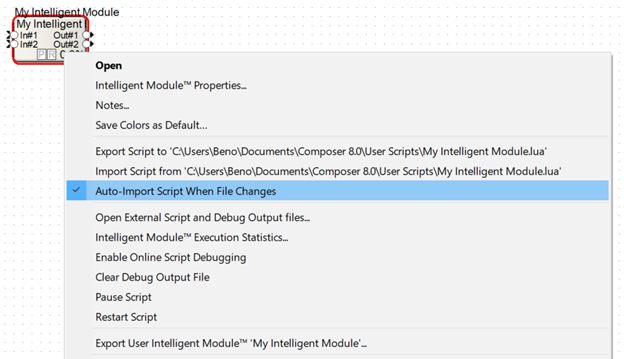
Now every time you save the script file your text editor, Composer will automatically import the updated script and you will immediately see the changes in the Debug Output File. Let’s try it by adding one more line to the script:
print(Device.LocalUnit.ControlIP)
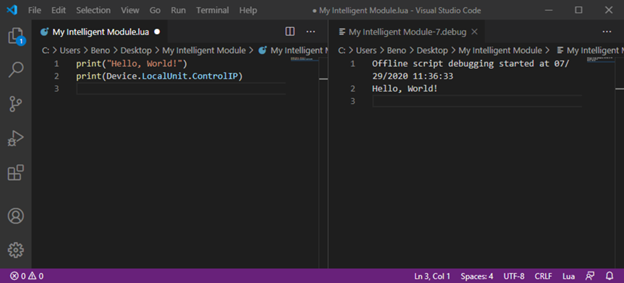
This line will print the IP Address of the Device currently executing the script. If Composer is offline, the Computer’s IP address is shown and if Composer is Online, the Symetrix Device’s Control IP address is shown. In the screen shot above, the little blue “1” in the upper left corner is indicating that the script has changes. If you save it, you will immediately see the Debug Output File on the right update without having to go back to Composer to manually import the changes.
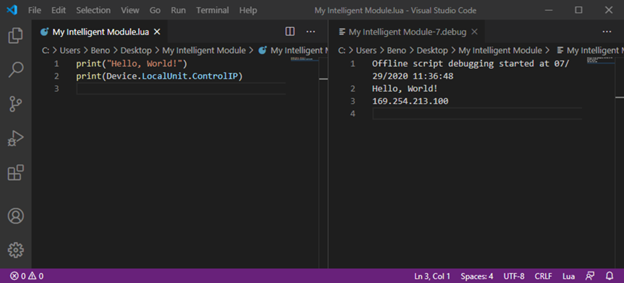
In the example image, you can see the additional line “169.254.213.100” in the Debug Output File for my computers control IP address. Yours should display your computers IP Address.
Printing to the Debug Output File is helpful, but let’s put this information somewhere the user will be able to see it by changing the text in the label we placed earlier. We’ll do this by adding the following text to the script and saving:
NamedControl.SetText("Label #1", Device.LocalUnit.ControlIP)
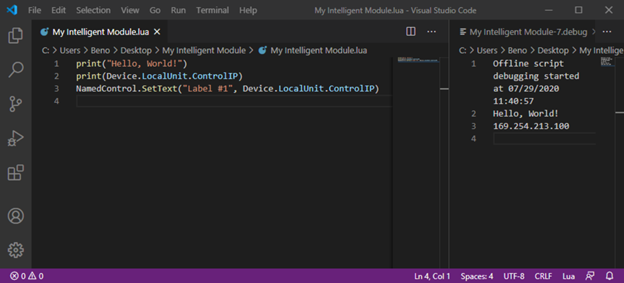
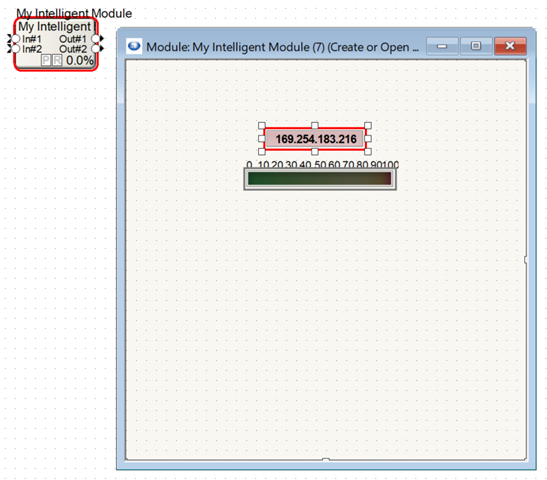
The Debug Output File doesn’t change, but if you look at the Control View for the Intelligent Module, you’ll see the label text has been set to the computers IP address.
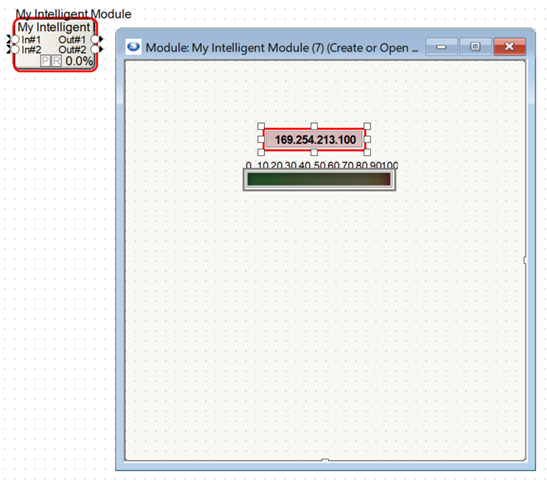
The script told the Intelligent Module to set the Text of the control called “Label #1” to the value of Device.LocalUnit.ControlIP. Once again, we don’t expect you to understand all the above code at this point. There are additional tutorials and reference material to teach how it all works.
Normally, you would continue doing as much development as possible offline, before finishing development online (see below to learn more about offline and online debugging differences). But to continue this walkthrough, let’s say we are done with our script and want to verify operation online.
In Composer, you will now select “Go online (Push Site file to hardware)”:
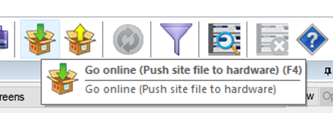
The result will be anticlimactic as you won’t see anything change. In fact, your Debug Output File will still say it is still offline. Why is that? Because you need to explicitly tell Composer that you want to “Enable Online Script Debugging and Import” from the Intelligent Module right click menu.
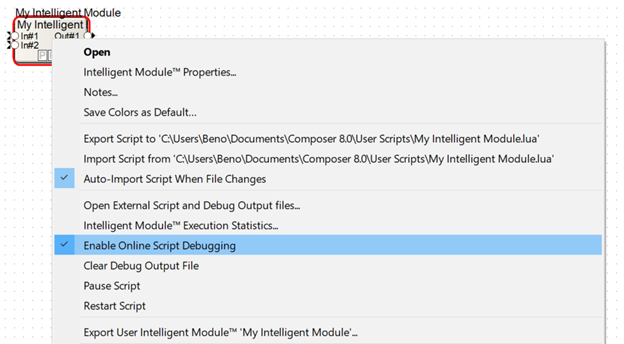
This setting must be pushed to the device in order to take effect. As such, changing it when Composer is online, will present a window allowing you to take Composer offline so you can push your Site file and the state of this setting.
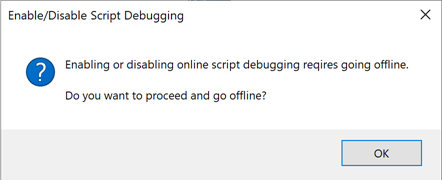
So, push the Site file again and look at the result in your Debug Output File.
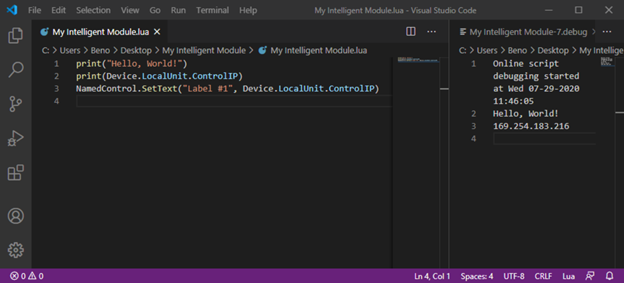
Now you will see that automatic information at the top of the Debug Output File now says that the script is “Online”, and the IP address is your unit’s IP address, not the computer’s. Similarly, in the Control View, you will see the unit’s IP address is now shown.
Now let’s use a control input. Add a “1 Fader” module from the Control Modules>Control Inputs section of the toolkit and connect it to the first Control input on the Intelligent Module.
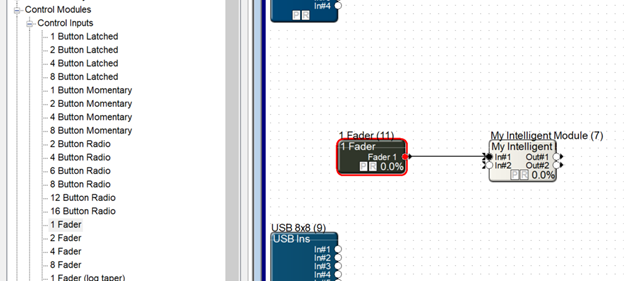
This change will take Composer offline, so once it is complete, push your Site again. Then add the following code to your script.
Controls.Inputs[1].EventHandler = function ()
print(Controls.Inputs[1].Value)
NamedControl.SetPosition("Meter #1", Controls.Inputs[1].Value)
end
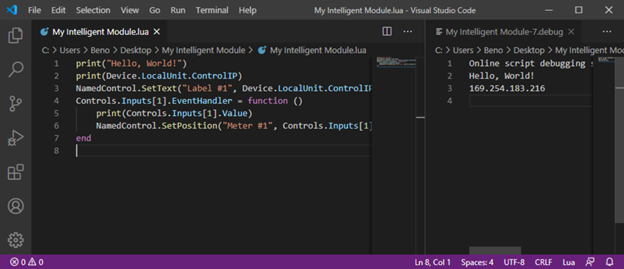
This code monitors the first control input of the Intelligent Module, and any time it changes, does the code in the function. In this case it prints the value of the 1st control input to the Debug Output File, and it sets the meter you added at the beginning to the same position.
And because we still have both Auto Import and Online Script Debugging enabled, simply saving the file will import it into Composer and send it to your device so we can see the results. Move the fader and you’ll see the meter update on the Intelligent Module as well as see the fader position printed in the Debug Output File every time it changes.
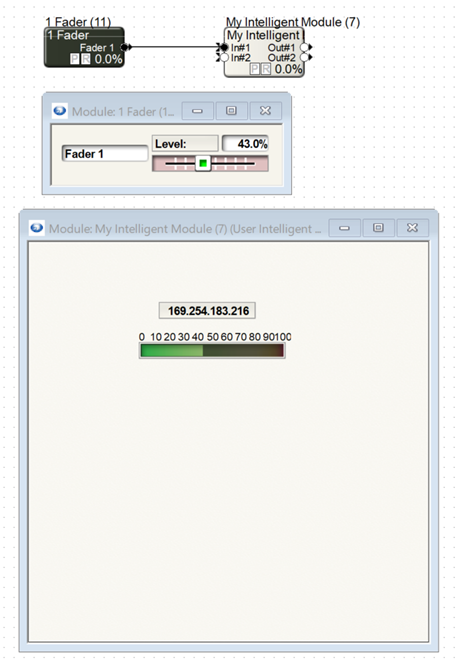
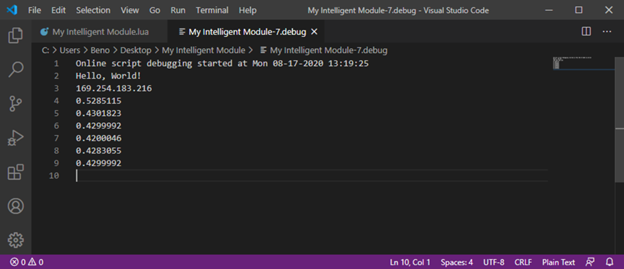
During real development, you will continue to develop your script until completed, ensuring that it works on your hardware.
Creation Workflow - User Library Intelligent Modules
As noted, there are some differences when creating and using an Intelligent Module to control a User Library Dante device. The section will once again walk you through creating an Intelligent Module, but will focus on the differences compared to the Stand Alone workflow, described above.
Create or Update a User Library Dante Device
The differences start with creation of the device. First, you must create or update a User Library Dante Device. This is described in detail here.
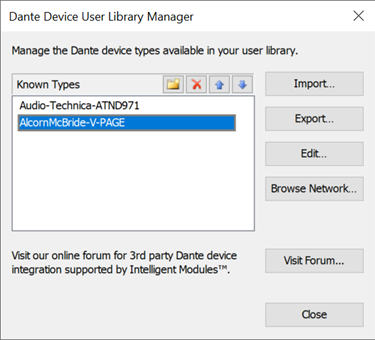
In the above example, there are two device types available in the Dante Device User Library Manager. Each device type can have an Intelligent Module associated with it, giving you the ability to add to control and monitoring to that device type (it’s important to realize these are device types, and apply to any devices on the network of that type). Click the “Edit…” button for the device type you wish to associate a Custom Intelligent Module.
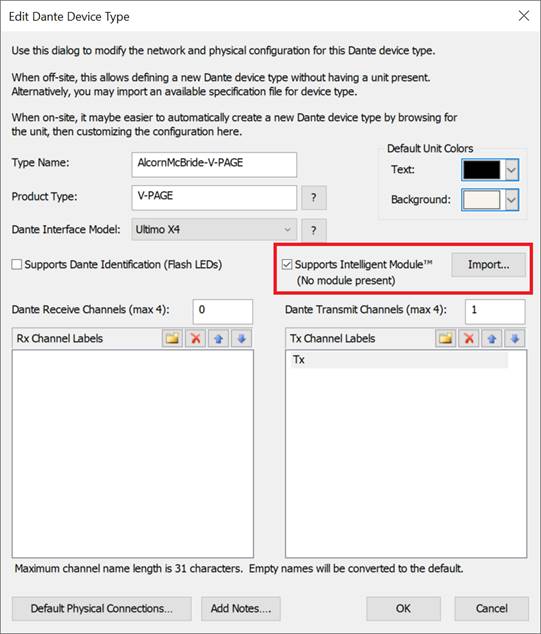
You will see an option for “Supports Intelligent Module”. Enable this checkbox. Note the text below the option says that currently there is “(No module present)”. That is expected because you haven’t created an Intelligent Module for it yet (if you were reusing an existing Intelligent Module, you would choose import - we’ll cover that in a later section).Click OK.
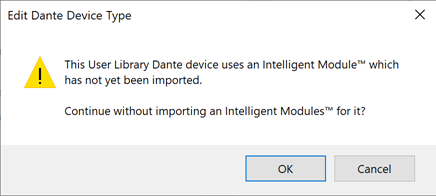
Since you did not import an existing Intelligent Module, you will see this warning telling you that the Intelligent Module .mod file has not been imported. Again, this is expected as you will create the module shortly, so click OK. You can now also close the Dante Device User Library Manager Window.
At this point you have told Composer that that this User Library Dante Device Type will use Intelligent Modules. The User Library is part of your Composer installation, so it applies to all Site files using this device type.
Create a New User Library Dante Device
Now you need to add the User Library Device to a Site.
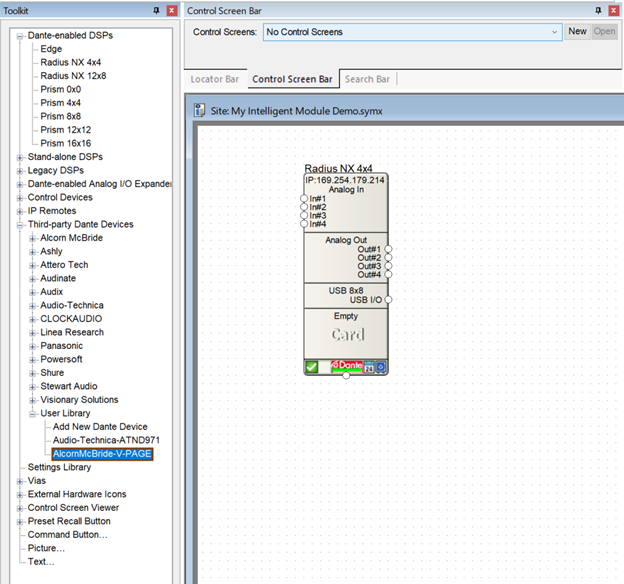
Drag the Device Type you created from the “Third-party Dante Devices>User Library” section of the Toolkit into your Site.
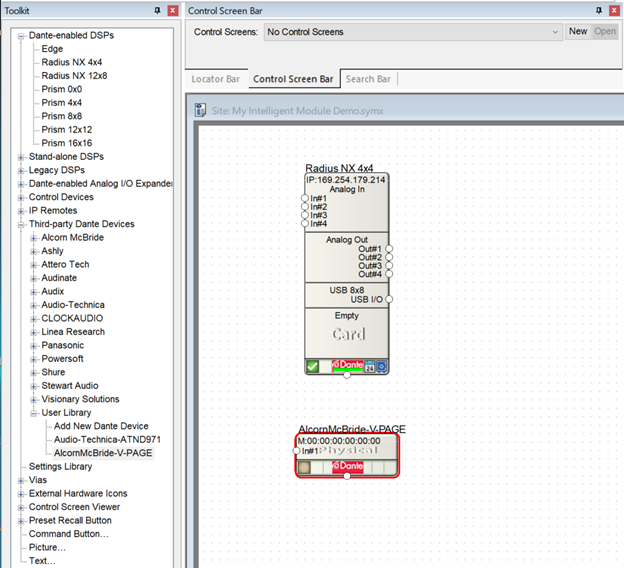
This creates an instance of the Device Type and by adding it to your Site, you will now have the ability to add an Intelligent Module for the device to the Design.
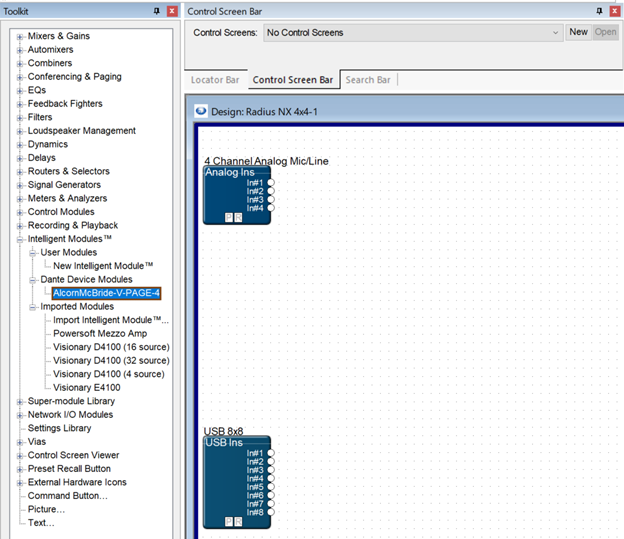
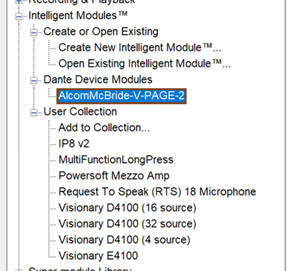
The corresponding Intelligent Module can be found under “Intelligent Modules>Dante Device Modules” in the Toolkit. Note this is the same location for any built-in 3rd party devices with Intelligent Modules. Drag it in to your Design and you will see a dialog window appear.
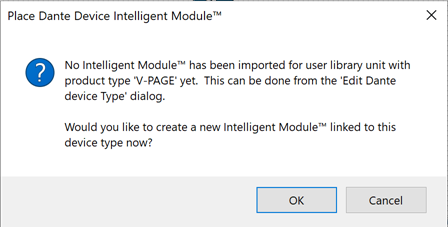
This is telling you that there is not yet an Intelligent Module associated with the device and is asking if you would like one made. Click OK. (Clicking “Cancel” ends the operation and the Intelligent Module is not added).
You will now be shown a Configure Intelligent Module Window that is the same as those shown when creating a new Stand Alone Intelligent Module as described in the previous section. For this walkthrough, you can accept the defaults or customize it as you like.
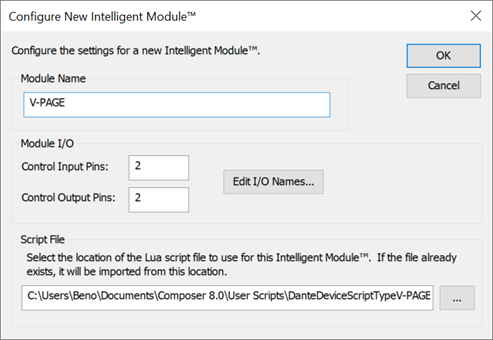
After the module is configured, the Properties Panel for the Intelligent Module will display the Site Unit Name and the Dante Product Type (this is described in more detail in this section)

These are important as this Intelligent Module is associated with this Dante Product Type. This code will be used for exporting as well, as described below.
And because each User Library Intelligent Module is tied to specific device in the Site view, it cannot be duplicated, and deleting the device in the Site view will delete the associated Intelligent Module.
Control View Layout
Creating the control view for a User Library Intelligent Module, is an identical process to making one for a Stand Alone Intelligent Module. In this walkthrough, you’ll simply add two labels:
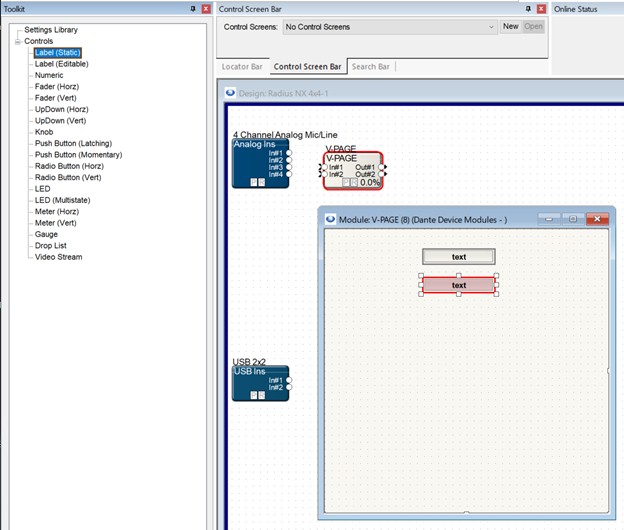
Script Development
You can now develop the script following the same instructions as described for Stand Alone Modules above. The only difference is that the script can take advantage of some additional capabilities in the Device API since it has a Dante Device type associated with it. Let’s see how this can be used.
As before, right click on the Intelligent Module and choose “Open External Script and Debug Output files…”. Add the following script to the file:
print(Device.LocalUnit.ControlIP)
print(Device.RemoteUnit.DanteModel)
print(Device.RemoteUnit.DanteIP)
NamedControl.SetText("Label #1", Device.LocalUnit.DanteModel)
NamedControl.SetText("Label #2", Device.RemoteUnit.DantelIP)
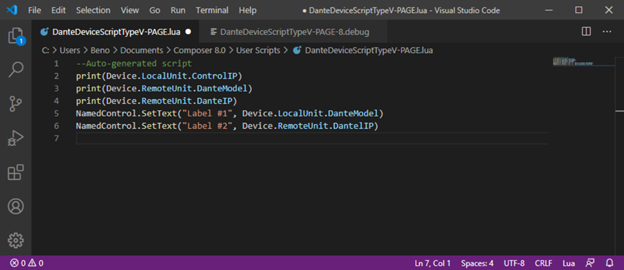
This script prints to the Debug Output File the Local Unit’s IP address as we did before, but it also prints the Dante Model name and Dante IP address of the Remote Unit, which is the associated User Library Device. The last two lines display this same information about the remote unit on the text fields we added to the Control View.
If you followed the previous steps exactly, you actually won’t see this expected information and instead your Control View and Debug Output File will look this:
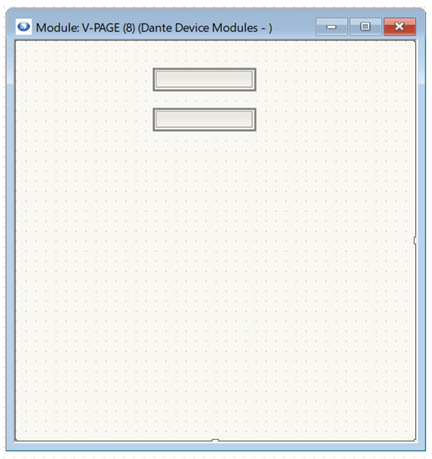
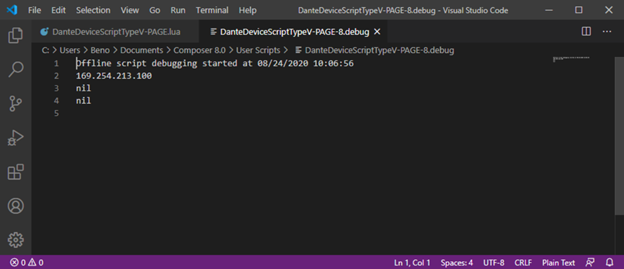
Why are the RemoteUnit API calls returning nil? Because we have not “located” the User Library Dante device so composer can’t get its IP. Once you locate the device and select “Restart Script” from the Intelligent Module right click menu, the control view and Debug Output File will display the expected results.
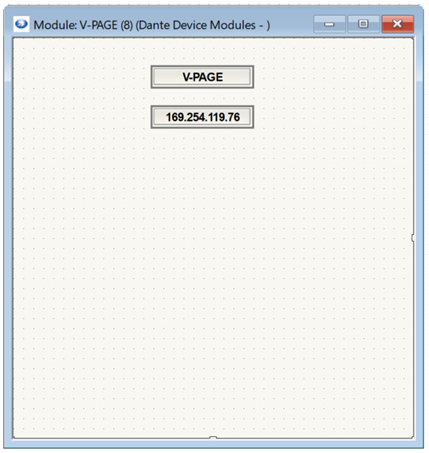
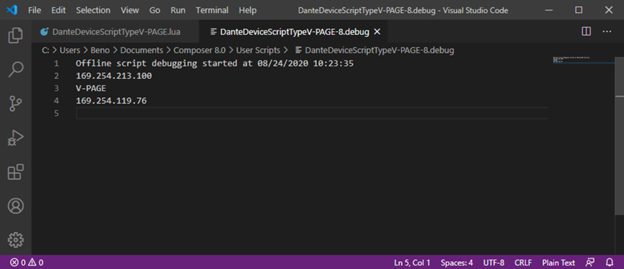
Now, you would normally continue developing your Intelligent Module.
That’s the end of the walkthrough. You’ve now created two Intelligent Modules. Read on to learn more about configuring and interacting with Intelligent Modules, including Exporting and Importing.
Intelligent Module Properties
Selecting an Intelligent Module will display its information in the Properties panel.
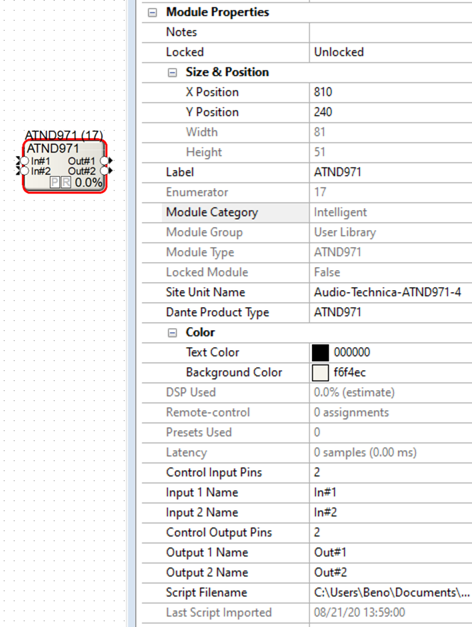
Many of the properties are like every other Module, but some are unique:
-
Notes - Notes for the Intelligent Module. These are good place to provide direction on how to use and connect the Intelligent Module.
-
Locked - Configures whether the module position in the Design is locked or unlocked. This is different then “Locked Module” property described below.
-
Size & Position - Configures the Size and Position of the Intelligent Module icon. The Size is not editable.
-
Label - This is the name of the Intelligent Module. It is initially set in the Configure Intelligent Module dialog but can be changed here. It will additionally be used during initial script creation and exporting.
-
Enumerator - Number assigned to all modules making them uniquely identifiable. This is used along with the script name to automatically name the Debug Output File (e.g. “MyScript-17.debug”)
-
Module Category - Displays the Category of the Module, in this case, “Intelligent”
-
Module Group - Displays the Module Group. For Intelligent Modules, you will see the following Groups:
-
User Library - Displayed for User Library Intelligent Modules.
-
Site - Displayed for Stand Alone Intelligent Modules that are only present in the site.
-
Collection - Displayed for Stand Alone Intelligent Modules that are present in the Toolkit User Collection.
-
Module Type - Displays the Module Type.
-
For Stand Alone Intelligent Modules, you will see the module Name
-
For User Library Intelligent Modules, you will see the module Dante Product Type
-
Locked Module - Displays whether the Intelligent Module is locked (true) or unlocked (false). As noted elsewhere in this document, locked Intelligent Module will display an “L” Icon as well, will have a limited Right Click Menu and cannot be unlocked,
-
Site Unit Name (only shown for User Library Intelligent Modules) -Lists the Site view name of the specific device associated with this instance of the Intelligent Module.
-
Dante Product Type (only shown for User Library Intelligent Modules) - Lists the User Library Dante Product Type associated with the Intelligent Module.
-
Color
-
Text Color
-
Background Color
-
DSP Used - Intelligent Module use up virtually no DSP. Instead they require CPU time. See Intelligent Module CPU Usage section for more information.
-
Remote-control - Displays the number of remote control numbers assigned to the Intelligent Module
-
Presets Used - Displays the number of Presets assigned to the Intelligent Module
-
Latency - Displays the latency of the Intelligent Module. Since Intelligent Module don’t process audio, this will be 0.
-
Control Input Pins - Specifies the number of input control pins on the Intelligent Module.
-
Input 1-N Name - Specifies the name for input control pin 1-N
-
Control Output Pins - Specifies the number of output control pins on the Intelligent Module.
-
Output 1-N Name - Specifies the name for output control pin 1-N
-
Script Filename - Specifies the location and name of the Script file associated with the Intelligent Module.
-
Last Script Imported - Specifies the Date and Time the script file was last imported from the external file.
Right Click Menu
Right clicking on an Intelligent Module presents the following options. Many of these options have already been described in the context of the workflow but are described in detail here. Note these will differ slightly depending on the selected text editor. These options will also differ depending on if the Intelligent Module is locked or unlocked.
Unlocked Intelligent Module using Visual Studio Code or “Smart” Custom Editor
If Visual Studio Code or a Custom Editor with the “Open debug output file with script file and automatically update during operation” option enabled is selected, you will see the following right click menu options for Intelligent Modules:
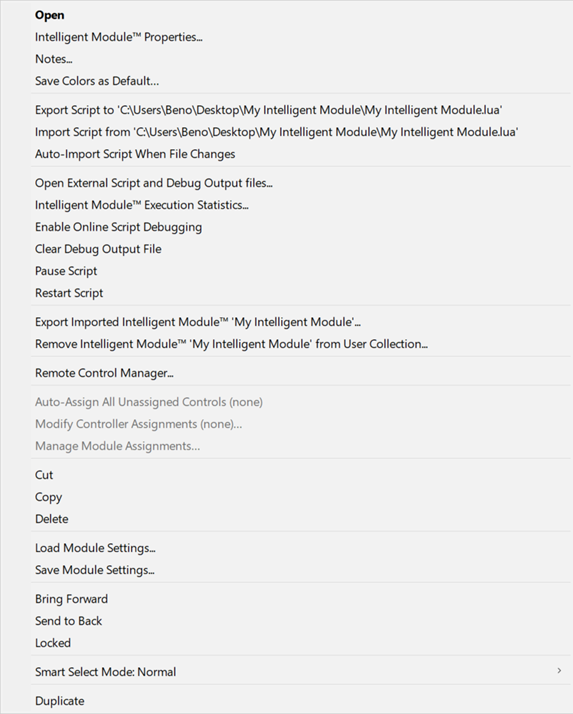
The right-click options function as follows (the items are grouped in sections below for ease in understanding; these sections titles are not present in the right click menu):
-
Standard section
-
Open - Opens the Control View; also activated by double-clicking the Intelligent Module
-
Intelligent Module Properties… - Opens the Properties panel if not already open and displays properties for the module.
-
Notes… - Shows the notes dialog, same as with any module.
-
Save Colors as Default… - All intelligent modules use the same default for their design view color scheme.
-
Import Export section
-
Export Script to \
- Exports the script from the Site file to the location designated in Configure Intelligent Module window and Properties panel. Normally this is only done when first creating a script for a new Intelligent Module, or when using a Site File or Intelligent Module file to obtain the script. If the location is not valid (e.g. a folder that doesn’t exist on your machine) you will be prompted to select a new location. If a file already exists in that location, you will be prompted to overwrite. Once you have exported once, you generally will not need to do so ever again on the same computer. -
Import Script from \
- Imports the script to the Site file from the location designated in Configure Intelligent Module window and Properties Panel. This will automatically run the script if offline. If online and “Enable Online Script Debugging” is checked, then the script will be pushed to the device and run on import. When importing, if the file doesn’t exist, Composer prompts you to select a different file location. -
Auto-Import Script When File Changes - Since during script development, you will be importing the script often to see the results of your latest changes, you can enable this option to perform the import automatically. When enabled, Composer will watch the script file and anytime the file is saved, Composer will automatically import the changed file and run the script. This allows you to see the results of your changes immediately, just by pressing Save in your text editor, so we highly recommend you enable this option. This option must be enabled per Intelligent Module and must be re-enabled every time you close the Site file. This prevents unwanted changes to your Intelligent Module and ensures there is no unneeded, performance zapping overhead when you aren’t editing a script.
-
Debugging section
-
Open External Script and Debug Output files… - This command is the first thing to do when you are editing a script. Composer opens both the script and Debug Outputs File in your configured text editor. If the script file doesn’t exist (which is the case of a brand-new Intelligent Module or when you receive an unlocked Intelligent Module and want to view its script) Composer will export it before opening. Similarly the Debug Output File will be created if it doesn’t already exist. Once open, you can edit your script, save it, and assuming you have “Auto Import Script When File Changes” option enabled, immediately see the output of your script in the Debug Output file.
-
Intelligent Module Execution Statistics… - Opens the Intelligent Module Execution Statistics Window showing information about the processing time used by the Intelligent Module.
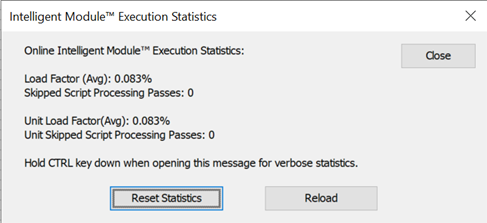 How to use this information is covered in detail in a later section.
Note, holding down the Control Key while accessing this right click menu option will provide additional information that might be requested by Technical Support.
How to use this information is covered in detail in a later section.
Note, holding down the Control Key while accessing this right click menu option will provide additional information that might be requested by Technical Support.
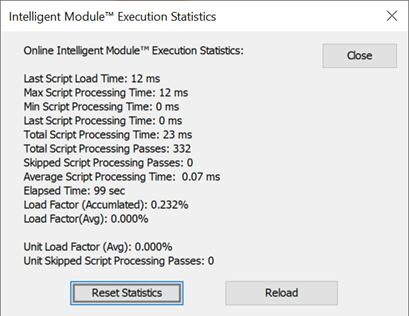
-
Enable Online Script Debugging and Import - Enables debugging output when the Site is Online. When enabled, the debug output will appear in your Debug Output File just the same as when you are offline. But under the hood, since the script is running on your Symetrix Hardware unit, the output is being sent to over the control network back to Composer, which then writes it to the appropriate file. The setting also enables automatically pushing an imported script to the online device, allowing you to see the results of the changed script without having to push the site again. This setting must be pushed to the device in order to take effect. As such changing it when Composer is online will present a window allowing you to take Composer offline so you can push your Site file and the state of this setting.
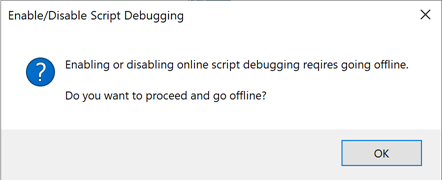 You should ensure this option is disabled before pushing a production Intelligent Module to a device for long term use, as the debug output logging takes up extra CPU processing that isn’t needed unless Composer is connected and looking at the output. To help facilitate this, this option must be enabled per Intelligent Module, and must be re-enabled every time you close the Site file. This ensures there is no unneeded, performance zapping overhead when you aren’t editing a script.
 -
Clear Debug Output File - Clears the contents of the Debug Output File. This command is always available when offline; when online it will only be available when “Enable Online Script Debugging” is enabled.
-
Pause Script - Pauses the running of the script. This is useful when you are debugging the script and want the Debug Output Log to stop updating. This command is always available when offline; when online it will only be available when “Enable Online Script Debugging” is enabled. While this setting applies to both online and offline, it only changes the devices state when Composer is online. For example, let’s say you are online, and the script is running on your Radius NX. You then you choose to Pause the script which will stop script execution on the Symetrix device. Now you take Composer offline, and the offline execution will remain paused as does the script execution on your Radius NX. Now if you disable Pause Script, it will restart operation offline. But the script on your Radius NX will remain paused. Finally, if you push settings to the Symetrix Device, the Radius NX will unpause and restart execution of the script.
-
Restart Script - Restarts script execution from the beginning. This command is always available when offline; when online it will only be available when “Enable Online Script Debugging” is enabled. This also affects to the current Online or Offline state. So, if you are offline, the offline script will be restarted but the online script will continue running.
-
Intelligent Module section
-
Export Intelligent Module \
… - Opens a dialog window with a variety of options for exporting the Intelligent Module to a file. The exact functionality will differ depending on whether the Intelligent Module is a Stand Alone module or associated with a User Library Dante Device. -
Remove Intelligent Module \
from User Collection… (Only Shown for instances of Intelligent Modules from the User Collection) - Selecting this will remove the imported Intelligent Module from the “Intelligent Module>User Collection” section of the Toolkit and make it no longer available for future use. Any Intelligent Module instances already in use in a Site that were based on the recently removed Intelligent Module will still retain the same functionality as before.
The remainder of the menu items are the same as for any module, except that Duplicate is not shown for User Library based Intelligent Modules.
Unlocked Intelligent Module using Notepad or “Basic” Custom Editor
If Notepad or a Custom Editor with the “Open debug output file with script file and automatically update during operation” option disabled is selected, you will see the following right click menu options:
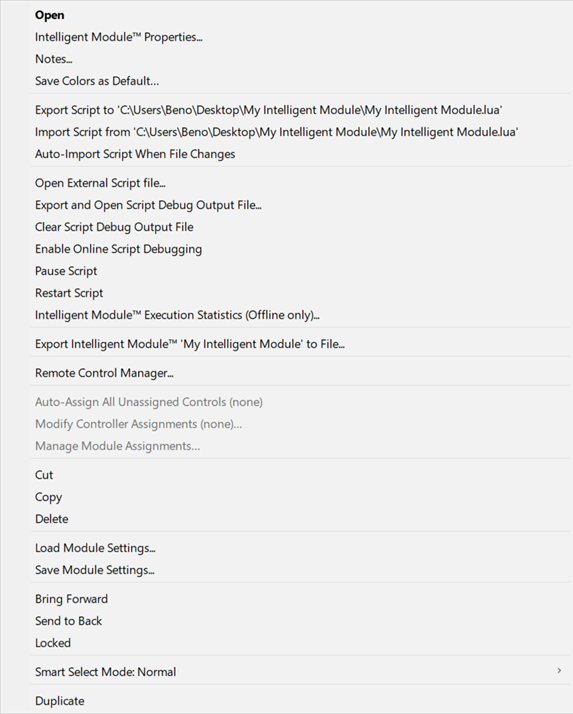
The only difference is in the first option in the Debug section. Instead of a single option for “Open External Script and Debug Output files…”, two options are shown:
-
Open External Script file… - Opens the External Lua script file in the selected text editor.
-
Export and Open Script Debug Output File… - Presents a Save As… window to select a location and name to export the Script Debug Output File. Click Save and the file will be saved and opened in your text editor. This must be repeated each time you wish to see a change in the debug output. This step is needed because “basic” text editors do not allow changes to a file it already has open. As you can tell this is tedious which is why we recommend using a “smart” text editor like Visual Studio Code.
Locked Intelligent Module
If a locked Intelligent Module is imported and used, its right click menu will be greatly reduced as shown. It will behave the same no matter the text editor configuration being used.
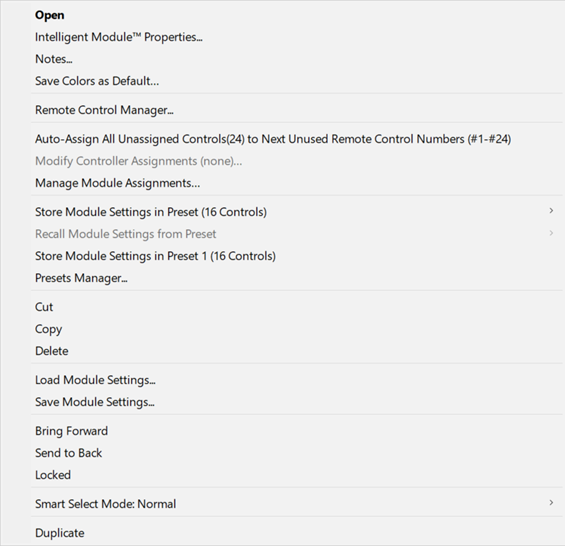
As you can see, none of the script management, debug or exporting options are shown.
Built In Intelligent Module
Symetrix includes some Intelligent Modules for 3rd party devices built into Composer. These behave as locked Intelligent Modules: the Control View cannot be directly edited and all of the right click Intelligent Module options are not available. However, they can be exported as unlocked Intelligent Module because the export option is still available from the right click menu.
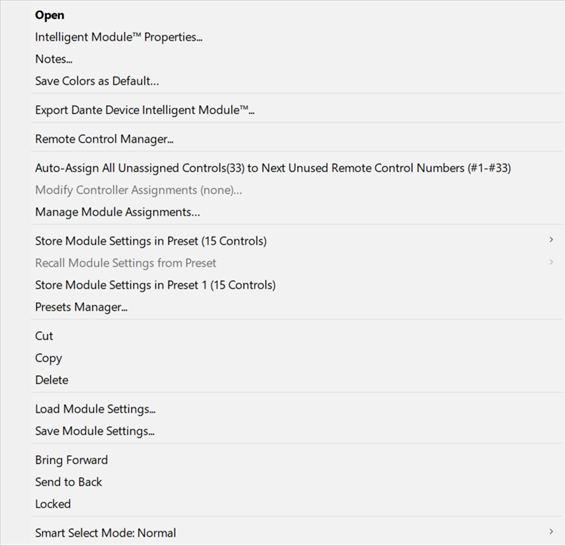
This allows you to export an unlocked Intelligent Module and then reimport it to a user library device with the same Dante Type (see the section below for more on exporting and importing). Once complete, you can edit the Control View and view and modify the script. This is great for customizing the functionality or using it as a starting point for your own script development.
Exporting and Importing Intelligent Modules
Exporting Stand Alone Intelligent Module
Once you have completed your Intelligent Module, you will want to export it as a file for a variety of reasons:
-
Use in other Sites - Intelligent Module are only available to the Site files they are created in unless exported and then imported as described below.
-
Backup - You’ll want to backup the .mod file along with your script as they both may be needed again.
-
Sharing - You may want to provide the Intelligent Module to others. The .mod file is all that is needed.
This is done by choosing “Export Intelligent Module \
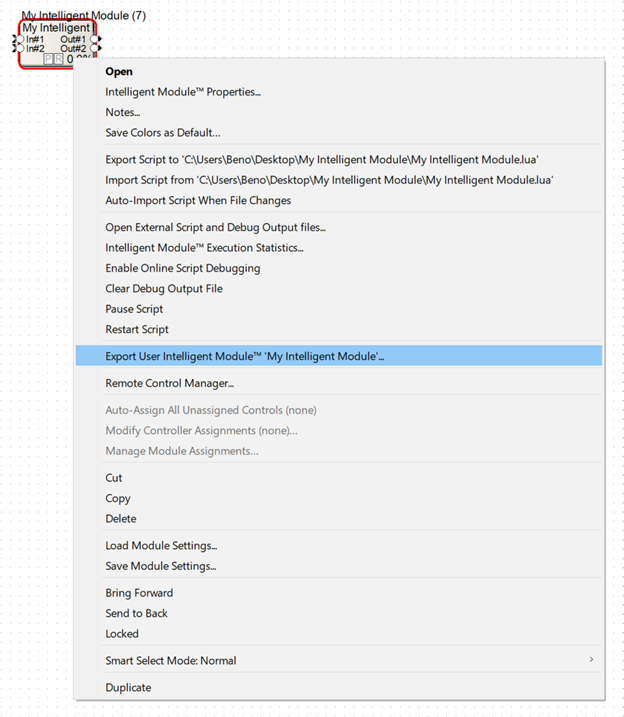
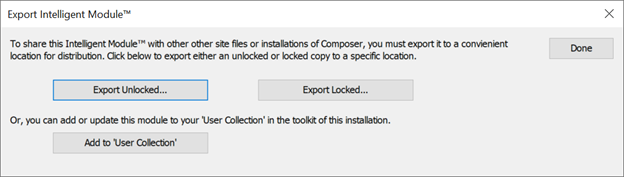
This will then present a popup where you can choose how you want it exported:
-
Export Unlocked… - Allows you to select a file location to export an unlocked Intelligent Module .mod file. Because it will be unlocked, anyone with the .mod file can import it and edit all aspects of the Intelligent Module. This includes changing the control view layout and exporting the script it contains allowing it to be modified. This is the option you should use for backup purposes and for sharing with others who may need to edit the script in the future.
-
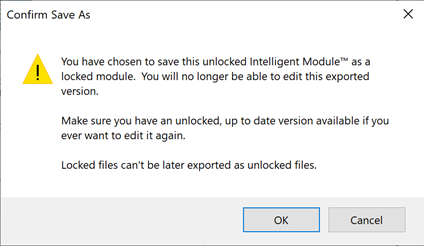
Export Locked… - Allows you to select a file location to export a locked Intelligent Module .modx file. A locked Intelligent Module cannot be reconfigured in any way, the control view layout cannot be changed, and the script cannot be exported or importing thus it cannot be viewed or edited. But it can still be used by anyone with the .modx file. So all the controls will be fully functional and the input and output control pins can be connected and used. Therefore, this is the option to use for sharing the Intelligent Module with others who will need to use the module, but not edit it. Note that a locked .modx file cannot be unlocked in the future. So, it is usually best to export an unlocked version for your own uses and backup, in addition to the locked version for sharing. You will see a warning explaining this when exporting.
-
Add to ‘User Collection’ - This option adds the Intelligent Module to the “User Collection” in the Toolkit, making the Intelligent Module available to be dragged into any Sites on your installation.
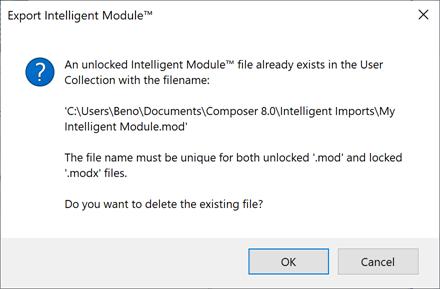
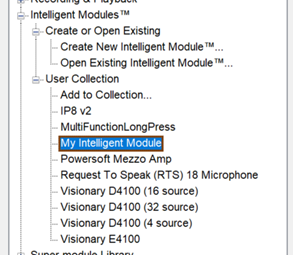 It is the equivalent of Exporting the Intelligent Module and then Importing it to a specific location Composer uses for this purpose: “C:\Users\USER>\Documents\Composer 8.0\Intelligent Imports\. If an Intelligent Module with the same name already exists in the User Collection, you will be prompted to replace or cancel:
-
Done - Closes the window. This allows you to do multiple exports, one after another, and then close the window when completed.
If you improve the Intelligent Module in the future, you’ll want to re-export it and re-add it to your User Collection so you and others can take advantage of the changes.
Importing Stand Alone Intelligent Modules
Once a Stand Alone Intelligent Module has been exported as described above, it can be imported by you or other users who have been provided the .mod or .modx file. This can be imported in two ways: by opening the file making it available to a single Site, or by adding it the User Collection, making it available for all Sites.
To open an Intelligent Module, select “Open Existing Intelligent Module” from the Intelligent Modules>Create or Open Existing section of the Toolkit:
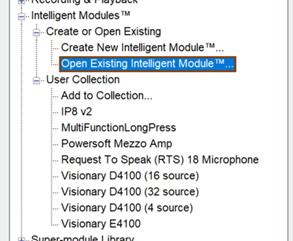
This will present a file browser to for you to locate and select the module file (.mod or .modx) to open, which will then add an instance of the Intelligent Module to the current design. It can be added to other designs in the same fashion, but it won’t be added to the User Collection in the Intelligent Modules section of the Toolkit.
To make an Intelligent Module available in the toolkit for all sites, select “Add to Collection…” from the “Intelligent Modules>User Collection” section of the Toolkit.
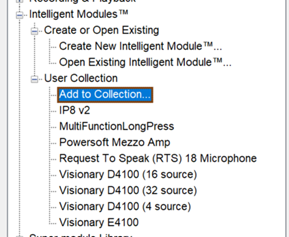
You will similarly be shown a file browser for you to locate and select the module file (.mod or .modx) you wish to Add to the Collection. It will add an instance of the Intelligent Module to the current design and it will now be shown in the Toolkit:
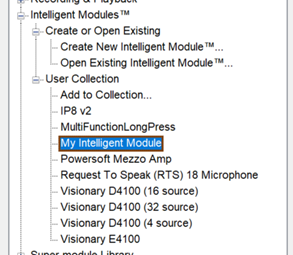
You can drag the module into other designs directly from the toolkit. Like other modules, dragging an Intelligent Module from the toolkit creates a unique instance of the Intelligent Module. For an unlocked .mod file, it will have all the same functionality as an Intelligent Module you created new in the current Site. The Control View layout can be edited as can the script which will not affect any other Sites using the same Intelligent Module. You can even have multiple Intelligent Module instances of the same Intelligent Module in a single Site.
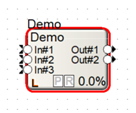
When adding a locked Intelligent Module to a design, whether through opening or the User Collection, it will show a much simplified right click menu that won’t allow any editing of the Control View layout or editing or viewing of the Lua script. Its locked state will also be indicated with an “L” Icon on the Intelligent Module:
Exporting User Library Intelligent Module
To export a User Library Intelligent Module, as with Stand Alone modules, choose the Export option from the right click menu:
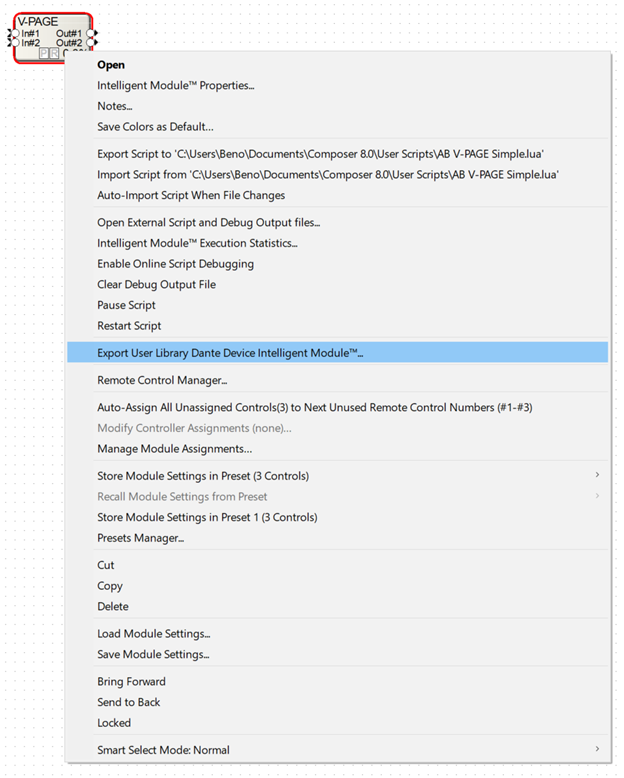
This will show a dialog with the following options:
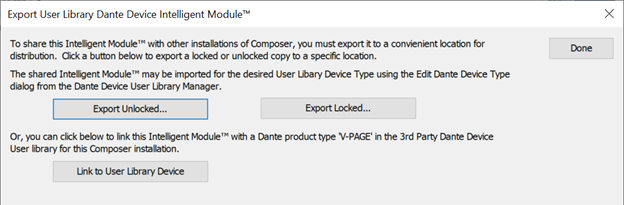
-
Export Unlocked… - This operates the same as with Stand Alone Intelligent Modules as described above
-
Export Locked… - This operates the same as with Stand Alone Intelligent Modules as described above
-
Link to Use Library Device (this option is not available for built in 3rd party Intelligent Modules) - To be used by other Sites on your installation of Composer, the .mod file needs to be placed in a particular location: C:\Users\USER>\Documents\Composer 8.0\Intelligent Devices. This option exports it here with a specific name linking it to the associated User Library Device. If one already exists, you will be prompted to overwrite. If you edit the Device Type in the User Library, it will now show that an Intelligent Module is present.
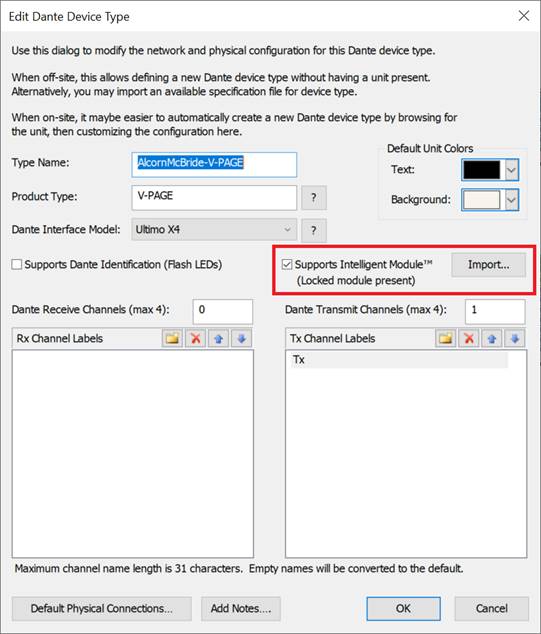
And if you add the User Library Dante Device to any Site, the corresponding Intelligent Module will be available in the “Intelligent Module>Dante Device Modules” section of the Toolkit.
In order for a User Library Intelligent Module to be used on a different installation of Composer (as described in the following section), the other computer needs to have the same User Library entry for the associated Device Type. As such, you should also export the User Library type entry.
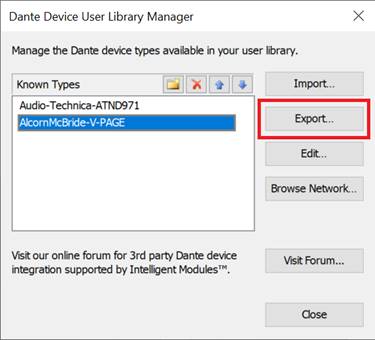
And like Stand Alone Intelligent Modules, if you improve the Intelligent Module in the future, you’ll want to re-export it and re-Link it your User Library, so you and others can take advantage of the changes.
Importing User Library Intelligent Modules
User Library Intelligent Modules cannot simply be added to the Site or added to the User Collection as described for Stand Alone Intelligent Modules. In fact, if you try to use that process, you will see an error:
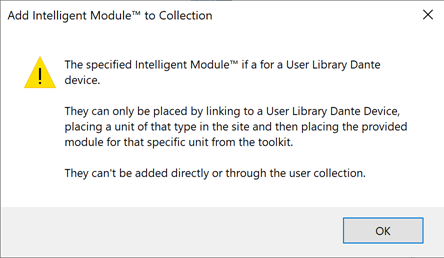
Instead, to use the Intelligent Module on a different installation of Composer on a different computer, first open the Dante Device User Library Manager and Import the User Library XML File.
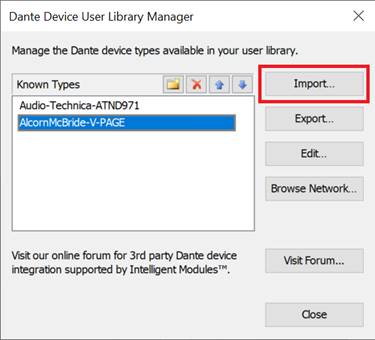
You will see this warning after importing if as expected, this computer does not yet have a .mod or .modx file for the new User Library device:
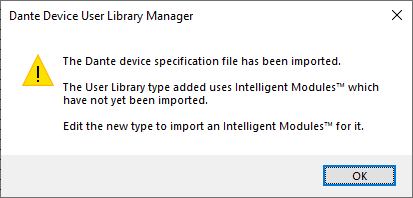
So next, Import the .mod or .modx file into the newly created User Library Device.
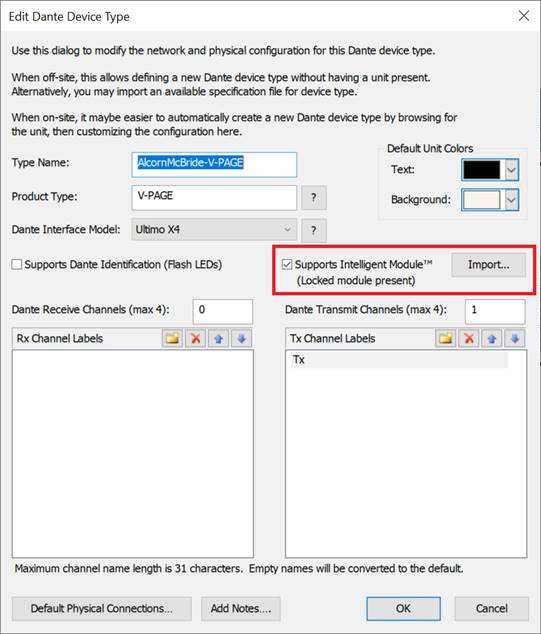
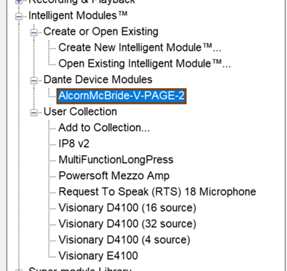
The User Library Device and the corresponding Intelligent Module will now be available for use. Create a new Site, add the User Library Dante Device, and the Intelligent Module will be available in the “Intelligent Module>Dante Device Modules” section of the Toolkit to be added to your design.
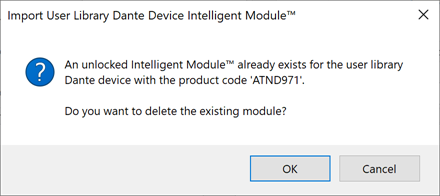
Note there can only be one Intelligent Module file, locked or unlocked for a given Dante device, based on its Dante Product Type. As such if you import a new Intelligent Module file to the User Library Device, and there already is a .mod or .modx file present for the associated Dante Device Product Type, you will see the following warning.
There is a similar message if a locked intelligent module already exists.
Intelligent Module Options
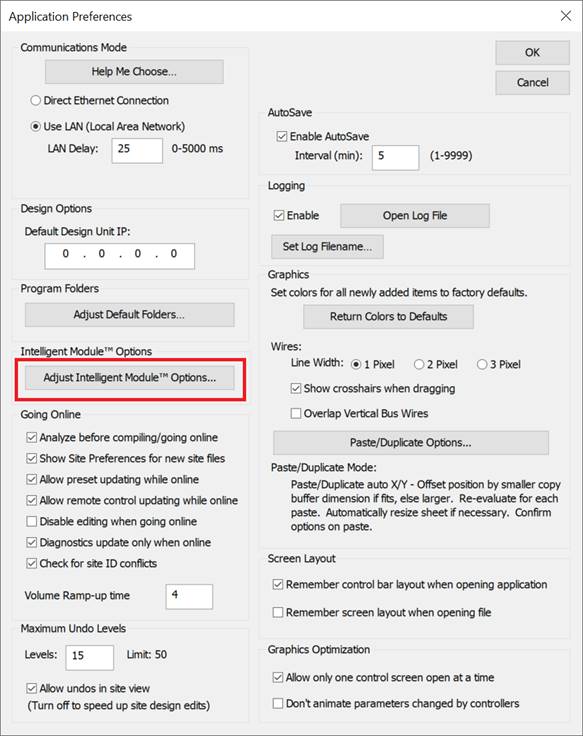
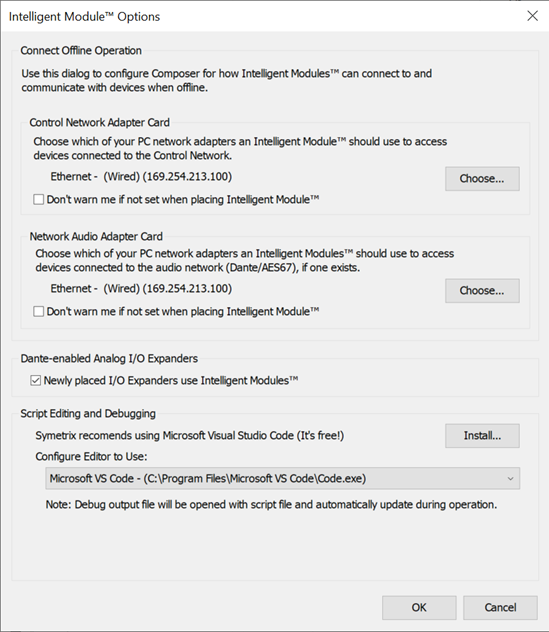
The following settings are available:
Connect Offline Operation
This option configures which network adapters Composer should use with offline Intelligent Modules.
-
Control Network Adapter Card - Click “Choose…” to select the network adapter that is connected to the Control Network.
-
Network Audio Adapter Card - Click “Choose…” to select the network adapter that is connected to the Dante Network
A pop-up window will be shown allowing selection of the adapter.
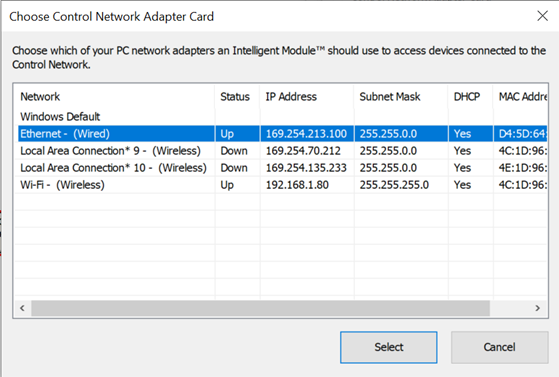
If these are not configured correctly, various aspects of Intelligent Modules will not work offline. Therefore, Composer will present a warning when placing an Intelligent Module if these options are not configured. This warning can be hidden for each network adapter by enabling the corresponding “Don’t Warn me if not set when placing Intelligent Module” checkbox.
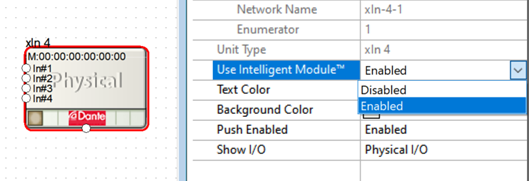
Dante-enabled Analog I/O Expanders
This option determines if newly placed Symetrix I/O Expanders (e.g. xin 4) use Intelligent Models for control. We highly recommend you leave this checked for the most flexible level of operation.
This option can be overridden on a per device basis from its Properties panel.
Script Editing and Debugging
This section configures which external text editor to use for creating and editing Intelligent Module scripts. There are three editor options available: Notepad, Visual Studio Code and Custom.

Composer has different functionality depending on which is selected.
-
Notepad - The Notepad application is available on all Windows computers. It provides basic text editing capabilities but without any advanced and helpful features. We strongly suggest you use one of the other options, but this is available in a pinch.
-
Visual Studio Code - We highly recommend you use Visual Studio Code. It provides a great experience and has received the most testing. If you have it installed on your computer, it will be selected by default. If you don’t have it installed, we’ve provided a handy button to go get it. It is created by Microsoft and provided for free.
-
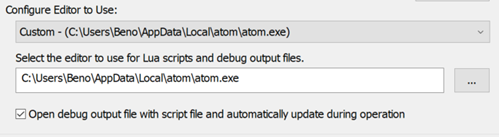
Custom - If you are already a user of another development text editor like Sublime Text, Notepad++, or Atom to name a few, and would like to use it for your Intelligent Module scripts, select the Custom option. You will then see two additional settings to configure.
-
Location - First you will need to select the location of the editor to use. Click the “…” button to browse your hard drive and find the .exe for your text editor of choice.
-
“Open debug output file with script file and automatically update during operation” - When checked, this option allows Composer to automate these two tasks that you will do repeatedly during development. This requires your text editor be able to handle a file being changed that it has open. Most text editors designed for programing (including the examples mentioned) can handle this capability. Some basic text editors, like Notepad, cannot and you’ll need to disable this option. In general, you will want this checked unless you see strange behavior with your text editor. Here are few tips for getting the most out of a few popular text editors.
-
ATOM - Install Lua support: https://atom.io/packages/language-lua
-
Notepad++ - You will want to enable “Monitoring” for the Debug Output File by clicking the “Eye” Symbol with the file selected.

-
Sublime Text - Sublime Text doesn’t allow you to move a tab to a new column easily while the tab is updating. So, you may need to Pause the script in Composer to move the tab, and then unpause the script.
Benefits of External Script Editor
Symetrix has chosen to use an external editor for script creation and debug output logging because it provides the most powerful development environment with distinct advantages over a built-in editor and debug output.
Most importantly, you get to choose the editor you want to use. We know that many of you will already have experience developing code. We want to allow you to work in the environment that you feel the most comfortable and productive. Chances are you already have fallen in love with one particular text editor, and with Composer you can use it.
Another benefit is that these third-party editors have powerful feature sets with deep customization. With an external editor, you get to take advantage of things like Snippets, Multi Line Select, Plugins, and multiple color schemes to work just how you want to. And they are backed by huge development teams providing regular updates making them better and better. Even in our wildest dreams, we couldn’t hope to devote the engineering hours that Microsoft puts into Visual Studio Code. And this means that we get to have our engineers work on other aspects of making our products better, instead of reinventing the wheel.
And with your script files living outside of your Site file, you get to take advantage of powerful source control using free tools like GitHub. This will allow you allow you to ensure your scripts are working perfectly before committing changes, while having the ability to easily roll back to previous versions, should a problem arise. You can even view the differences between multiple versions to see what has changed. Source Control will make development easier and safer and is a must for larger scripts or multiple person development teams.
Finally, if you are just starting out with Script development, you’ll get to learn with powerful industry standard tools, allowing your skills to translate to other platforms easier and faster.
Offline vs Online
Unlike most modules, Intelligent Modules have some amount of functionally when used offline. Much of the behavior while developing and debugging a script offline is the same as when online, but there are some differences to keep in mind.
Offline
When Offline the script is running on the same computer as Composer, and any network communication is from the computer to the device via the configured ports. Depending on your network configuration, the Dante and Control networks may be separate or bridged.
Another important thing is that just like other modules, control signals do not flow through your Design while offline. While the controls in your Intelligent Module can interact with your script and your script can communicate to network devices Offline, control signals connected to and from your Intelligent Module will not be functioning. Therefore, you will not be able to test or debug functionality involving how your Intelligent Module interacts with the rest of your Design while offline.
But the key benefit to working offline, is that you can develop much of your script without any hardware present. This is especially important as you can begin work before all of the hardware is available.
Online
While online the script is running on your Symmetrix hardware, and any network communication is from that hardware to other network devices via the control port. Depending on your network configuration, the Dante and Control networks may be separate or bridged.
While online you will have the full functionality of your Intelligent Module and it will interact completely with other modules in your Design via the control pins.
The main drawback is that you must be on the same network as your device and you’ll need to take your device offline to iterate and debug your new Intelligent Module during development. This may be time consuming and inconvenient if the system is already deployed.
Recommended Process
Given these differences, it is recommended you develop as much of your script as possible offline. This includes writing all the functionality offline, even that which interacts with things you can’t test. Then when you have completed the initial development, and tested as much as possible offline, go online and work through the remainder that depends on real hardware. You will want to recreate as much of the dependent hardware as possible at the office, to be able to complete development and testing, before going to a client’s location for commissioning.
Always On
Script files are always running, whether online or offline, unless they are explicitly paused. If your intention is to stop the script when offline, then the script should have code which interrogates the online/offline state before executing. It is good practice for a script that communicates with a device using UDP or TCP, to provide a control to the user to defeat offline operation if that is desired (an example is provided in the best practices page). All the Symetrix Intelligent Modules include this functionality.
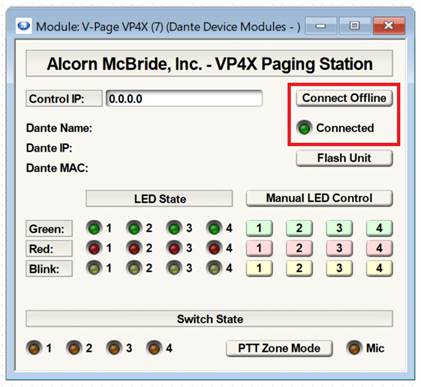
This is especially important if a device only permits one controller at a time. Otherwise, it is possible for an offline instance of Composer and a script running on a Symetrix DSP to simultaneously try to control a device. If the device allows multiple connections, this situation will often lead to unexpected hard to debug results. If you experience strange behavior, try disabling offline connection if possible.
Errors
When developing a script, it is common to make mistakes. Composer and the Symetrix Hardware send your script through a Lua interpreter, not a compiler. This means that the script file is read as it is needed. Composer or the Device do not check the entirety of the code when it is first imported. So while an error may be reached as soon as the script is imported, just as often an error might not be detected until a specific operation happens.
In either case, if you make a syntax mistake in your Lua script that causes an error in the Lua interpreter, Composer will stop the script execution and display an error. It does this in two ways.
First you will see an error Icon that looks like a red triangle on the associated Intelligent Module:
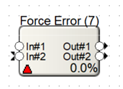
Clicking on it will display a popup with more information:
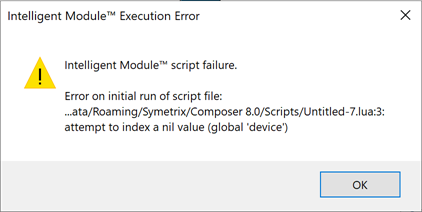
The error information comes from the interpreter and the same will be added to the Debug Output File:
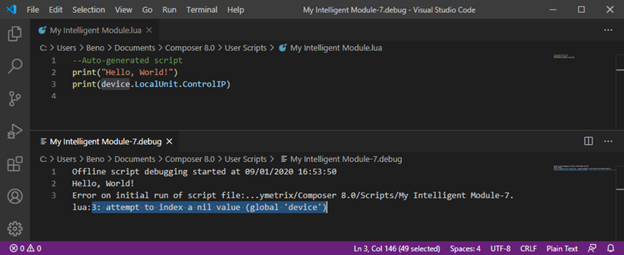
The important part of the error is the line number and the message that follows. The line number is displayed after the name of the file (don’t worry that the file name and location looks odd, as it is the internal script file Composer uses).
In the above example, a simple typo generated the error saying “3: attempt to index a nil value (global ‘device’)”. This tells you that the error is on line 3. And the message explains that ‘device’ is a nil value. Well that’s because “device” with a lowercase “d” is used instead of “Device” with an uppercase “D”. Since Lua is case sensitive, it doesn’t know what “device” means. Simply changing that one letter and importing again will fix the error.
Sometimes the message from the interpreter won’t be as helpful, but the line number will usually point you to the place to start looking for something that isn’t quite right.
Note you cannot push an Intelligent Module to a device with an error; you must fix it first.
Intelligent Module CPU Usage
The bulk of the work done by Intelligent Modules is not performed on the DSP, instead it is executed on the device’s CPU. This is the same processor that manages all non-audio processing aspects of your device, including communications, control, remotes, SymView and more. This is a hefty processor, but there is only so much available processing time, and just like with your computer, you can only run so many programs simultaneously. As such, Intelligent Modules can only occupy a certain percentage of a CPU’s processing time. In most cases, you won’t have to worry about this. But some Site files with many Intelligent Modules that each have large scripts, may run into this limit. Therefore, Composer imposes limits on how much processing a script may consume and provides monitoring tools and warnings if you are nearing or crossing the limit.
On Radius NX, Prism and Edge DSPs, Composer and the firmware measure the execution time for each pass of loading the script or executing any callbacks, all of which happens no faster than 4Hz (every 250ms). The following limits are imposed:
-
If the pass takes more than 125 ms to complete, an error is printed to the Debug Output File and the next pass will be skipped.
-
If the pass takes longer than 250 ms to complete, an error is printed to the Debug Output File and two passes will be skipped.
-
If more than 500 ms, the script will be prevented from running and an error state will be displayed.
The Server D100 has a faster processor so it executes Intelligent Module scripts every 100 ms. Thus its limits are shorter as well.
-
If the pass takes more than 50 ms to complete, an error is printed to the Debug Output File and the next pass will be skipped.
-
If the pass takes longer than 100 ms to complete, an error is printed to the Debug Output File and two passes will be skipped.
-
If more than 200 ms, the script will be prevented from running and an error state will be displayed.
To monitor usage, simply hover your mouse over an Intelligent Module to see the following:
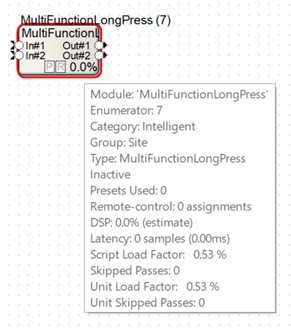
You will see the following information:
-
Script Load Factor - The Load Factor is calculated by first taking the time used by the script divided by the elapsed time since loading the script This is then averaged over the last 40 passes and normalized against a target limit so that if it reaches 100%, the script is using too much CPU time.
-
Skipped Passes - The number of passes that have been skipped due to excessive processing time for the script.
-
Unit Load Factor - The sum of the Load Factors for all Intelligent Modules running on the same unit in your Site. If this reaches 100%, your site is using too much CPU time.
-
Unit Skipped Passes - The sum of the Script Skipped Passes for all Intelligent Modules running on the same unit in your Site.
This same information can be found in the Execution Statistics accessed from the Intelligent Module Right Click Menu.
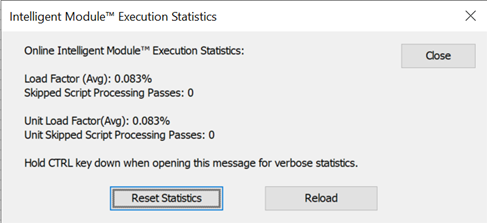
Here, you can Reset the statistics to restart the measurements used to calculate the values. In general, while the firmware can handle spikes here and there, you should target all the Unit Load Factor to be no more than 100%. This leaves enough processing resources available for the myriad other things the processor needs to accomplish, and you should see no skipped Passes. If the Unit Load Factor is above 100% and/or you see skipped passes, the scripts from all Intelligent Modules are consuming too much processing time. Use the individual Script Load Factor and Skipped Pass numbers to find the script that is using the most processing time, and work to improve its efficiency.
These numbers will vary significantly when viewed offline vs online. This is because in most cases, your PC will have more processing time available than the CPU in your unit. Generally, you care about the online performance. Similarly, each Symetrix device (Server D100, Radius NX, Edge, Prism and Solus NX) has a different amount of CPU time available to Intelligent Modules, so the number of Intelligent Modules that can be run and their associated Script Load Factor will differ for each device.
Also, be aware that printing to the Debug Output File and performing Online Script Debugging consume significant resources, so while your script may be over the limit in these development situations, it may operate acceptably under normal use. See the Best Practices, Tips and Tricks page for additional advice on how to reduce CPU usage if needed.
Next Steps
Now that you know how everything works, it’s time to create some Intelligent Modules. If you want to see much of the same material in video form, check out the Training Videos.
Then utilize the various references:
- Lua Reference
- Examples
- Control View Layout Reference
- Symetrix Lua API Extension References
- Best Practices, Tips and Tricks
The Symetrix Community Forum is a great place to discuss creating Intelligent Modules with other users. You can also download additional Intelligent Modules created by other users and an ever-growing list of 3rd party partners.
For specific questions about the Composer Lua Extensions or Intelligent Module functionality, please reach out to tech support. They are here to help.