Server D100

Overview
Server D100 is an enterprise-class rack component designed specifically for professional AVoIP installations with high node counts and for systems that require complex channel management.
The platform leverages an HP Enterprise processor and is purpose-built for large scale systems such as campuses, transportation hubs, museums, performing arts, and more.
Symetrix Server D100 ships with 256 by 256 Dante channels, 64 channels of acoustic echo cancellation (AEC), 32 media playback channels, eight media record channels, and flexible open architecture processing to tie it all together. On-demand software upgrades can further expand channel counts and media management capacity allowing for performance and cost optimization.
The Server D100 platform includes a proprietary operating system, a rewritten premium audio engine, and all new AEC algorithms to deliver clarity that empowers effective communication.

Operation
Powering On
1. Connect power to one or both rear power inputs. For full redundancy, both inputs should be used and ideally connected to separate electrical circuits. While only one power input is required for operation, the front panel Health LED will flash amber and diagnostic errors will appear in Composer if only a single power source is used.
2. Allow approximately 2 minutes for the initial low-level boot process. During this time, the Power On LED will remain amber.
3. If the Power On LED (front panel button 4) does not turn green automatically, press the button manually. The LED should then switch to green.
4. The internal fans will spin up to full speed while the Symetrix firmware loads and system checks are performed. This phase can last up to 4 minutes.
5. Once the boot process is complete, the fans will slow down to a normal operating speed, adjusted based on the ambient temperature, and the D100 will be ready for use in Composer.
Specifications
System Specifications
- Platform: HPE ProLiant DL20 Gen11
- Ethernet Dante: 2x RJ45 1 Gbit/Sec
- Ethernet Control: 1x RJ45 1 Gbit/Sec
- Ethernet HPE ILO (Integrated Lights Out): 1x RJ45 1 Gbit/Sec
- System Drive: 500 GB SSD
- Media Drive: 500 GB SSD
- Sampling Rate: 48 kHz
Base Configuration
- Dante Channels: 256 x 256
- AEC Channels: 64 @ 256 ms tail length
- Playback Channels: 32
- Record Channels: 8
- AV Remote Monitoring: Symetrix AV-Ops Center
- IT Device Management: HPE ILO, SNMP
Front Panel Features
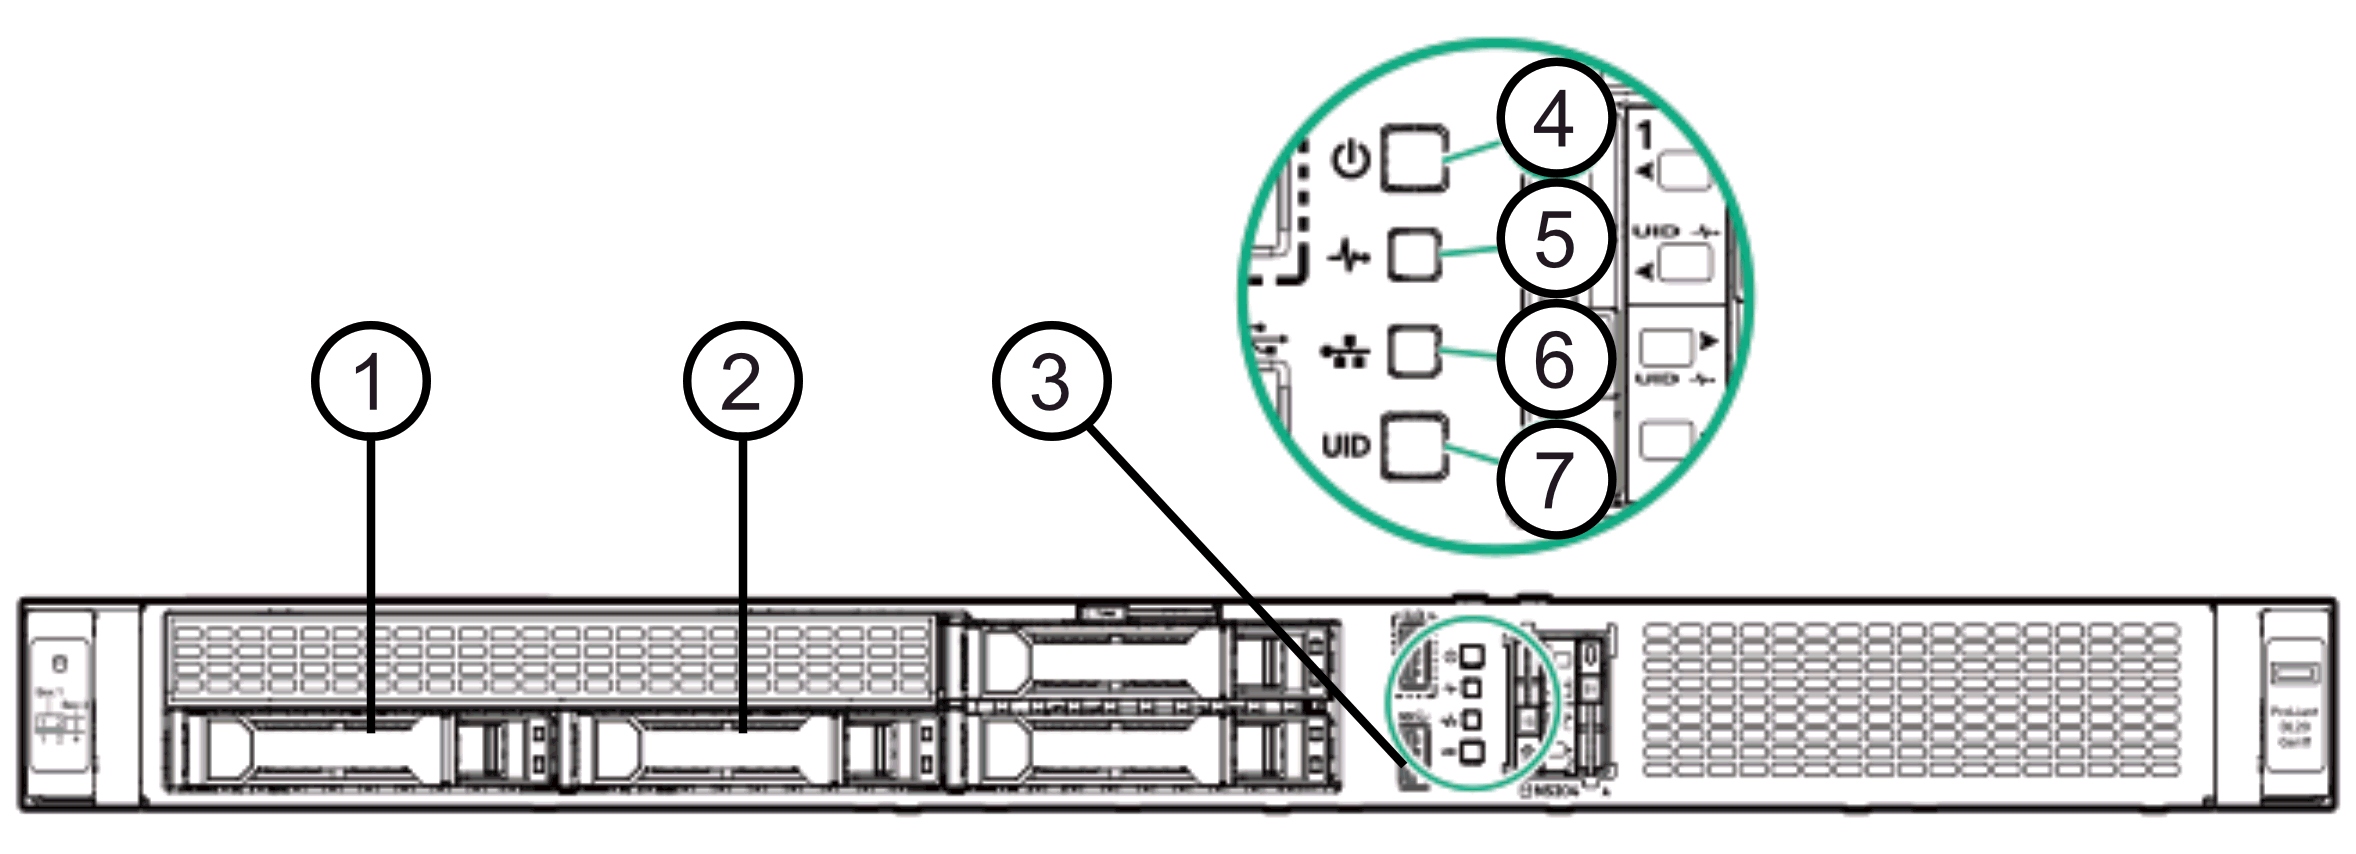
-
500 GB System SSD
-
500 GB Media SSD
-
Keyboard/Mouse USB Ports (used for factory reset described below)
-
Power On/Standby button and system power
-
- Solid green > System on
- Flashing green > Performing power-on sequence
- Solid amber > System in standby
- Off > No power present
- Press to sleep/wake the Server D100.Don't do this while audio is passing, it will interrupt audio.
-
Health LED
-
- Solid green > Normal
- Flashing green > iLO is rebooting
- Flashing amber > System degraded
- Flashing red > System critical
-
NIC status LED
-
- Solid green > Linked to network
- Flashing green > Network active
- Off > No network activity
-
UID button/LED
-
-
Solid blue > Activated
-
Flashing blue >
-
- 1 flash per second = Locating, Remote management or firmware upgrade in progress
- 4 flashes per second = iLO manual reboot sequence initiated
-
8 flashes per second = iLO manual reboot sequence in progress
-
Press to enable/disable the ILO identify indicator in the ILO software (this isNOTthe Dante or Composer identify)
-
Press and hold to power cycle ILO.Don't do this while audio is passing, it will interrupt audio.
-
To power down the server, use one of the following methods:
-
Press and release the Power On/Standby button.
-
- This method activates a controlled shutdown of applications and the OS before the server enters standby mode. It can also activate a shutdown behavior governed by an OS configuration or policy.
-
Use a virtual power button selection through iLO 6.
-
- This method initiates a controlled remote shutdown of applications and the OS before the server enters standby mode.
Before proceeding, verify that the server is in standby mode by observing that the system power LED is amber.
Rear Panel Features
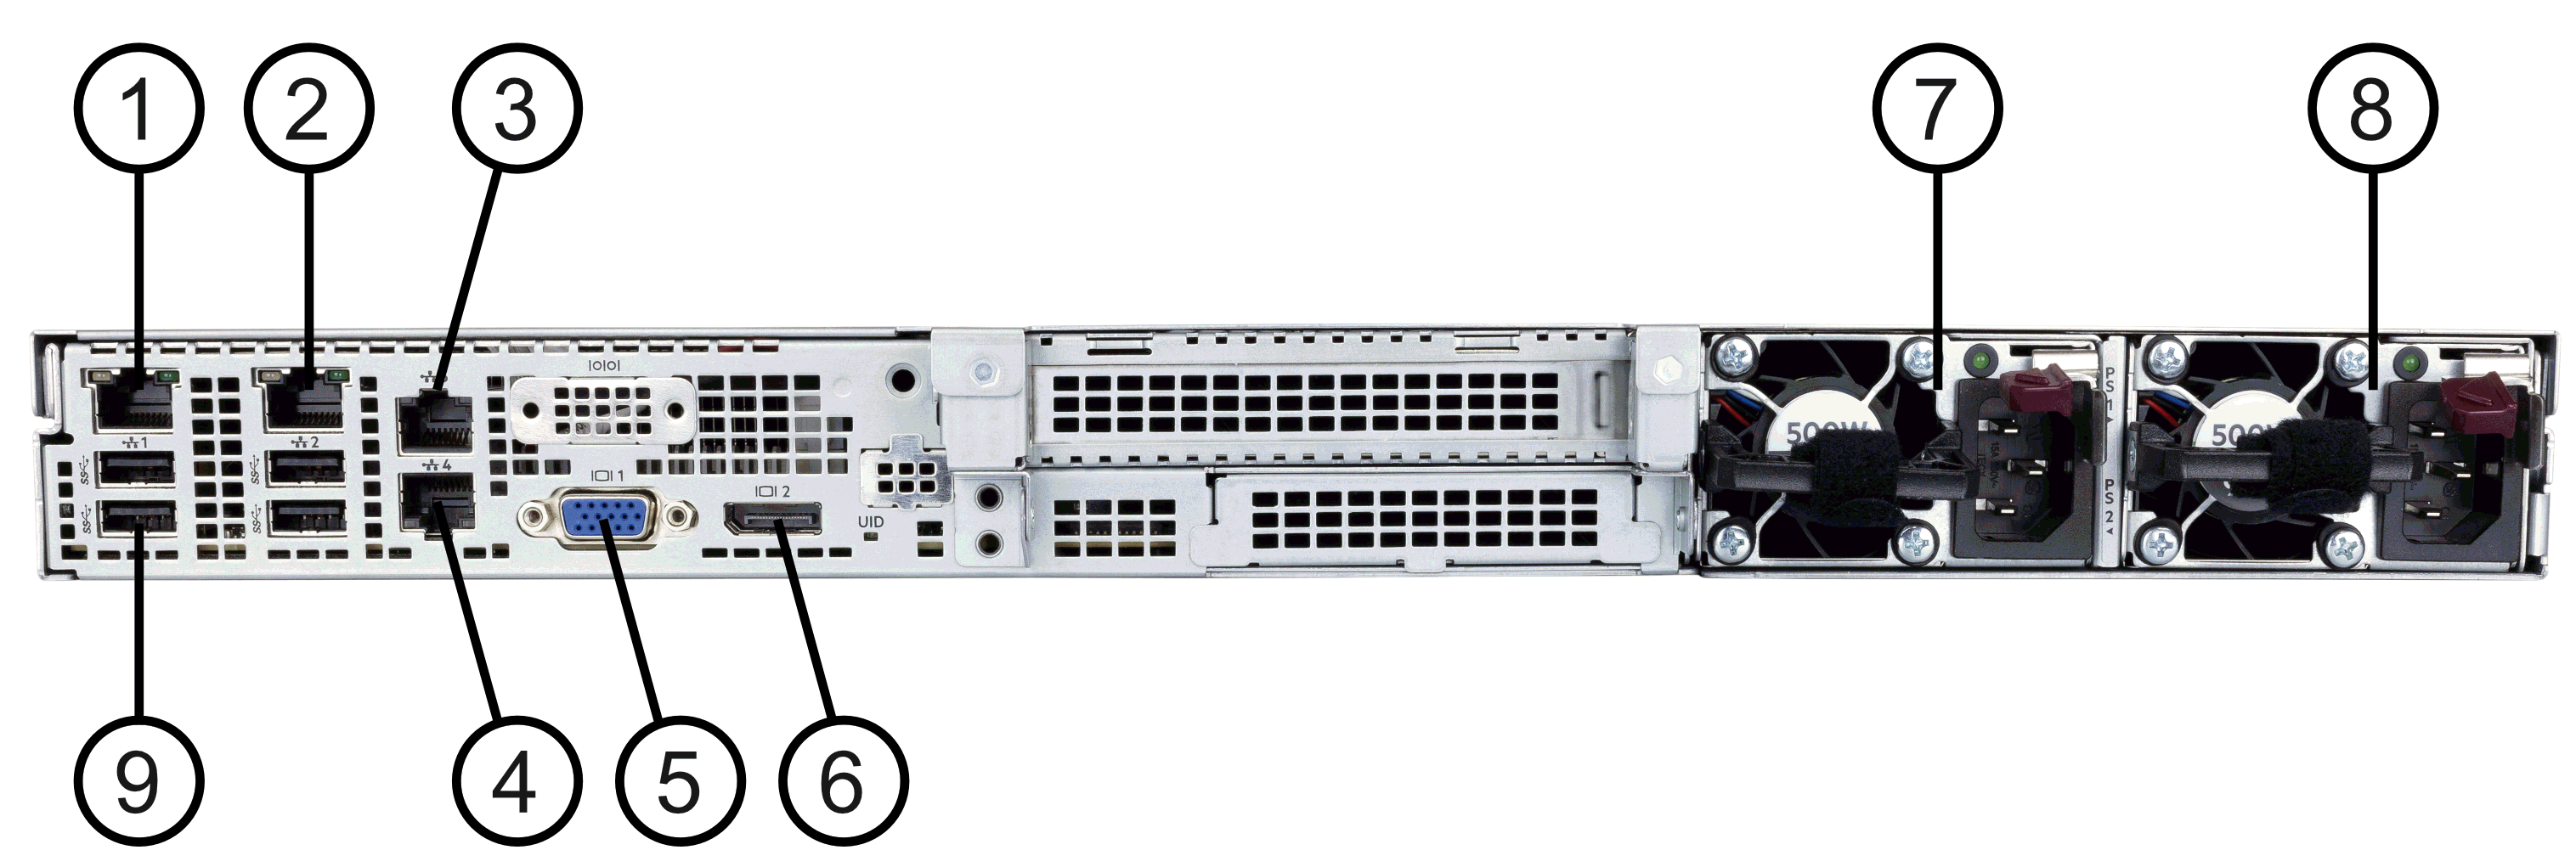
- iLO Lan Port (1 GbE)
- Control Lan Port (1 GbE)
- Primary Dante Lan Port (1 GbE)
- Secondary Dante Lan Port (1 GbE)
- VGA Video Output (used for factory reset described below)
- Display Port Video Output (not used)
- Hot Swapable Power Supply Unit 2 — 500 W
- Hot Swapable Power Supply Unit 1 — 500 W
- Keyboard/Mouse USB Ports (used for factory reset described below)
Software Upgrade Options
- Dante 128x128 Channel Upgrade: Upgrade the built in Dante channels from 256x256 to 384x384 via AV-Ops Center
- AEC 32 Channel Upgrade: Upgrade the built in AEC channels from 64 to 96 via AV-Ops Center
- Playback 32 Channel Upgrade: Upgrade the built in playback channels from 32 to 64 via AV-Ops Center
- Playback 96 Channel Upgrade: Upgrade the built in playback channels from 32 to 128 via AV-Ops Center
The Server D100 Feature Licenses section contains additional information about how to purchase and enable these licenses.
Power
- Power Supplies: Dual Redundant Hot Swappable
- Rated Line Voltage: 100 to 120 VAC; 200 to 240 VAC
Mechanical
- Processing Capacity: ~4x Radius NX
- Included Rack Rail Kit: HPE Easy Install Rail 12 Kit
- Dimensions: 1.70 x 17.11 x 15.05 in (4.32 x 43.46 x 38.22 cm) [without rack rails]
- Shipping Weight: 26.46 lb (12 kg)
- Form Factor: 1U Rack
Operating Environment
The Server D100's enterprise class cooling system is designed to keep the server operational at all costs. The means the fans can spin quite fast when needed which will generate a lot of noise. This is normal if the operating environment requires it. For quieter operation, operate the D100 in a well ventilated and air conditioned environment.
-
Standard Operating Temperature: 10° to 35°C (50° to 95°F) at sea level with an altitude derating 1.0°C per every 305 m (1.8°F per every 1000 ft) above sea level to a maximum of 3050 m (10,000 ft), no direct sustained sunlight. The maximum rate of change is 20°C/hr (36°F/hr).
-
- The upper temperature limit and rate of change may be limited by the type and number of options installed. System performance during standard operating support may be reduced if operating above 30°C (86°F).
-
Standard Operating Relative Humidity: 8% to 90% - Relative humidity (Rh), 28°C maximum wet bulb temperature, non-condensing.
-
Non-operating Temperature: -30°C to 60°C (-22°F to 140°F) Maximum rate of change is 20°C/hr (36°F/hr).
-
Non-operating Relative Humidity: 5 to 95% relative humidity (Rh), 38.7°C (101.7°F) maximum wet bulb temperature, non-condensing.
-
Additional Specifications: https://www.hpe.com/psnow/doc/a50007009enw
Advanced Boot
D100 has a two slot boot system. Each update alternates slots so you are always able to boot from the current version and the last version used. By default it will automatically choose the most recent slot from which to boot. If there is an issue booting, you may want to manually boot from the previous slot.
This process will need a monitor and keyboard must be connected directly to the unit.
- Make sure the unit is powered off.
- Connect a keyboard and monitor.
- Power on the unit.
- Wait approximately 2 minutes for startup screens to finish.
- When a menu appears with a countdown, press the down arrow key on the keyboard to pause the countdown. The following screen will be shown:
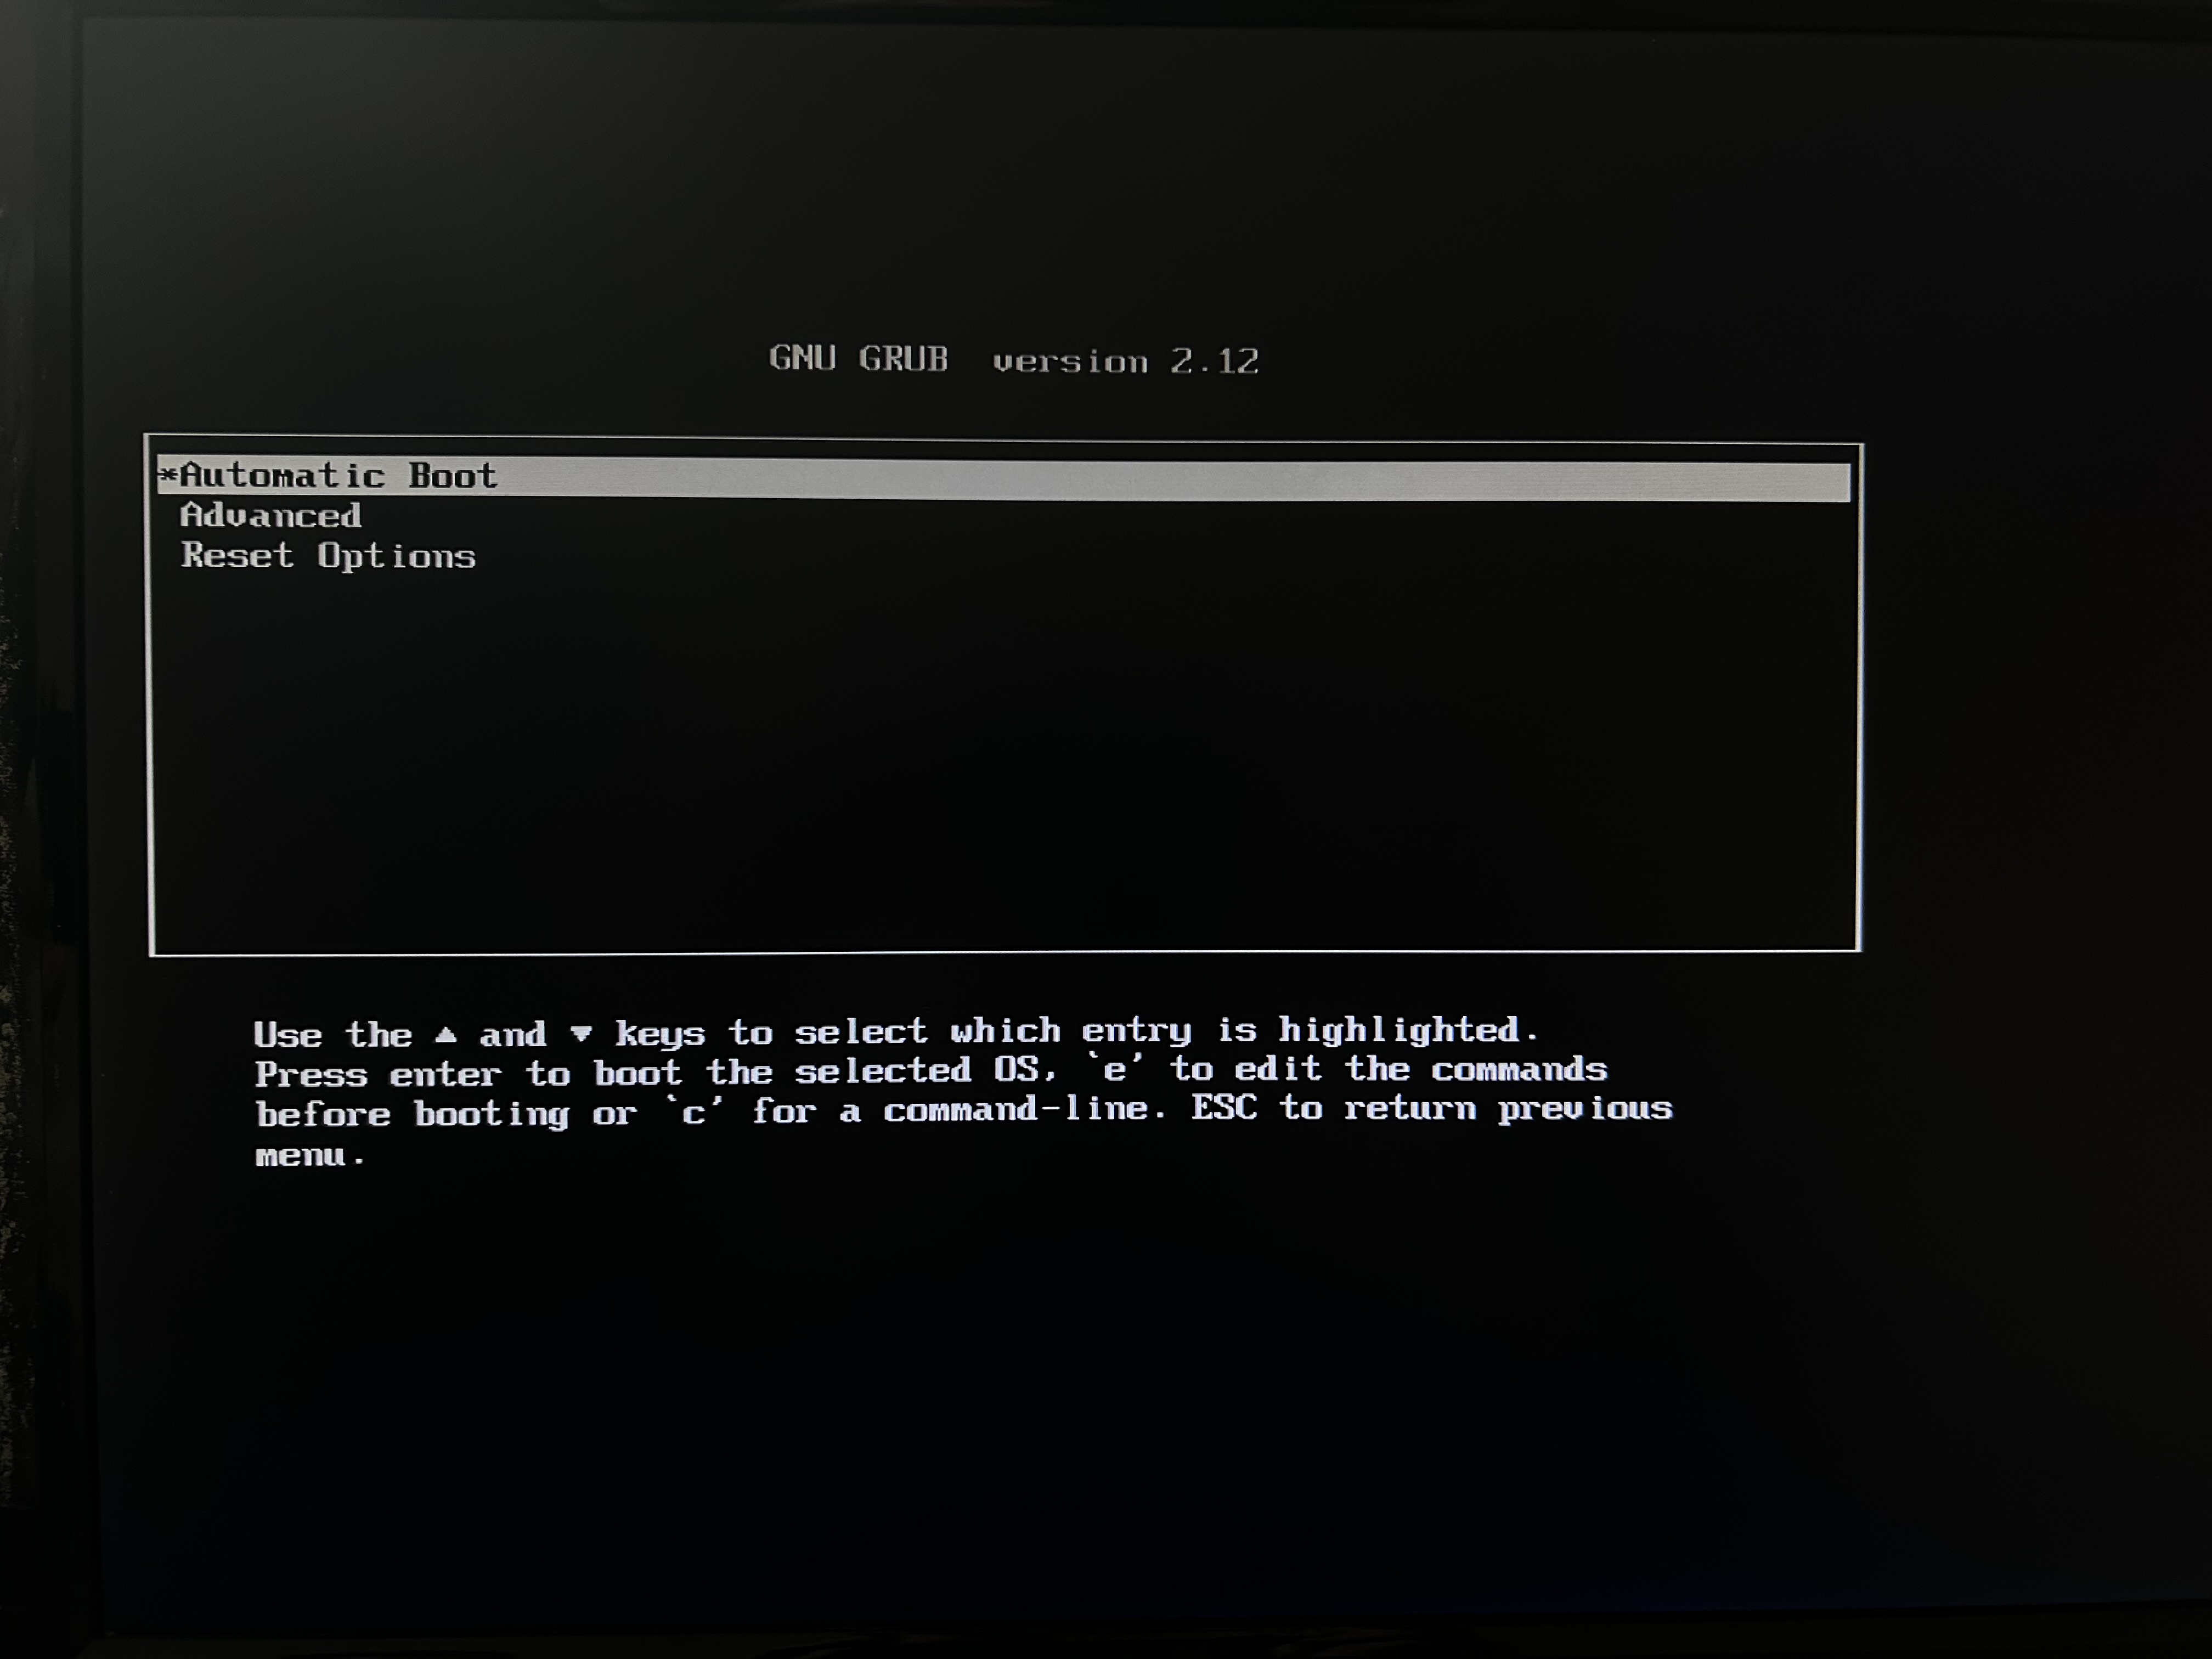
- Use the arrow keys to select the option labeled "Advanced". The following screen will be shown:
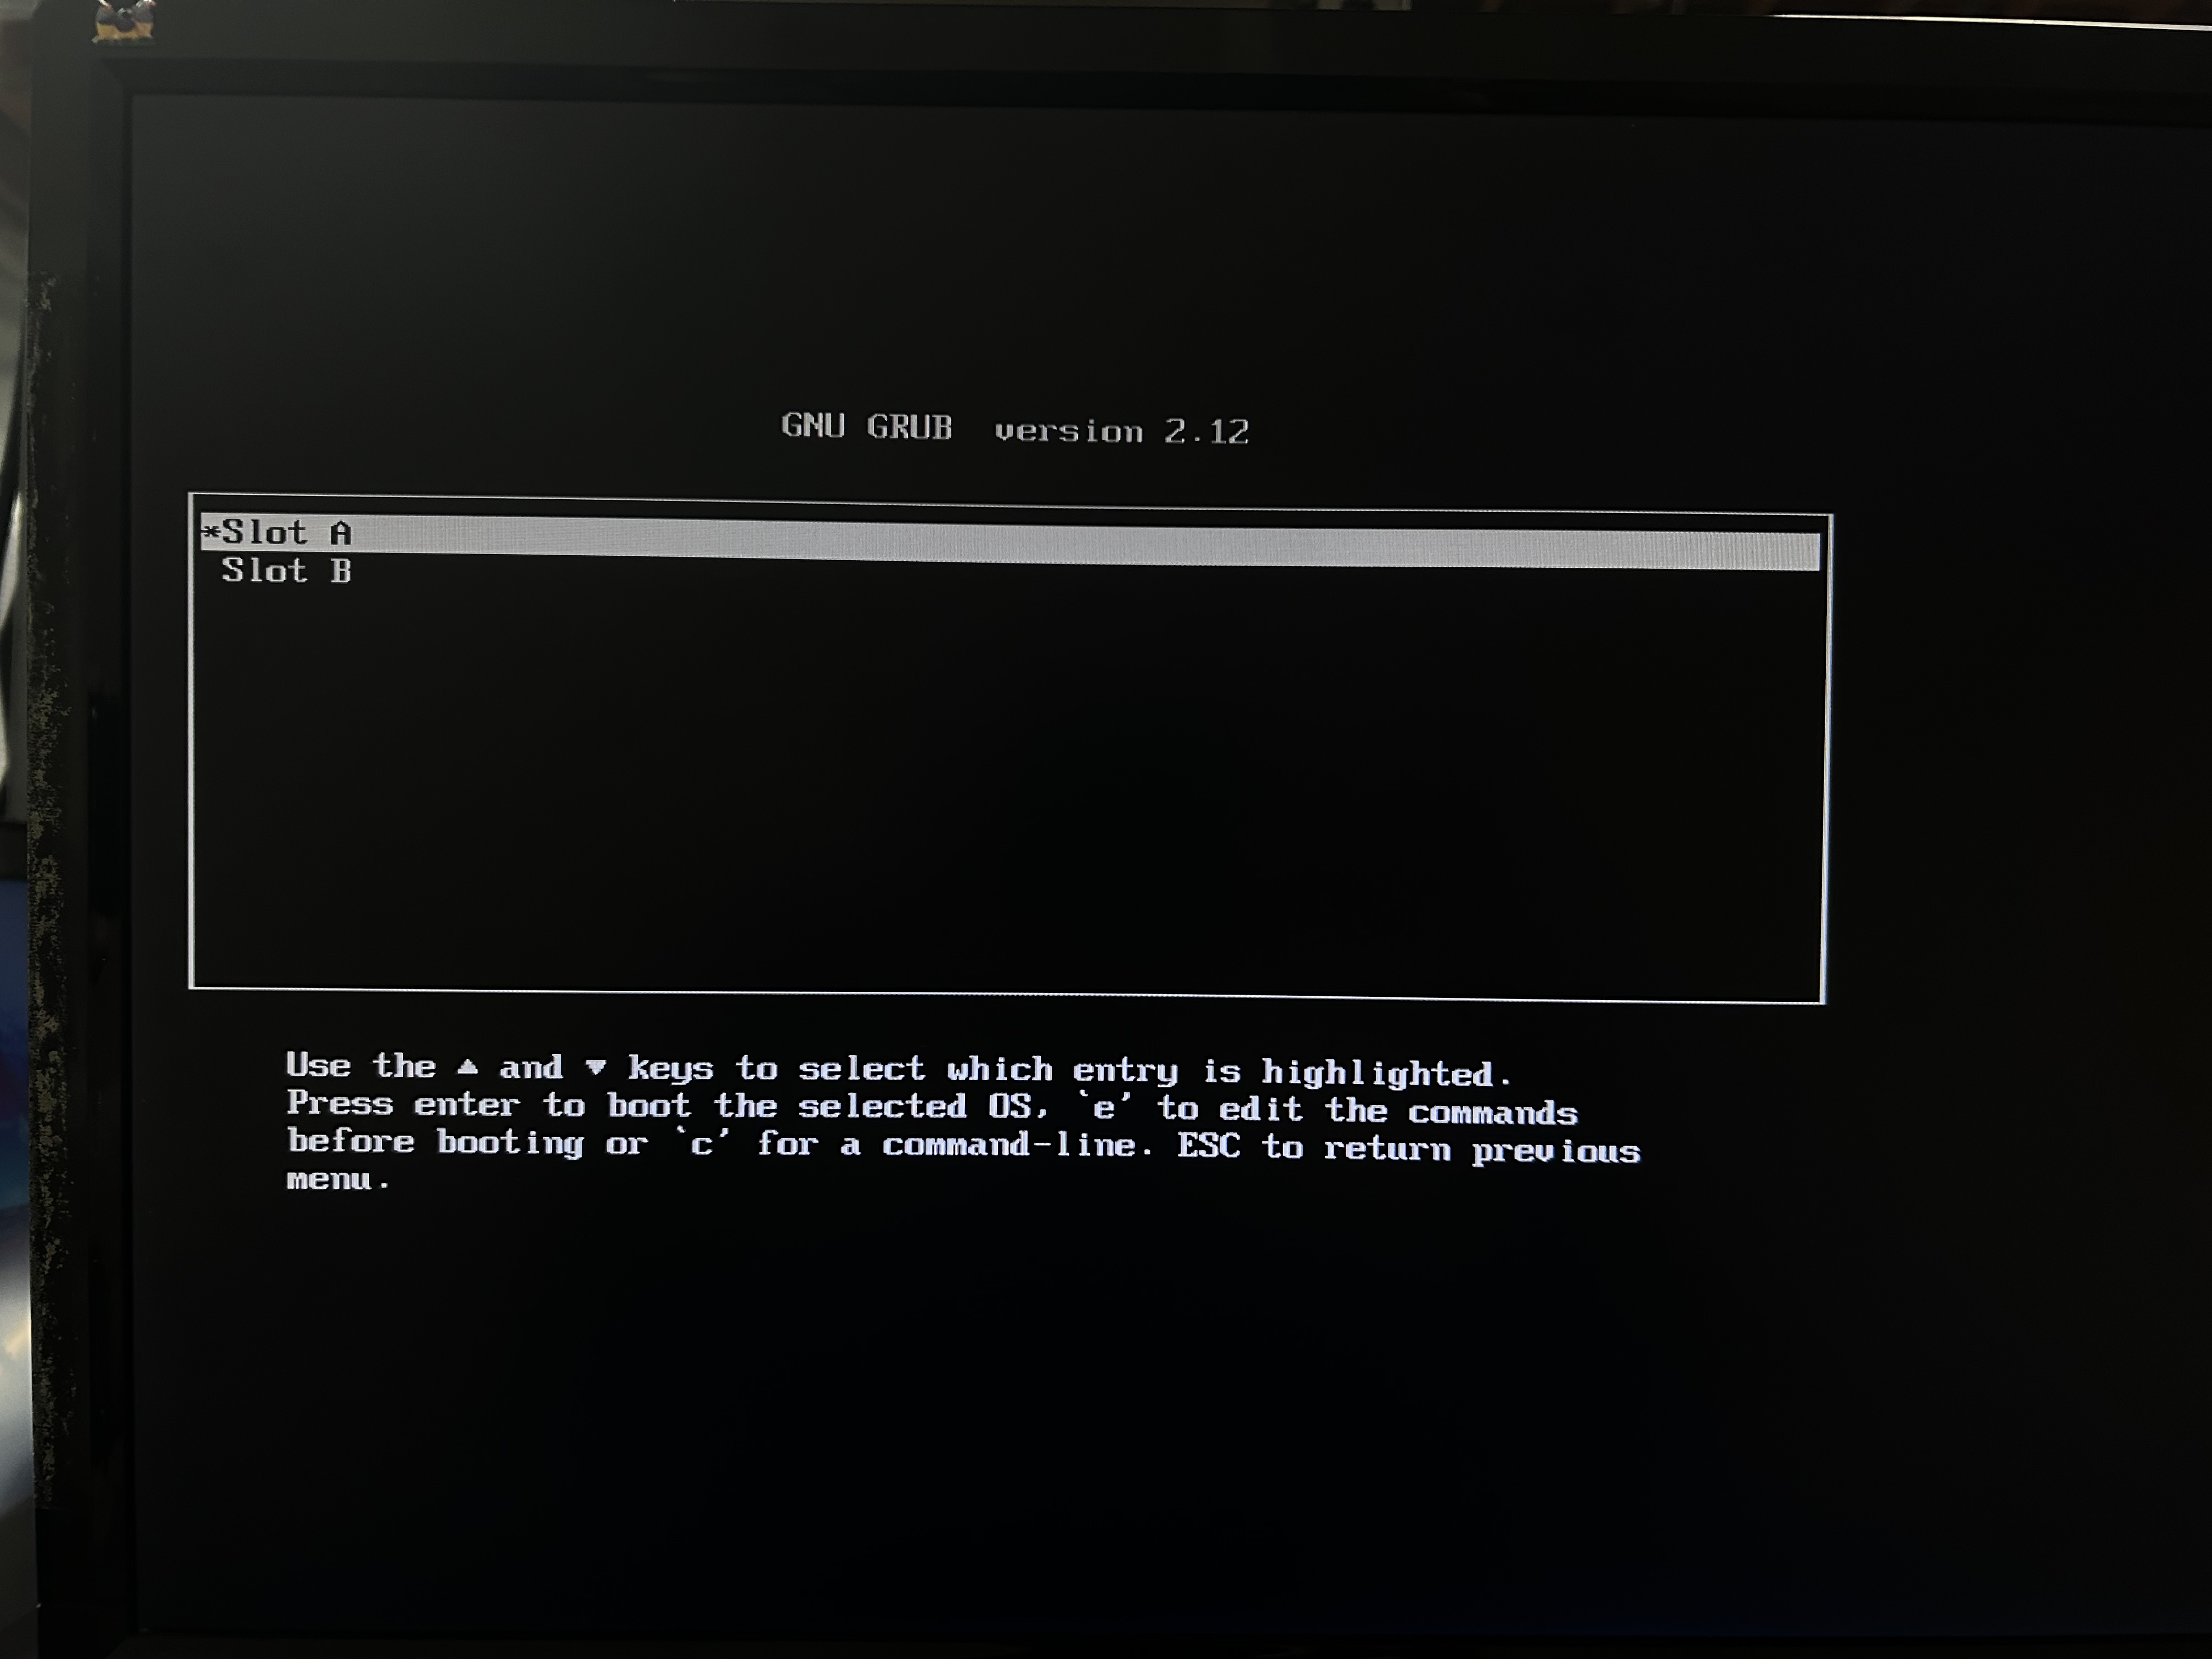
- Choose a slot. If the unit doesn't boot, repeat the process and try the other slot. If neither boots properly, contact support.
Factory Reset
To be used under the supervision of technical support. The device has the ability to reset its network configuration revert to factory default settings. Any upgrade licenses applied to the device will be maintained after the factory reset.
This process will need a monitor and keyboard must be connected directly to the unit.
-
Make sure the unit is powered off.
-
Connect a keyboard and monitor.
-
Power on the unit.
-
Wait approximately 2 minutes for startup screens to finish.
-
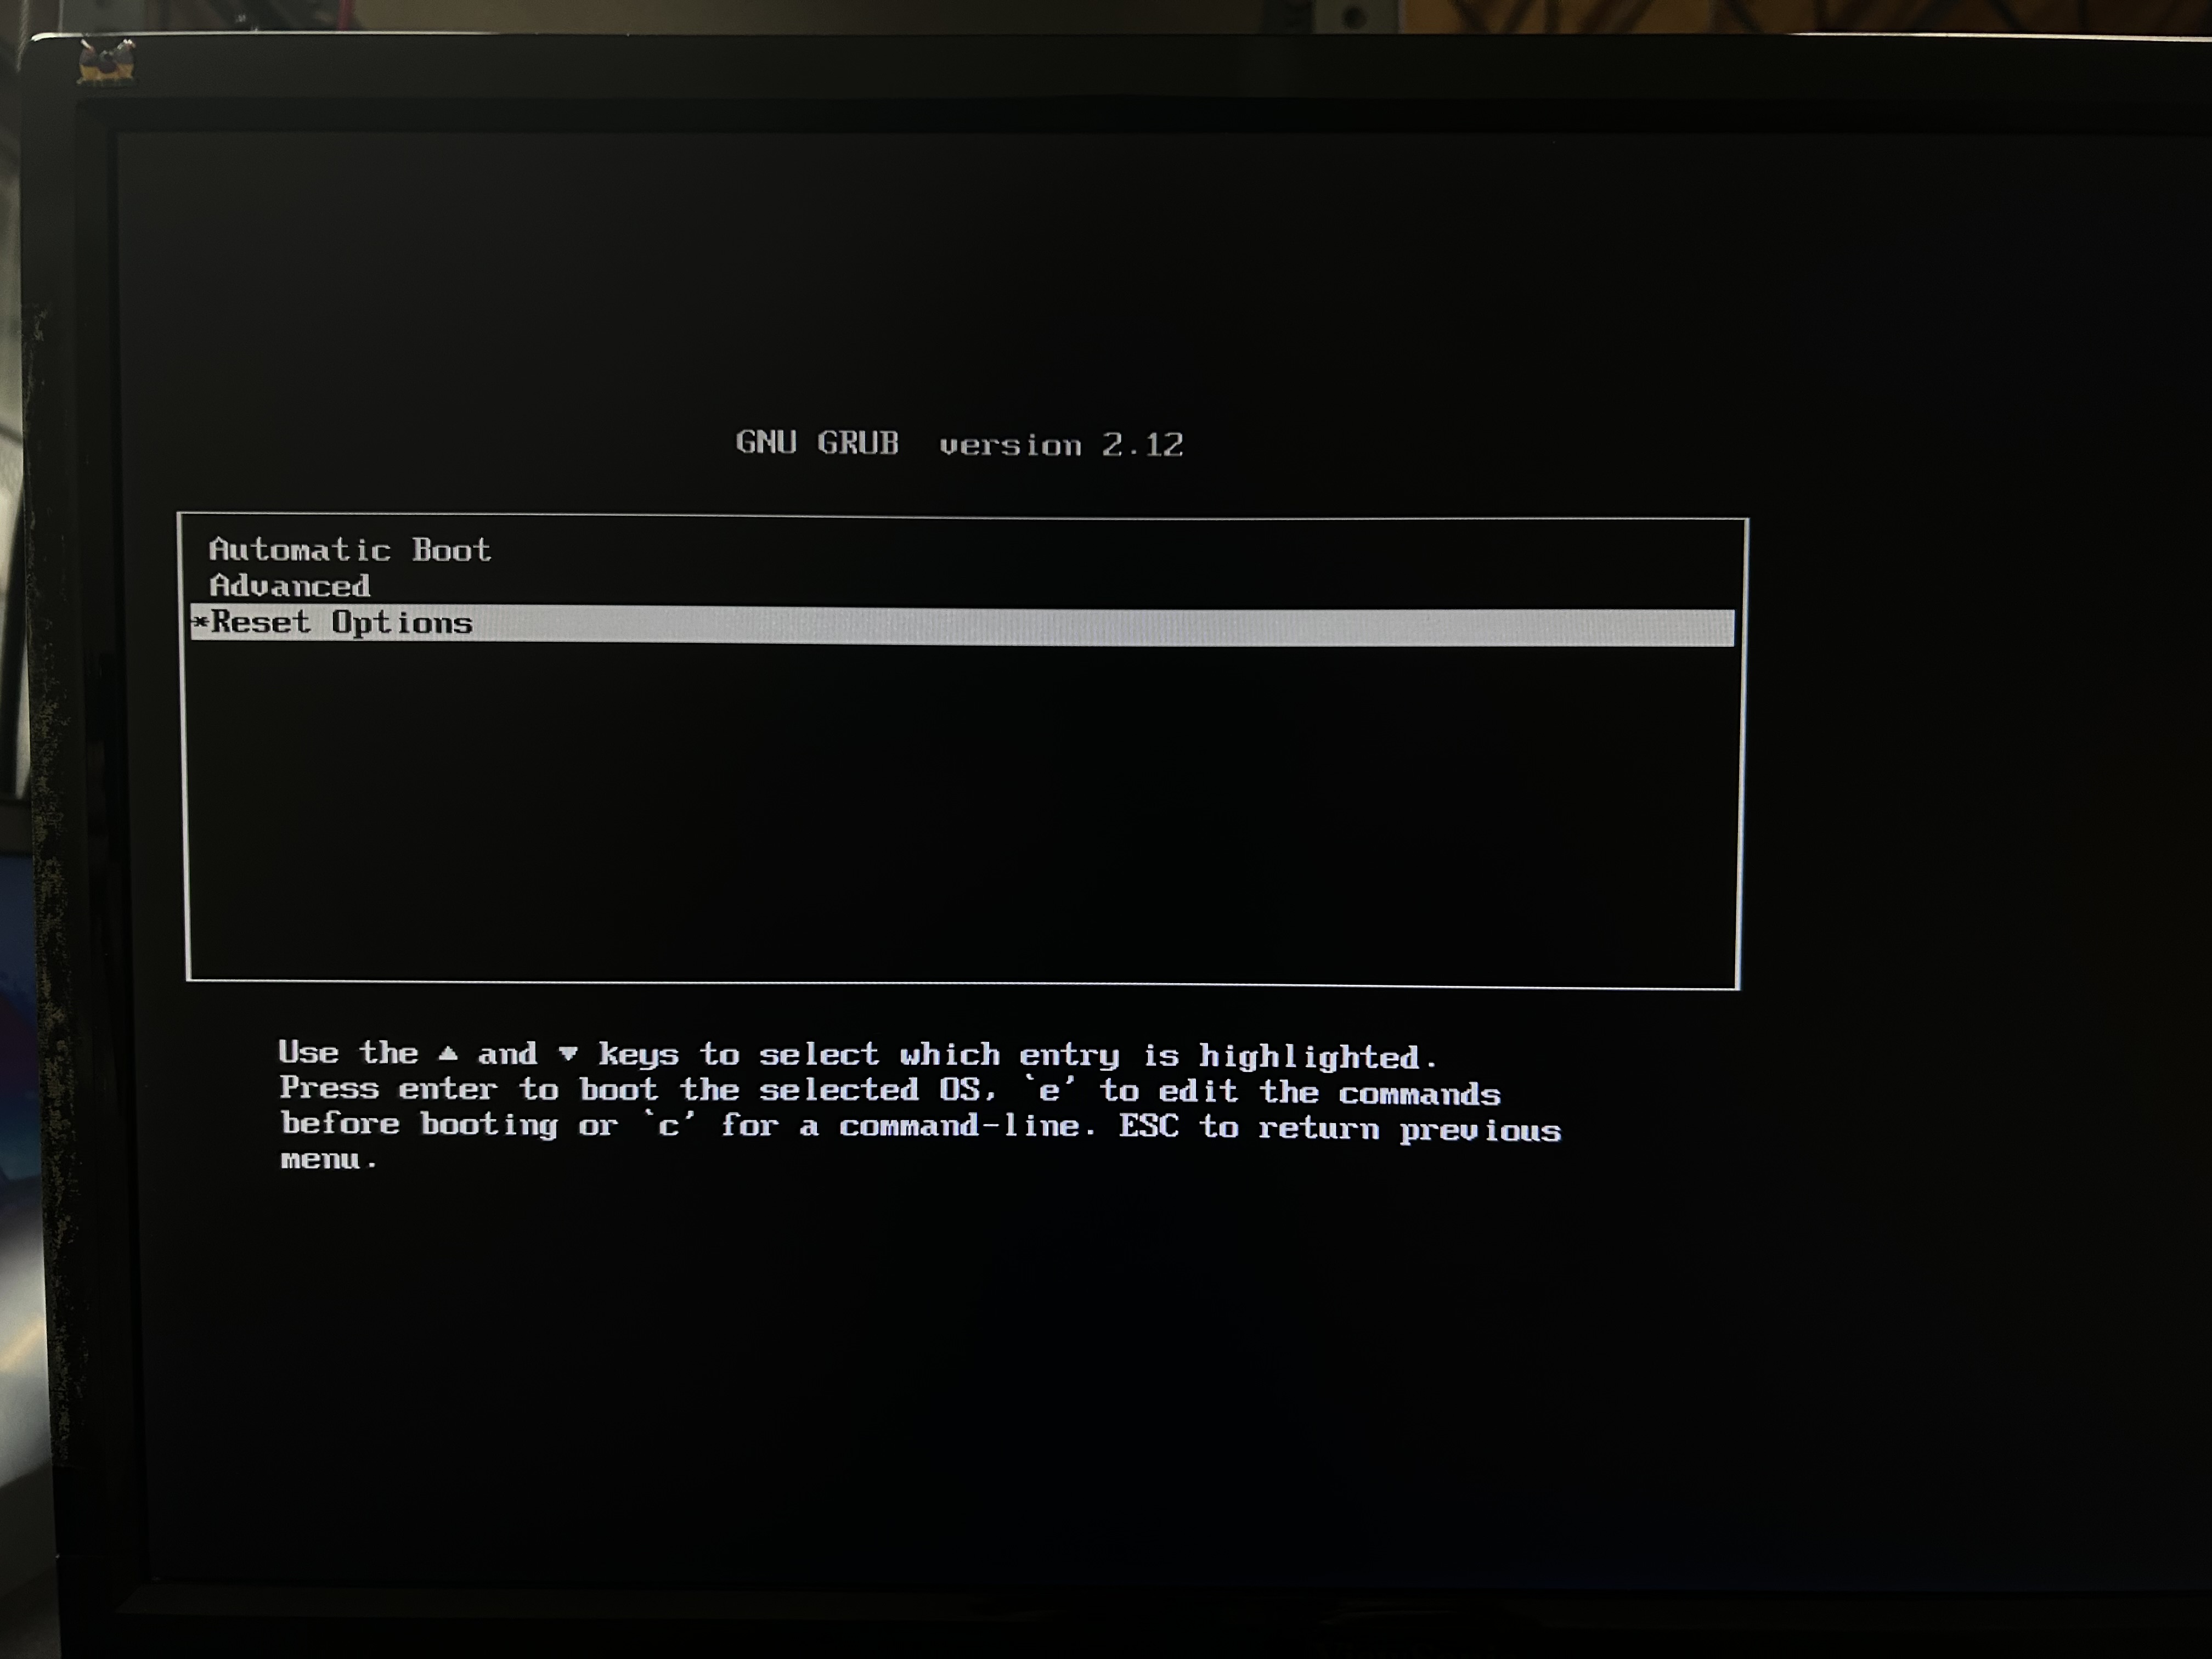
When a menu appears with a countdown, press the down arrow key on the keyboard to pause the countdown. The following screen will be shown:
-
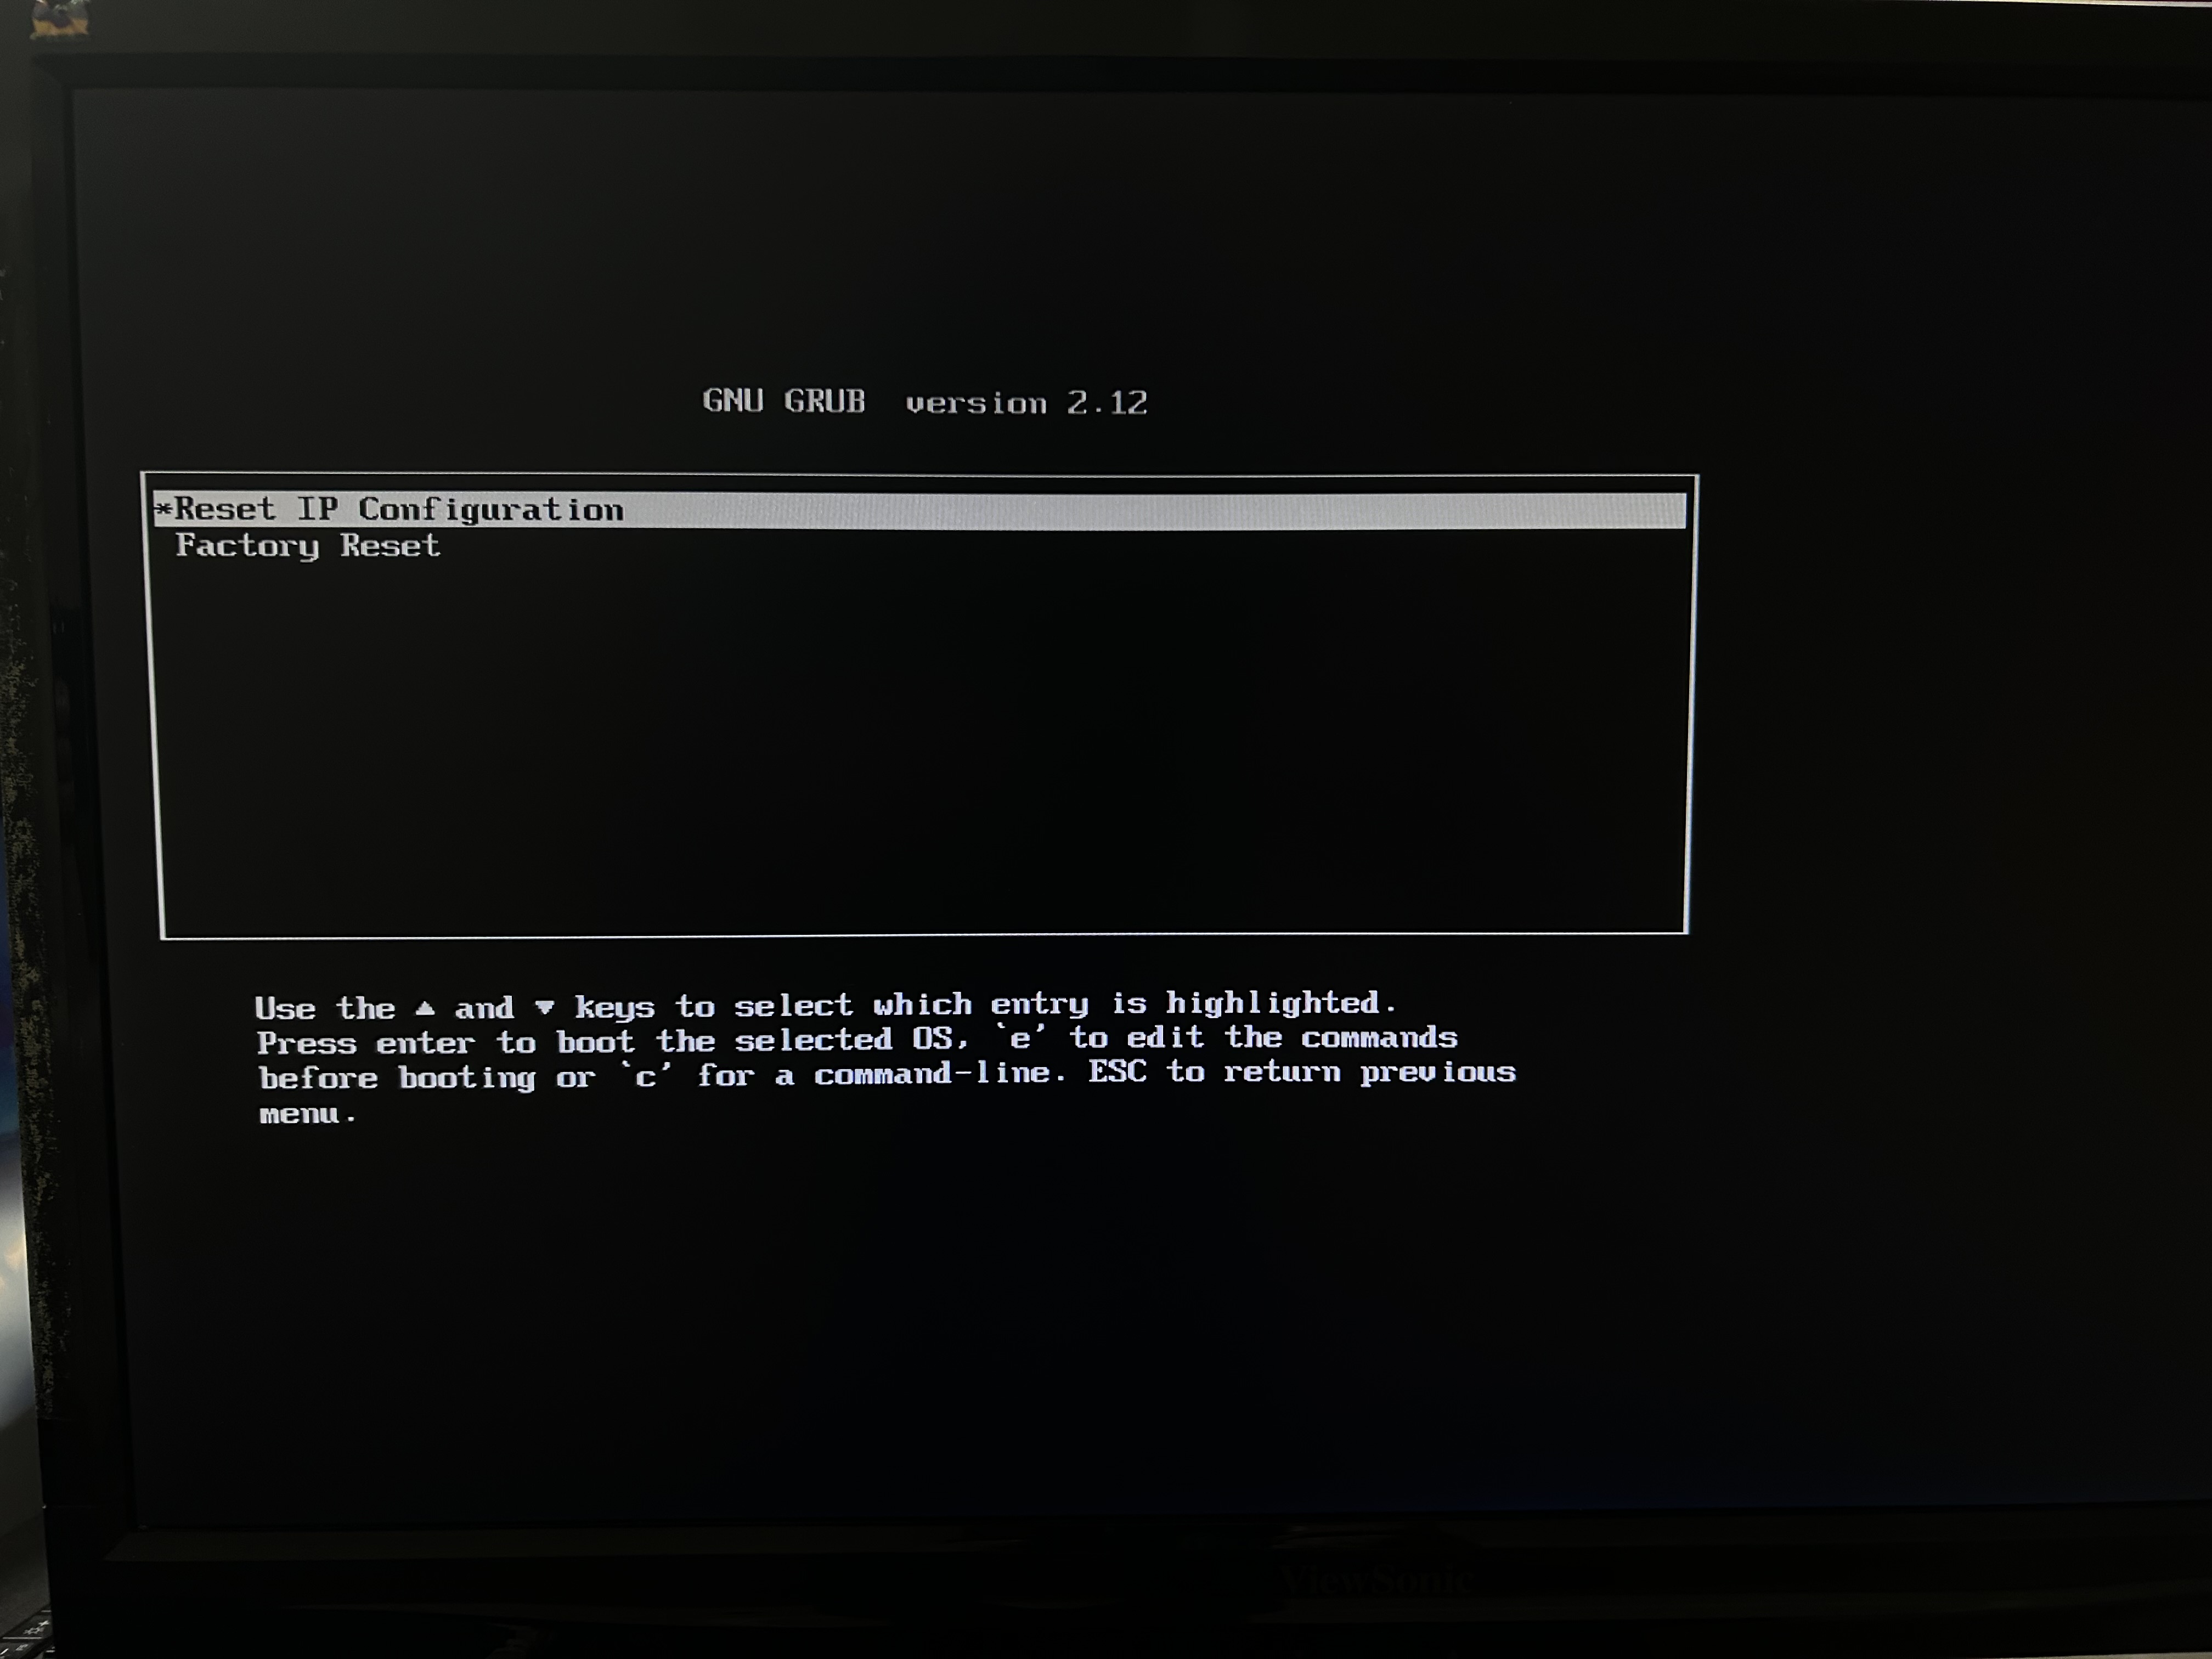
Use the arrow keys to select the option labeled "Reset Options". The following screen will be shown:
-
Select “Factory Reset".
-
The unit will ask you to confirm Select “Yes, factory reset this unit.
-
The system will restore factory settings and then automatically reboot.