Control Screens
Control Screen Right-Click Menu
Control Screen Overview
Control Screens are useful for creating custom user interfaces for commissioning a complicated system. The Control Screens can be used by technicians, or end users to operate the system, and may be exported to SymVue for multi-user, multi-point, control. They provide a way to simplify and condense the Symetrix user interface, so, for example, the user is limited to a range of controls, and will not have to and/or be allowed to adjust certain parameters in the system.
Control Screens are assembled from parameters in the Design, and can be linked with Control Screen Viewer buttons. There are two types of Control Screens: Site-wide and Super-module. Super-module control screens travel with the Super-module when imported and exported.
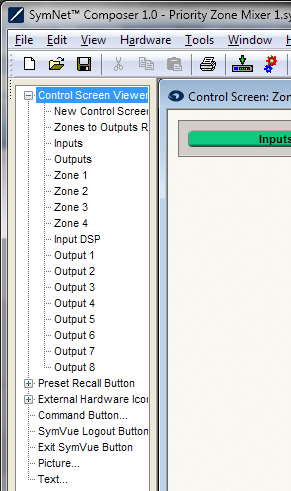 To add a Control Screen at the Site or Design View, simply select New Control Screen from the Toolkit and drag onto the appropriate view space. You can add External Hardware Icons, Pictures and Text to the Control Screen by dragging from the Toolkit onto the Control Screen. To add controls and displays from modules, you need to open the module containing the control or display you wish to add, and right click on that item. You then have the option of copying to any of the available Control Screens. Once added to a control screen you then have the option of opening that screen and dragging the item to wherever you desire.
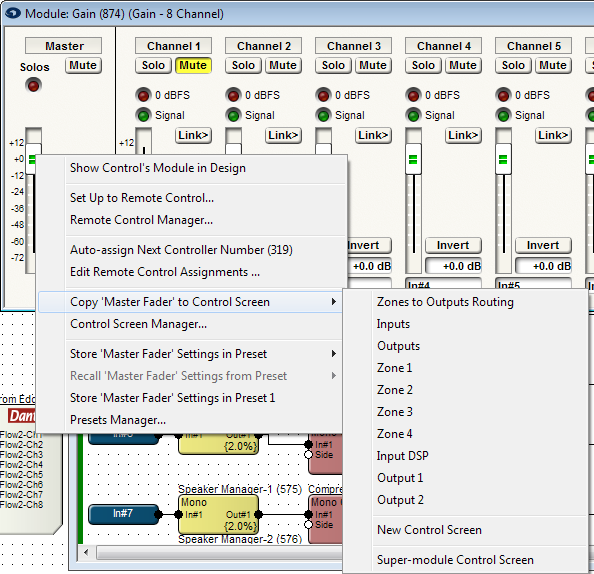
To copy the controls for an entire module you right-click in a blank area of a module view, choose Copy Entire Layout to Control Screen and choose New Control Screen. To copy an individual control to a Control Screen, instead of an entire module, right-click directly on the control you wish to copy, choose which Control Screen you would like to copy to, and repeat for additional controls. To add labels to a Control Screen, click and drag Text from the toolkit. You can change the font, size, color, etc. by right clicking on the Text object and choosing Text Properties. Some controls are grouped together by default. To break apart grouped controls, right click inside the grouped area and choose Un-group Controls.
When building and editing Control Screens they must be in Control Layout Edit Mode. Right-click in an open area and uncheck Control Layout Edit Mode to operate without disturbing the layout. The grid will disappear and all controls can be operated normally. Right-click and re-check Control Layout Edit Mode to continue editing.
Super-module Control Screens can be copied to Site-wide Control Screens, which also allows the addition of other parameters outside the Super-module to be added. Right-click on the background of the Super-module Control Screen and go to Copy Entire Layout to Control Screen. Then, select New Control Screen or select a previously created Control Screen.
Control Screens created are managed with the Control Screen Manager under the Tools Menu.
Control Screen Right-Click Menu
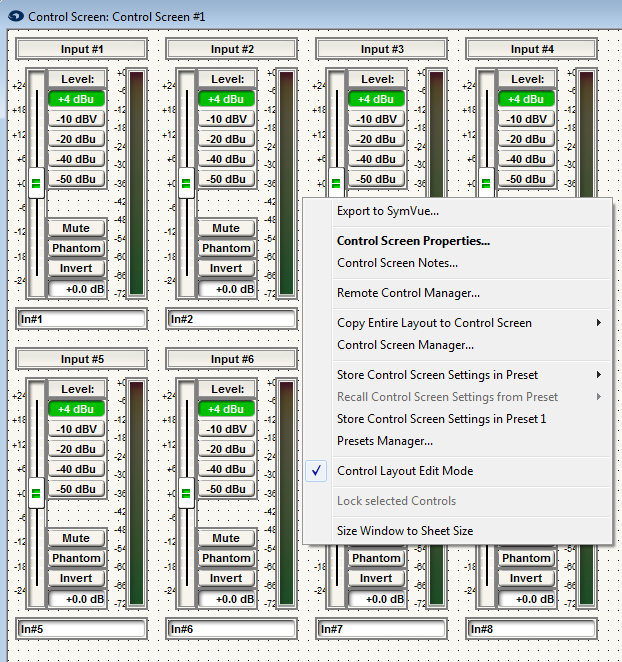
Export to SymVue...- Opens the SymVue Export Wizard to export the control screen to a SymVue file.
Control Screen Properties- Opens the Properties Window if it has been closed.
Control Screen Notes- Add programming notes to the control screen here.
Remote Control Manager- Opens the Remote Control Manager.
Copy Entire Layout to Control Screen- Copies the entire layout of the control screen to a new or existing control screen.
Control Screen Manager- Opens the Control Screen Manager.
Store Control Screen Settings in Preset- Stores the settings of the control screen in a specified preset.
Recall Control Screen Settings from Preset- Recalls the settings from a previously saved preset.
Store Control Screen Settings in Preset 1- Automatically saves the settings of the control screen to Preset 1.
Presets Manager- Opens the Presets Manager.
Control Layout Edit Mode- The control screen is in edit mode and changes can be made when this option is checked.
Locked Selected Controls- Selecting this option will prevent the controls from being moved or resized when one or more are selected. To un-lock the controls, right-click again and select Un-lock Selected Controls.
Size Window to Sheet Size- Conforms the window to the size selected in the Control Screen Properties under sheet size.
Control Screen Properties
Control Screen Properties
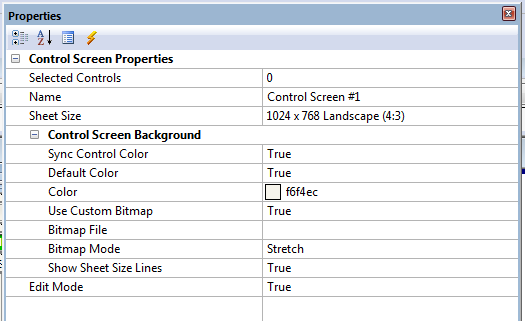
Selected Controls- Indicates the total number of controls selected in the control screen.
Name- Edit the control screen name here.
Sheet Size- Lists all of the preset sheet sizes:
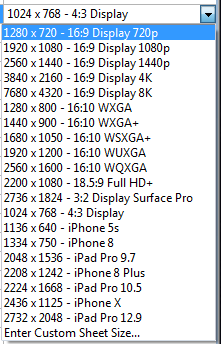
Enter Custom Sheet Size- Opens the Custom Control Screen Sheet Size dialog.
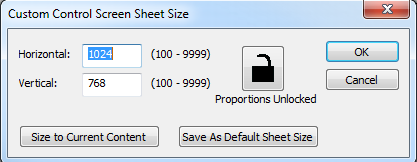
Horizontal & Vertical- Enter a custom sheet size. Horizontal: 100-9999 and Vertical: 100-9999.
Proportions Un/Locked- Locks or unlocks the proportions between horizontal and vertical sizes.
Size to Current Content- Automatically sizes the control screen to the incorporate all the controls contained within it.
Save As Default Sheet Size- Click this button to make the currently displayed settings the system default.
Edit Mode- Set this to True to enable editing in the control screen.
Background
Sync Control Color- Setting this to True matches the controls in the control screen to the color of the background.
Default Color- Setting this to True changes the background to the default grey color. This also disables the option to change the background color.
Color- Customize the color of the background here.
Use Custom Bitmap- Set this to True to select an image for the background of the control screen.
Bitmap File- This option is hidden unless 'Use Custom Bitmap' is set to True, it is used to direct Composer to the path for the custom bitmap file to use.
Bitmap Mode- Cycles between: Stretch, Center, & Tile to customize the way the background image is displayed.
Show Sheet Size Lines- Set this to True to enable a dashed line around the control screen where the sheet limits are set.