Modular ARC Programming
First, make sure you have assigned one or more parameters or presets to a Modular ARC as detailed in the Assigning Parameters to ARCs and Presets Manager. Then open the Remote Control Manager from the Tools Menu and double-click on the desired Modular ARC device in the RS-485 Remote Control section to bring up the Edit Modular ARC dialog:
Main Tab
The main tab houses options that apply to all Modular ARCs, regardless of configuration or SKU. Some options may not be available for certain SKUs, however.
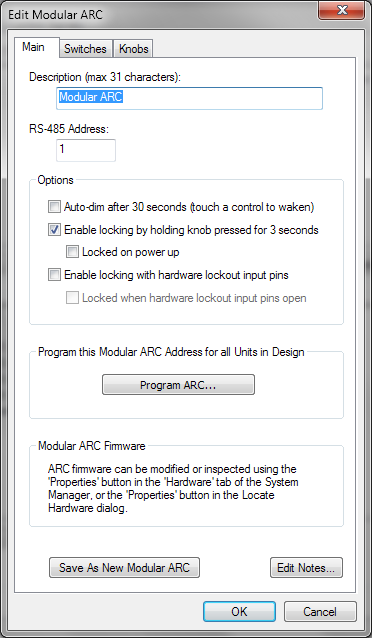
- ARC Description - Give your ARC a descriptive name to help you remember its main purpose or location, for example.
- RS-485 Address - Every RS-485 device must have a unique address. The address entered here must match the address of the physical hardware you intend to program. Up to 100 RS-485 devices are allowed per Site File. It does not matter which DSP unit the RS-485 devices are attached to.
- Auto-dim after 30 seconds - When checked, the ARC will dim to an inactive or "idle" brightness after 30 seconds of non-use.
- Enable locking by holding knob pressed for 3 seconds - When checked, the ARC may be locked by pressing the knob continuously for 3 seconds. (This option only available for Modular ARCs having a K1e panel.)
- Locked on power up - When checked, the ARC will be locked on power up. (This option only available for Modular ARCs having a K1e panel.)
- Enable locking with hardware lockout input pins - When checked, the ARC will look monitor the state of the hardware lockout input pins to determine its lock state.
- Locked when hardware lockout input pins open - When checked, the ARC will be locked when the lockout pins are open instead of closed (inverse logic).
- Program ARC... - Programs the ARC currently being edited.
- Save As New Modular ARC - Saves the ARC with current edits as a new ARC. Remember to give the ARC a unique Description and RS-485 Address before clicking this button.
- Edit Notes... - Opens the Notes dialog box allowing you to enter or edit notes for the ARC currently being edited.
Switches Tab
Modular ARCs may have up to four 4-button panels (SW4e and/or EX4e) for a total of up to 16 switches.
The Switches tab programs each of the switches and their LEDs.
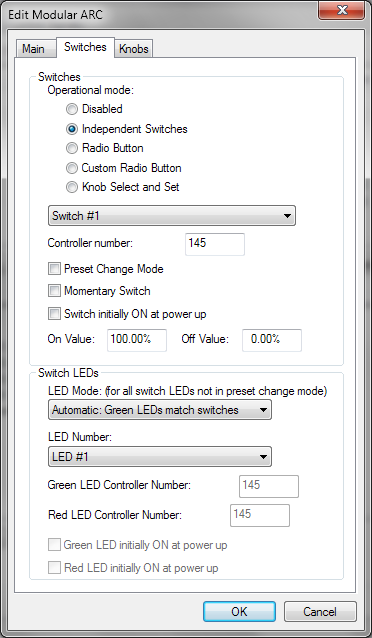
Switches:
- Disabled - Disables all Switches. The LEDs may still be used as indicators in this mode if manually assigned.
- Independent Switches - Allows the programming of each switch individually. Each switch addresses a different Control Number or Preset.
- Radio Button - In this mode, all of the buttons address the same Control Number and only one button may be on at a time. This mode is typically used for source selection.
- Custom Radio Button - This mode operates as a radio button with a single control number allowing custom configuration for the value sent with each position. This is commonly used to provide easy switching from a selection of positions for a slider or knob, for example, setting 4 preset gain positions.
- Knob Select and Set - This mode effectively gives you the same number of virtual knobs as you have switches. The switches operate in a radio button fashion. Selecting switch #1 enables virtual knob #1, selecting switch #2 enables virtual knob #2 and so on. (This option only available for Modular ARCs having a K1e panel.)
- Switch #n Drop Down Menu - Selects the switch currently being edited. There may be up to 16 switches listed here depending upon how many EX4e panels are defined.
- Control number - The Control Number the currently selected switch is addressing. (Changed in the Knobs tab in Knob Select and Set mode.)
- Preset Change Mode - Available in Independent Switches mode, changes the On Value and Off Value fields to On Preset and Off Preset, respectively. Pressing the button (switch on) will recall the On Preset and pressing the button again (switch off) will recall the Off Preset. If Momentary Switch is checked, Off Preset is not available.
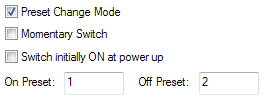 - Momentary Switch - When this is checked the switch will function in a momentary fashion instead of a latched fashion.
- Switch initially ON at power up - Sets the power up state of the switch to on.
- On Value - Determines the value sent to the DSP when the switch is on.
- Off Value - Determines the value sent to the DSP when the switch is off.
- Momentary Switch - When this is checked the switch will function in a momentary fashion instead of a latched fashion.
- Switch initially ON at power up - Sets the power up state of the switch to on.
- On Value - Determines the value sent to the DSP when the switch is on.
- Off Value - Determines the value sent to the DSP when the switch is off.
Switch LEDs:
- LED Mode - Determines the operating mode of the LEDs. Typically the LEDs follow the states of their switches in either green, red, or amber. However, for certain feedback type indications, they can react independently to Control Numbers. A Control Number can be assigned to the red and green LED states separately. Assigning both states to the same Control Number triggers the amber LED state.
- LED Number - Selects the LED currently being edited. There may be up to 16 LEDs listed here depending upon how many EX4e panels are defined.
- Green LED Control Number - Determines the Control Number the green LED state will follow.
- Red LED Control Number - Determines the Control Number the green LED state will follow.
- Green LED initially ON at power up - Sets the power up state of the Green LED.
- Red LED initially ON at power up - Sets the power up state of the Red LED.
Knobs Tab
Modular ARCs may have up to one knob panel (K1e) for a total of up to 2 virtual knobs (A and B).
The Knobs tab programs each of the knobs.
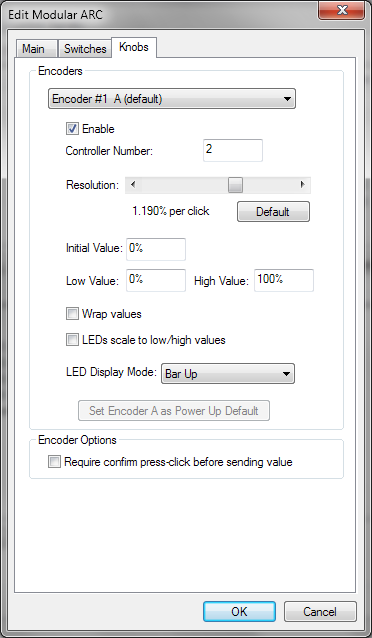
Encoders
- Encoder #n Drop Down Menu - Selects the knob currently being edited. There may be up to 32 knobs listed here depending upon how many EX4e panels are defined in Knob Select and Set mode, but typically there are only two (A and B).
- Enable - Enables the selected knob for use.
- Control number - The Control Number the currently selected knob is addressing.
- Resolution - Sets the amount of adjustment per up or down click. For volumes, typically steps of 1.5 to 3.0 dB per click are pleasing to the ear. You can return the resolution to the default by clicking the Set to Default button.
- Initial Value - Specifies the value (or position) of the knob at power up.
- Low/High Value - Specify an Lower and Upper Limits to restrict the user's range of control.
- Wrap Values - This option determines whether or not the knob wraps "end-to-end" or stops at its first or last items/values. You would typically want this disabled for a volume control.
- LEDs scale to low/high vales - This option determines whether or not the LED ladder scales to that the Low Value is at the minimum of the LED ladder and the High Value is at the maximum of the LED ladder or if the LED ladder displays absolute values.
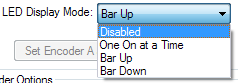
- LED Display Mode - Determines the LED ladder display mode:
 - Set Encoder #n as Power Up Default - Sets the currently selected knob as the default selection upon power up.
- Require confirm press-click before sending value - When this option is checked, adjusted values will not be sent to the system and take affect until the knob is pushed (center click). This is typically used for source selections and presets.
- Set Encoder #n as Power Up Default - Sets the currently selected knob as the default selection upon power up.
- Require confirm press-click before sending value - When this option is checked, adjusted values will not be sent to the system and take affect until the knob is pushed (center click). This is typically used for source selections and presets.