Gain-Sharing Automixer
Stand-alone Operation (Master Automixer Only)
Symetrix offers two types of gain-sharing automixers: master and slave. This distinction is only relevant when linking multiple automixers together to create a single larger mixer. If a simple stand-alone automixer is all that is required, use a master auto-mix module. You are given a choice of 4, 8, or 16 inputs. To conserve DSP processing, use the smallest mixer that meets your needs.
Module Inputs/Outputs
Automixers have inputs for each channel. Each channel also has a direct out that is affected by the automatic gain, channel fader and channel mute (i.e. it is post auto-gain, post fader, and post mute). There is also a mix output that is the sum of all the direct outputs. The other inputs and outputs are only used during linked operation and will be discussed below.
Channel controls
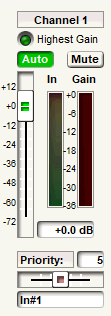 The channel mute is pre auto-gain. That is, turning Mute on removes the effect of that channel on the gain of the other channels. It mutes the channel in the mix and also mutes its direct out. The channel fader is post auto-gain. Changing its level controls the mix level and direct output level for the channel, but does not affect the automixer algorithm. The channel level can also be precisely controlled by clicking in the text box and entering a dB value.
The priority control affects the automix algorithm by allowing higher-priority channels to over-ride lower ones.
This control can take an while number value between 0 (lowest priority) and 10 (highest priority) with 5 (standard priority) as the default. You may adjust the priority either using the slider control, or by clicking in the edit box and entering a while number between 0 and 10. Increasing the value increased the priority.
If two channels are receiving signals with equal levels, the one with the higher priority will receive more gain. For every difference of one priority "unit" between channels, the higher priority channel receives 2dB more gain than the lower (assuming slope is set to 2.0). For example, if channel one's priority is set to 6 and the channel two's priority is set to 3 and both are receiving input signals at the same level, channel one will receive 6dB more gain than channel two. As implied above, the Slope setting also affects the priority weighting. If the slope is set to 3.0, then each priority unit difference between results in a 4dB gain difference. If all channels are of equal priority, leave all priorities set to 5.
NOTE: In some set-ups, care must be exercised when using extreme priority differences between channels, such as 0 and 10. If the channel with the very high priority is picking up significant signal from loudspeakers, background noise, etc. it may tend to "duck" the low priority channels even when not in use. Higher slope values can further increase this problem. If this happens in your installation, consider adding a noise gate, or expander before the automixer on the highest priority channels. Set the threshold to a level so that the gate or expander isn't opened by background noise, or loudspeaker pickup.
At the bottom of each channel control group, a space is provided to name the channel. If desired, click in the text box and type in a name.
Channel indicators
The "Highest Gain" virtual LED indicator lights on the channel strip for the channel which has the highest gain in the Automixer algorithm. The highest gain is determined by the following rules; If a channel is in Auto mode, the auto-gain is used, if a channel si not in Auto mode, the fader gain is used.
Each channel has (2) meters. The tricolor "In" meter indicates the level of the input signal. The meter is pre-fader and pre-auto-gain. The red "Gain" meter shows the auto-gain of that channel. It does include the settings of the channel fader. If the channel is not in Auto mode, this meter will indicate 0dB.
Master controls
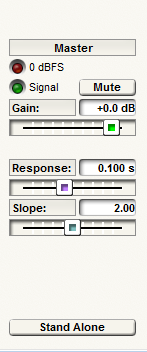 The Master section of the gain-sharing automixer module includes master gain and mute settings. These effect only the mixer output, not the channel direct outputs. The "Signal" (signal present) and "0dBFS" virtual LEDs indicate the level of the mix output.
The response time slider adjusts the speed by which the mixer changes it automatic gain. Fast times ensure that beginnings of words are not clipped. Slower times result in smoother, less obtrusive operation. We have found that values between .1 an 1 second work best. The automatic gain operation is designed so that it turns on a microphone much faster than it turns off. So, even with a .100 second response, beginnings of words are not usually clipped. With slow times of several seconds, the automixer responds as if it has a hold time, with the last active channel remaining on for several seconds.
The slope control affects the attenuation of lower-level inputs. Higher values cause softer channels to be attenuated more than lower values do. The slope control functions similarly to the ratio control on an expander. It is recommended that this control be left at or near 2.0. Setting it to 1.0 is equivalent to turning Auto off of all channels. Setting it to 3.0 results in more aggressive automatic gain adjustments that may sound unnatural. Higher settings also result in more over-all attenuation as more channels are open (effectively NOM attenuation). A value of 2.0 results in mathematically ideal gain sharing, which is why it is preferred.
The Stand Alone button controls whether a mixer acts independently, or based on control signals from other automixers (linked). For basic stand-alone operation, this button should be turned on. For linked operation, this button should be turned off.
Voice Band Filters
The automixer is equipped with a voice band filter on each channel. The filter affects only the control chain, not the audio signal path. The filter is a 4th order band pass with 300-3k Hz bandwidth. This helps to prevent rumble, hiss and other non-speech sounds from influencing the automixer. The operation of these filters is transparent to the user.
Linked Operation
Individual automixers can be linked together to form larger auto-mixers. In this way, large automixing systems can be constructed modularly. There are two ways of linking automixer modules; by daisy chaining, or by using automix combiner modules.
Linking by Daisy Chaining
To link multiple automixers together without using any extra modules, you must designate one automixer to be the master and the other(s) as slaves. Use a Master Automixer for the master and Slave Automixers for the slaves. You can control whether the mixers function independently, or as one by using the Stand Alone button. For linked operation, turn the Stand Alone button off for all linked automixers.
Connect the Master output off the master module to each of the slave's Master inputs. Connect the "Chain" output in a daisy chain starting with the first slave and ending with the master. If you are using the mix outputs, connect the Mix output to the Mix In input in a daisy chain, starting with the master and ending with the last slave. The complete mix out will be available from the Mix output of the last slave. (The mix daisy chain is only required if you are using the mixed outputs. It is not required for linked automixer operation.)
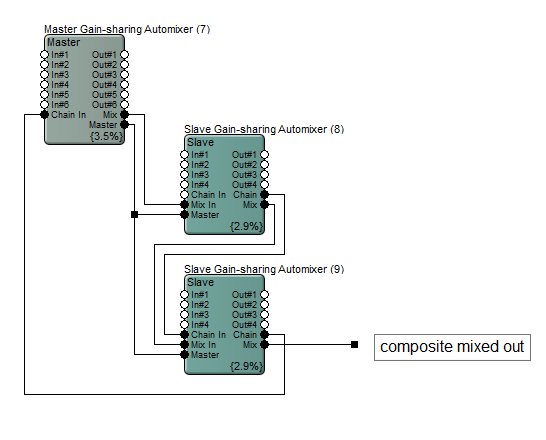
NOTE: The Chain and Master signals are control signals and are not intended to be listened to. Do not route these to your speaker system!
NOTE: For proper operation, all linked automixers must be set for the same response time and slope.
Linking using Automix Combiners
For applications that require dynamic switching of mixers between stand alone and linked, this method is recommended. For detailed instructions on this method, see the section on Room Combiners.
Suggestions for Implementation
Mix Dynamic Control
In some applications, it may be helpful to control the dynamics of the mixed output. Placing a compressor, or AGC (Automatic Gain Control) on the automixer's mix output may help maintain consistent levels. In other environments where the noise floor may have risen due to automixing, a noise gate, or expander on the output may be appropriate.
"Mix Minus" Applications
In sites that employ multiple speaker zones, it is very helpful to off, or down the microphones in the loudspeakers that the mics are physically near. This can greatly increase gain before feedback and allow higher overall levels without howling, or ringing. A traditional way to do this is to implement a "mix minus" approach, where each loudspeaker zone receives the entire mix, minus the microphone(s) that are close to it. This was often done by adding an out-of-polarity duplicate of the input to the mix. While you could set up a polarity swap in Composer, a much more reliable and flexible approach is to use a matrix mixer. This allows you to control the level of each channel as well as it's assignment independently in each output zone.