Network I/O Modules¶
The following are step-by-step instructions on creating Dante subscriptions using Composer 6.0 and later versions that have updated Network I/O Modules (formerly Dante Transmit and Receive Flows). AES67 support has also been added to the network audio capabilities.
These modules are only available for products with Dante or a Dante Card installed.
§ Symetrix Dante-enabled Analog I/O Expander
§ Supported Third-party Dante Devices
§ Generic Third-party Dante Devices
o Assign a Transmit Bus to a Symetrix Dante-enabled DSP
o Symetrix Dante-enabled Analog I/O Expander
o Assign a Transmit Bus to Third-party Dante Devices
o Assign a Transmit Bus to Generic Third-party Devices
Receive Buses¶
Symetrix Dante-enabled Analog I/O Expander¶
Here are instructions for creating Dante receive channels from a Symetrix Dante-enabled Analog I/O Expander:
(This example uses a Radius AEC and an xIn 4)
1. From the Toolkit add a Radius AEC and xIn 4 to the Site View page.
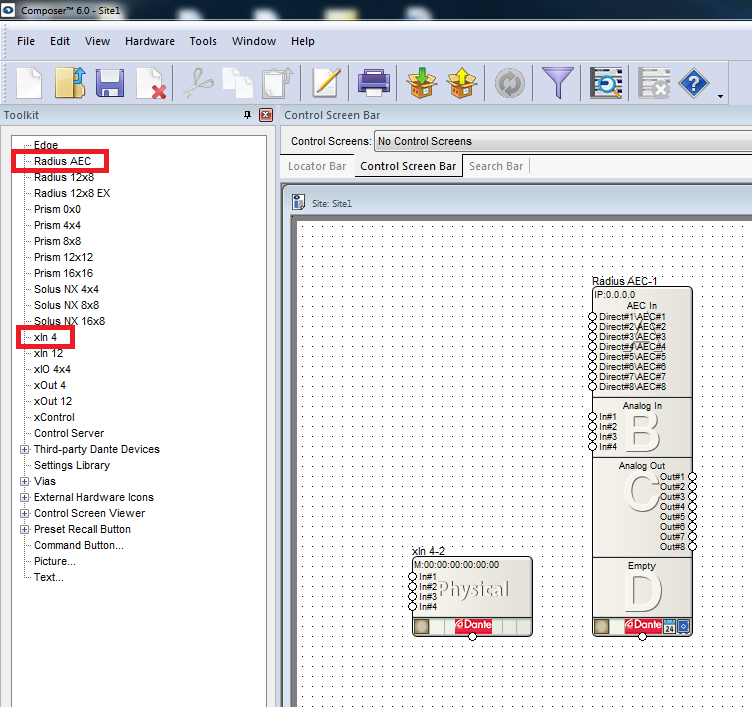
2. Open the Design View page by double-clicking the Radius AEC.
3. From the Toolkit, expand Network I/O Modules and then expand Receive Modules.
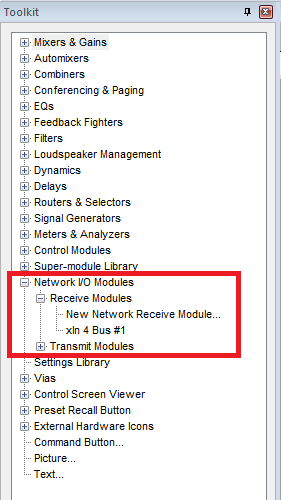
4. xIn 4 Bus #1 is automatically created and available. Add xIn 4 Bus #1 to the Design View page.
Note: Whenever a Symetrix Dante-enabled Analog I/O Expander, third-party Dante device, or transmit bus are added to a site file, a receive bus is automatically created and available from the Toolkit.
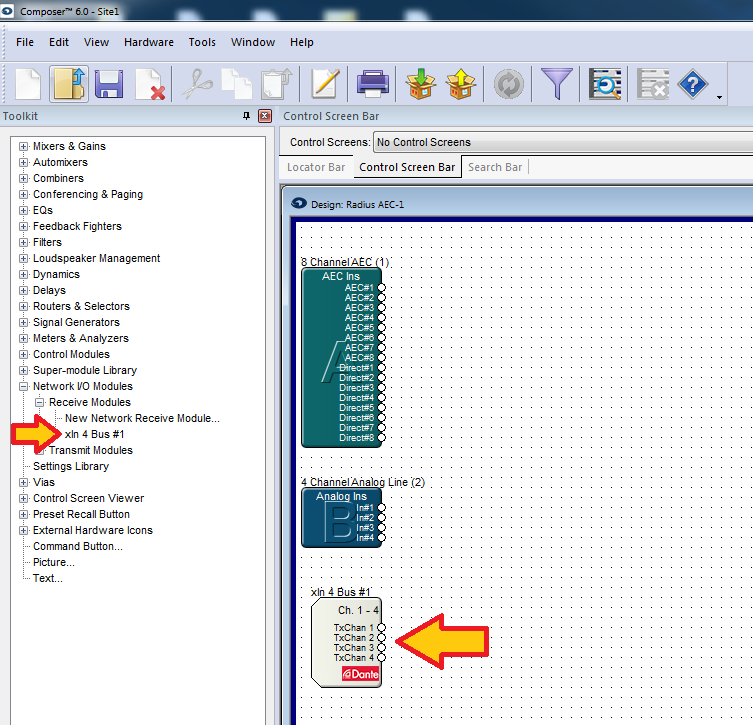
5. Push the site file and Composer will make the Dante subscriptions for these channels.
Supported Third-party Dante Devices¶
Symetrix Composer contains a list of supported third-party Dante devices.
Device List¶
Here are instructions for creating Dante receive channels from a third-party supported Dante device available in the Composer Toolkit:
(This example uses a Radius AEC and Audio-Technica ATND971)
1. From the Toolkit add a Radius AEC to the Site View page.
2. Next from the Toolkit, expand Third-party Dante Devices.
3. Expand Audio-Technica and add an ATND971 to the Site View page.
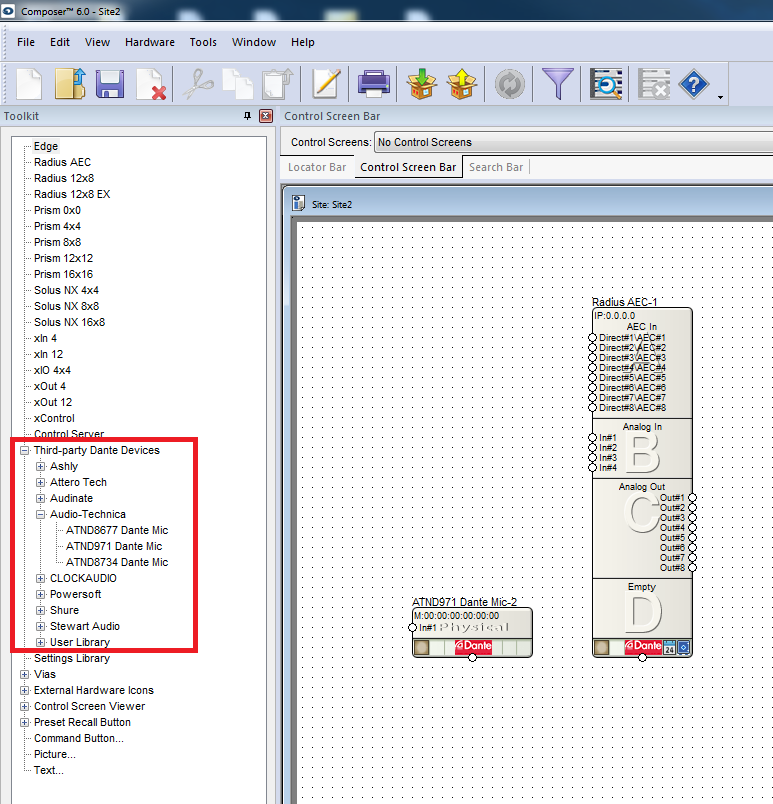
4. Open the Design View page by double-clicking the Radius AEC.
5. From the Toolkit expand Network I/O Modules and then expand Receive Modules.
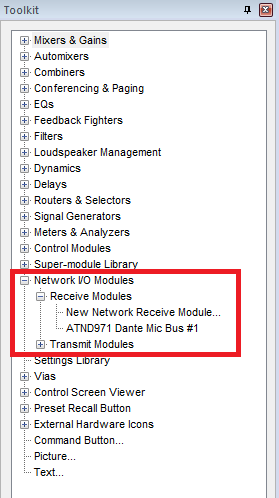
6. ATND971 Dante Mic Bus #1 is automatically created and available, add ATND971 Dante Mic Bus #1 to the Design View page.
Note: Whenever a Symetrix Dante-enabled Analog I/O Expander, third-party Dante device, or transmit bus are added to a site file, a receive bus is automatically created, and available from the Toolkit.
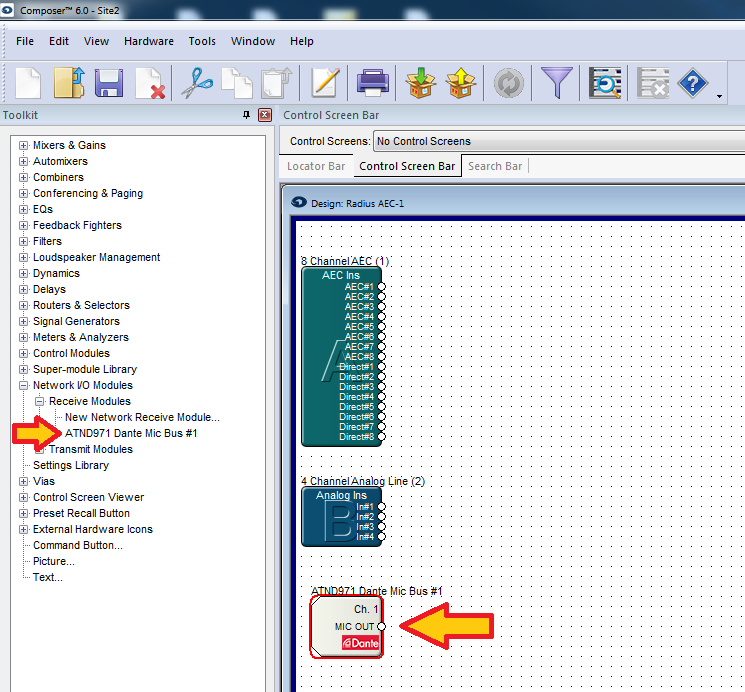
7. Push the site file and Composer will make the Dante subscription.
User Library¶
Symetrix Composer contains a list of supported third-party Dante devices. Among this list is the User Library. Any Dante device can be added to the User Library. Once added to the library, these devices are available to add to any site file.
Here are instructions for creating Dante receive channels from any Dante device using the User Library available in the Composer Toolkit under Third-party Dante Devices:
(This example uses a Radius AEC and a Windows PC running Dante Via)
1. From the Toolkit add a Radius AEC to the Site View page.
2. Next from the Toolkit, expand Third-party Dante Devices.
3. Expand the User Library and Add New Dante Device to the Site View page.
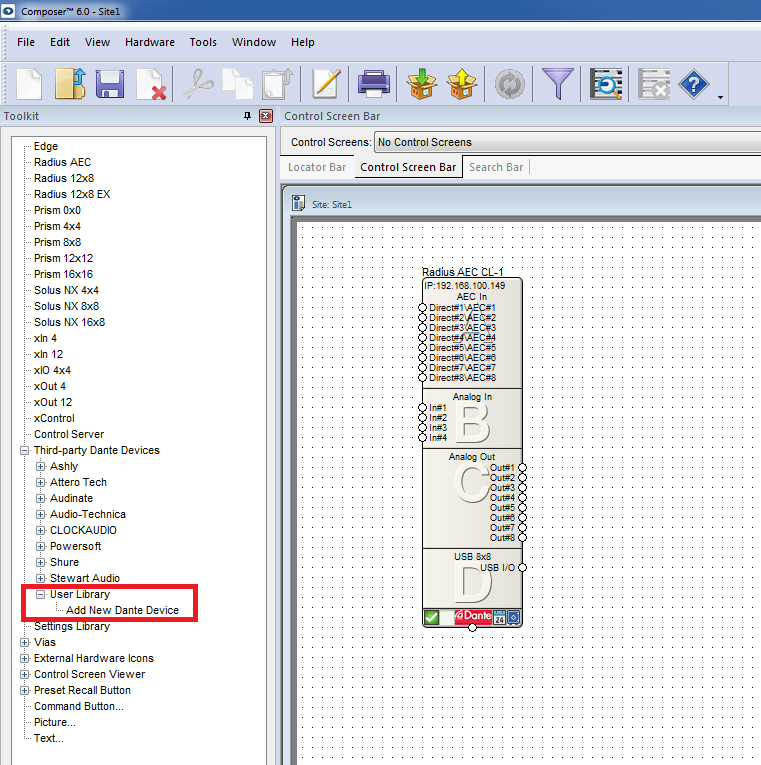
4. The Dante Device User Library Manager window will open.
5. Click the “Browse Network” button.
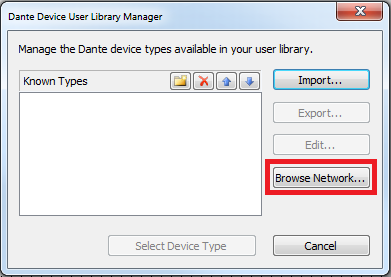
6. The Locate Hardware window will open and display all available Dante devices on that network.
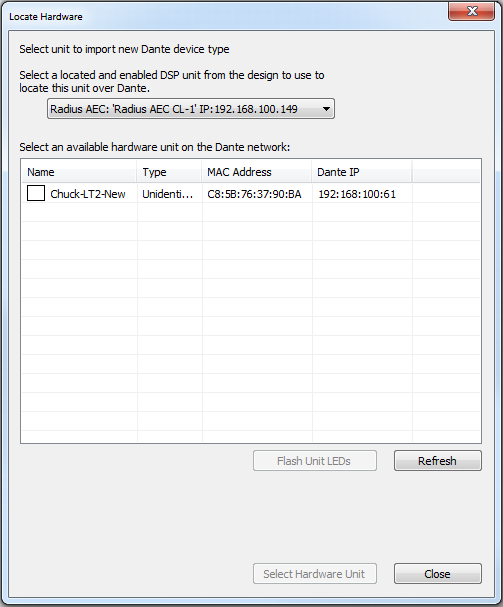
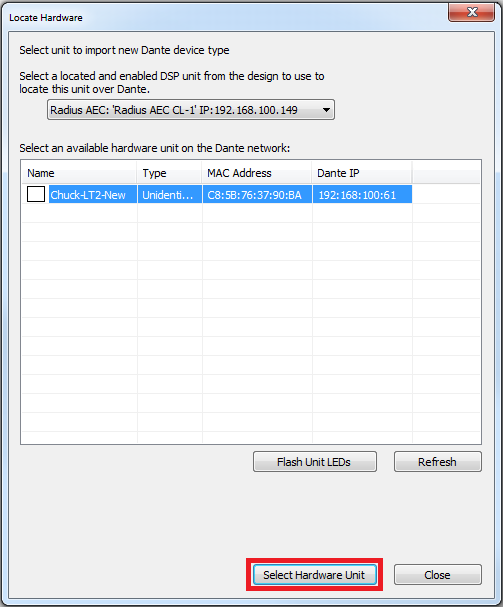
7. Select the desired Dante device, then click the “Select Hardware Unit” button.
8. The Dante Device User Library Manager will now list that Dante device. Select the desired Dante device and click the “Select Device Type” button. This will add the device to the site view page.
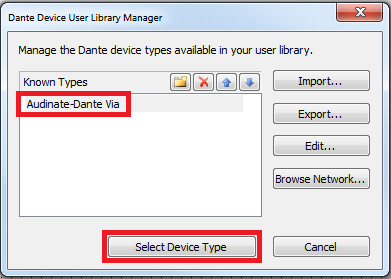
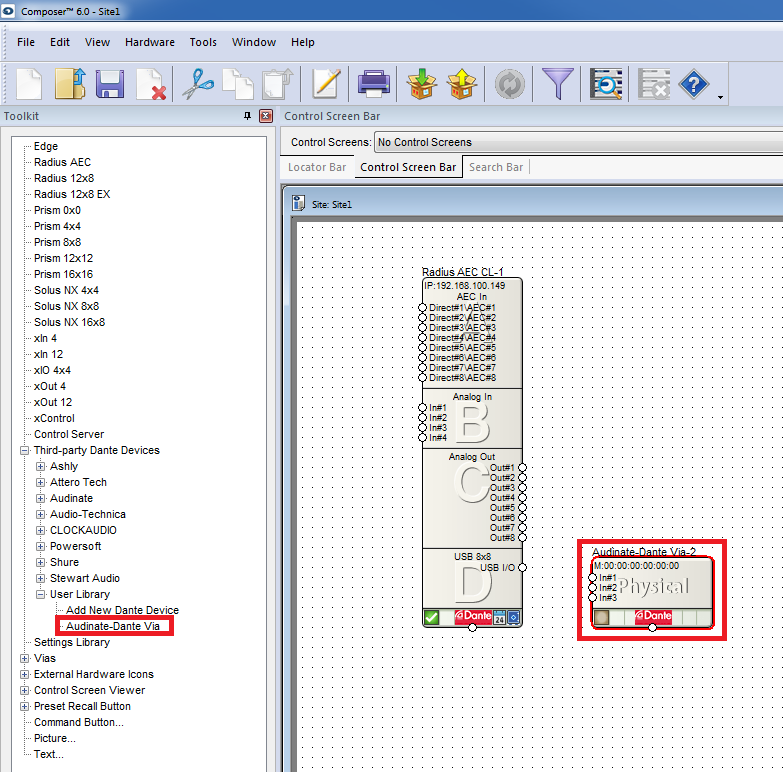
9. Once added to the library these devices are available to add to any site file.
10. Open the Design View page by double-clicking the Radius AEC.
11. From the Toolkit expand Network I/O Modules and then expand Receive Modules.
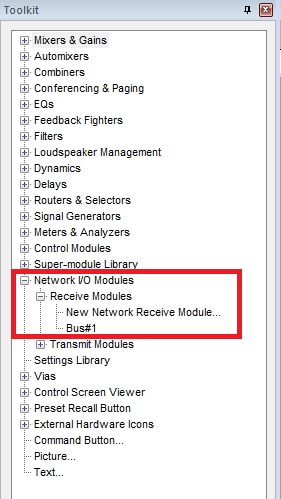
12. Bus#1 is automatically created and available, add it to the Design View page.
Note: Whenever a Symetrix Dante-enabled Analog I/O Expander, third-party Dante device, or transmit bus are added to a site file, a receive bus is automatically created, and available from the Toolkit.
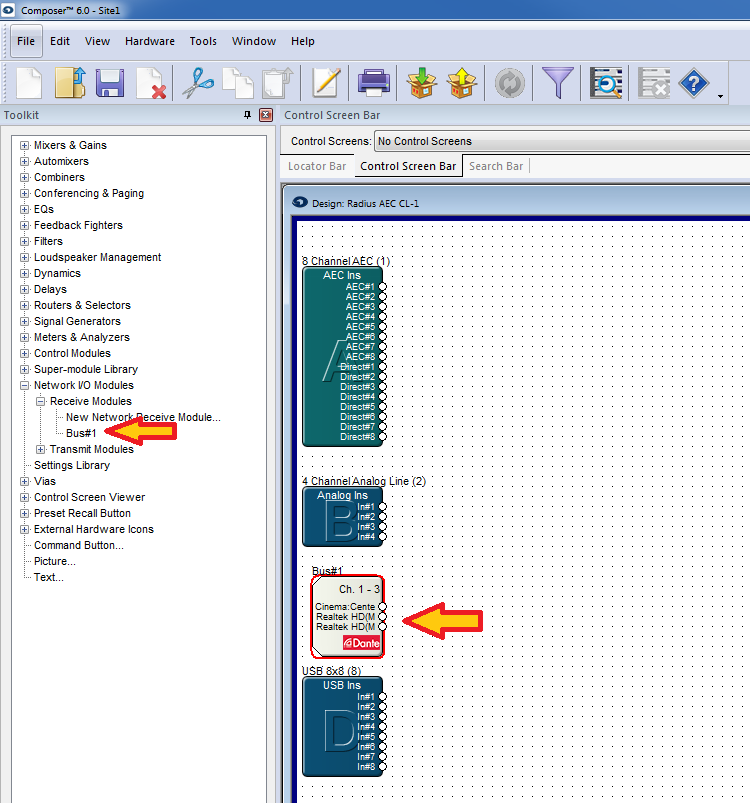
13. Push the site file and Composer will make the Dante subscriptions.
For more information about adding devices to the Third-party Dante Device User Library, click here.
Generic Third-party Dante Devices¶
Generic third-party Dante devices are devices that are not manufactured by Symetrix, or found in the third-party supported device list. There are two different ways to create Network Receive Buses for these Dante devices.
Here are instructions for creating Dante receive buses from a generic third-party Dante device, using the generic Network Receive Modules:
(This example uses a Radius 12x8 and MacBook Pro running DVS (Dante Virtual Soundcard))
1. From the Toolkit add a Radius 12x8 to the Site View page.
2. Open the Design View page by double-clicking the Radius 12x8.
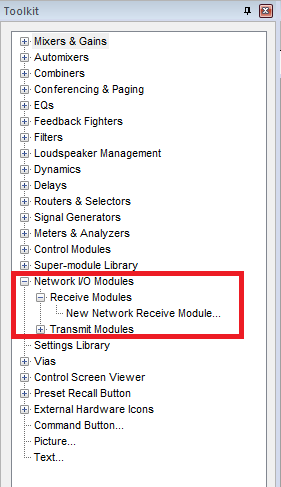
3. From the Toolkit expand Network I/O Modules and then expand Receive Modules.
4. Double-click or drag in a New Network Receive Module.
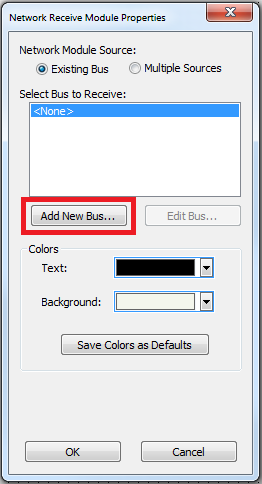
5. The Network Receive Module Properties window will open automatically. Click the button to “Add New Bus”.
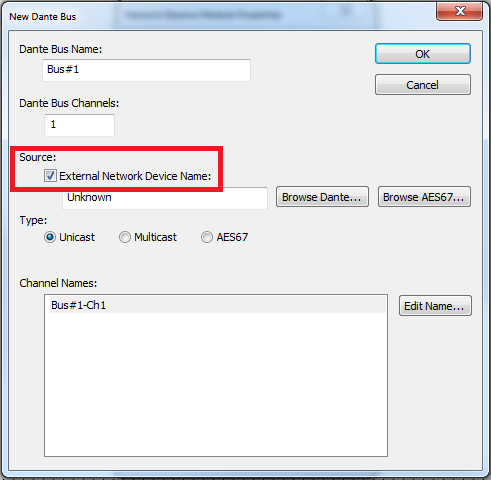
6. The New Dante Bus window will open. Select the box for “External Network Device Name”.
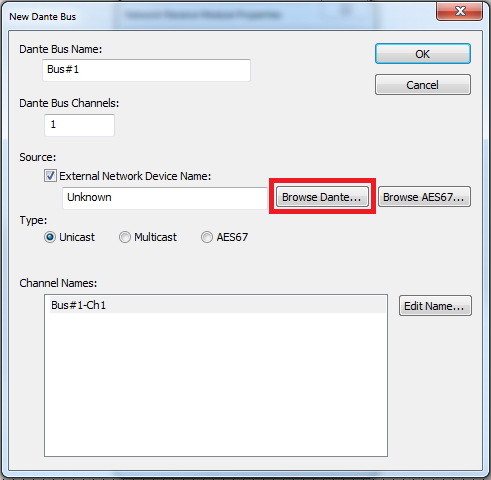
7. Click the “Browse Dante” button.
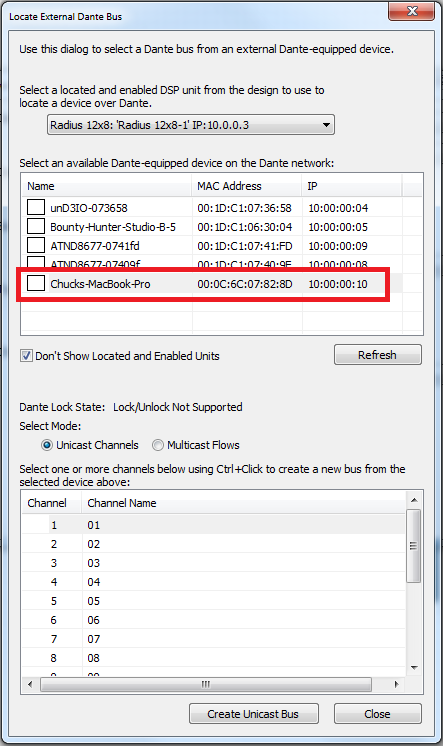
8. Select the desired Dante-equipped device, available from the Dante network.
9. Next select the desired channel or channels to create the new bus from.
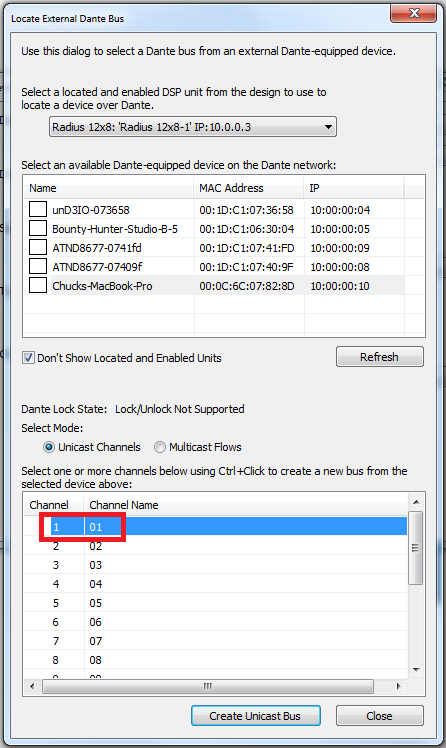
10. Click the “Create Unicast Bus” button.
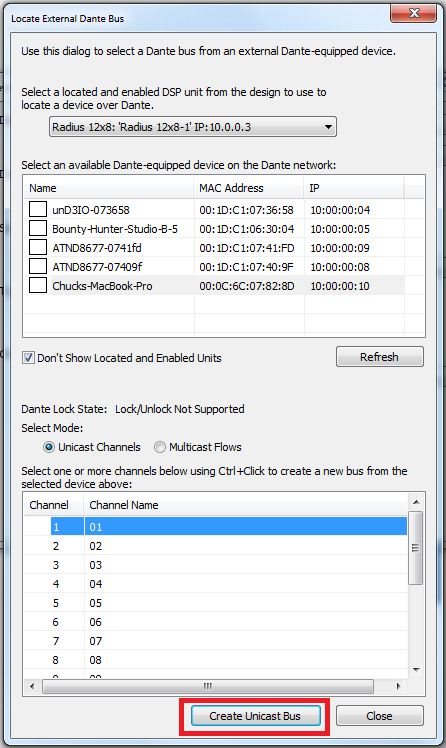
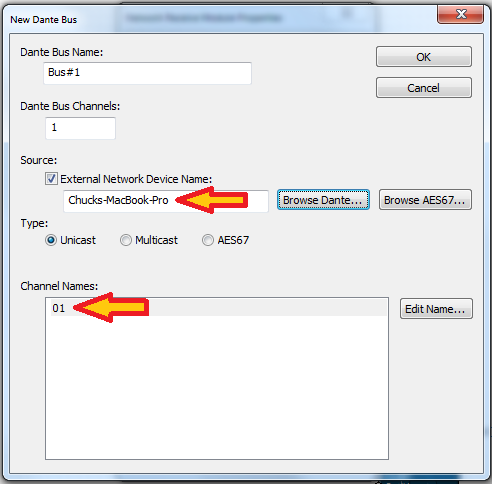
11. The new Dante bus has now been updated with the device network name and channel name(s) being received. Click Ok. The new receive bus has now been created.
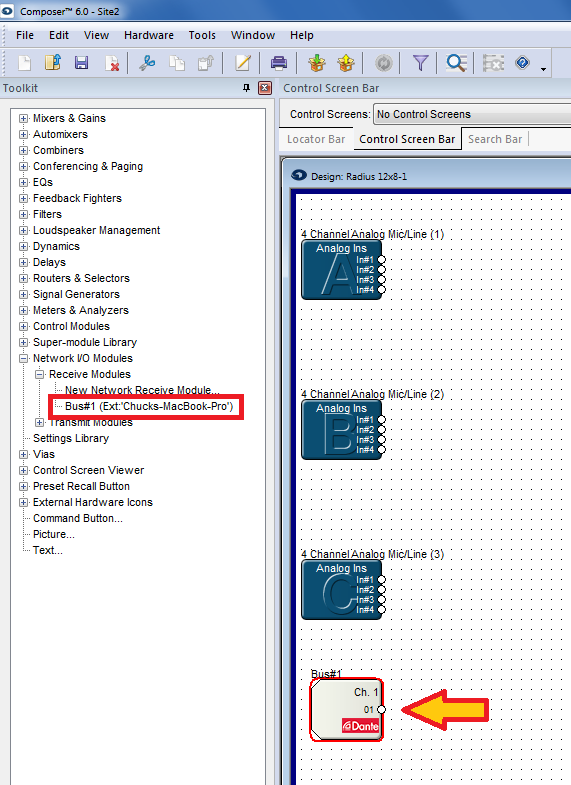
12. Push the site file and Composer will make the Dante subscriptions.
AES67 Stream¶
The AES67 standard provides interoperability between different forms of AoIP (Audio over IP).
Here are instructions for creating AES67 receive buses, using the generic Network Receive Modules:
(This example uses a Radius AEC and QSC Q-SYS Core 250i)
1. From the Toolkit add a Radius AEC to the Site View page.
2. Open the Design View page by double-clicking the Radius AEC.
3. From the Toolkit expand Network I/O Modules and then expand Receive Modules.
4. Double-click or drag in a New Network Receive Module.
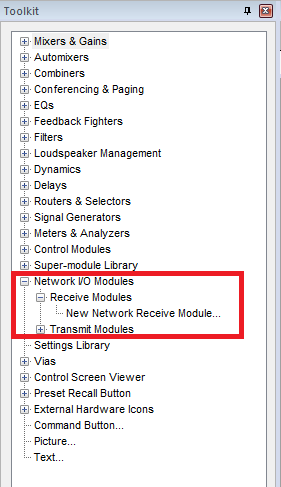
5. The Network Receive Module Properties window will open automatically. Click the button to “Add New Bus”.
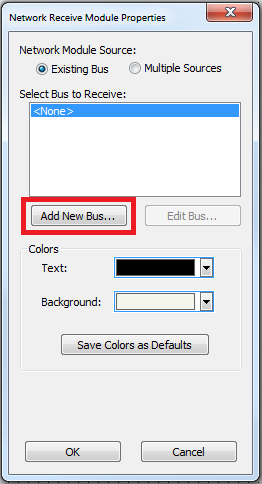
6. The New Dante Bus window will open. Select the box for “External Network Device Name”.
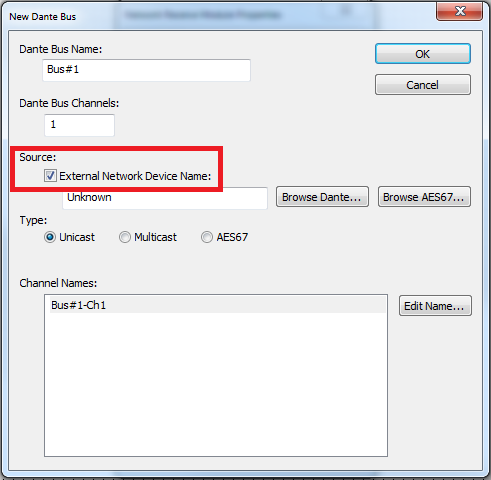
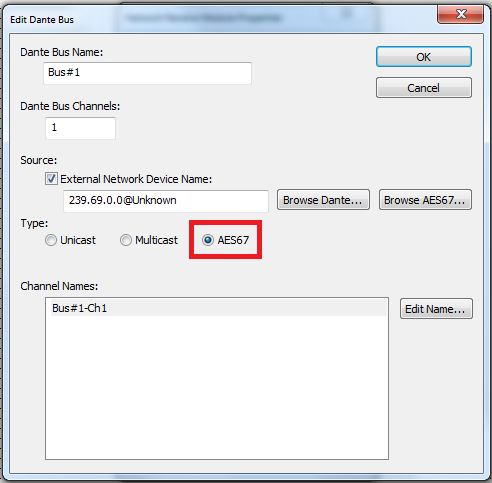
7. Change the type to AES67.
8. Click the “Browse AES67” button.
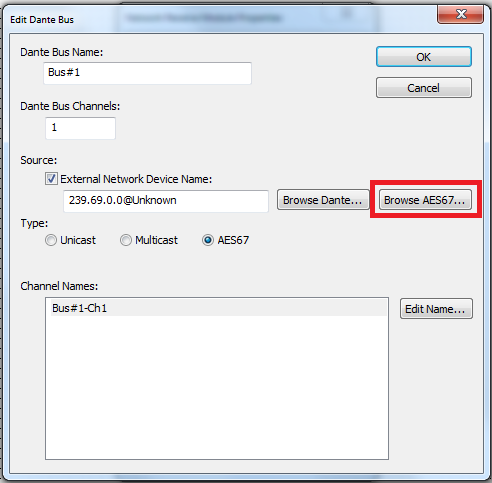
9. Select the desired AES67 multicast stream from the list.
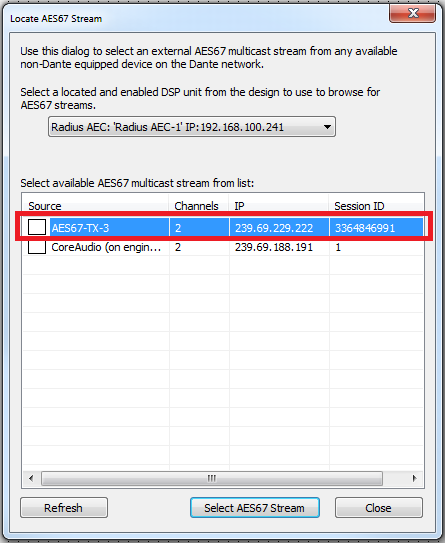
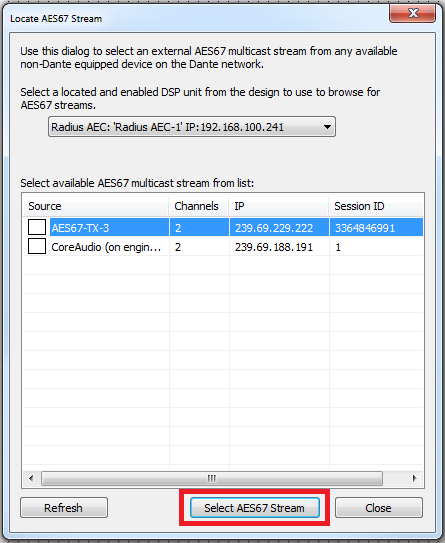
10. Click the “Select AES67 Stream” button.
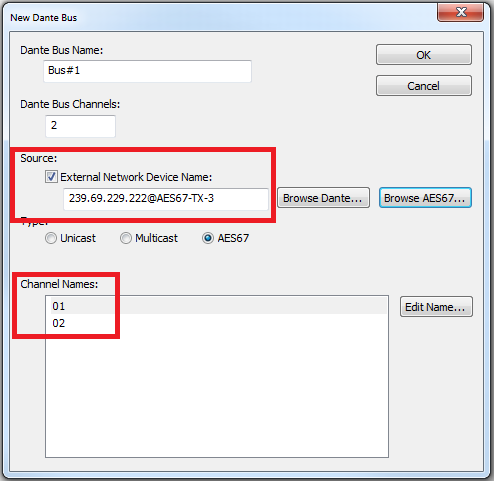
11. The New Dante Bus window is now updated with the AES67 stream information (device network name and channel names). Click OK.
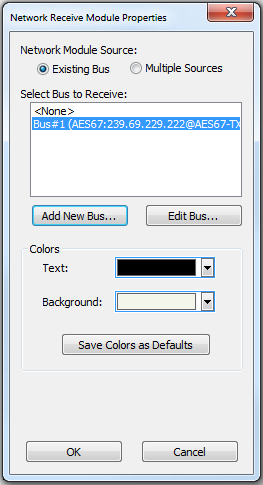
12. The new AES67 receive bus is available in the Network Receive Module Properties window.
13. Click Ok. The new receive bus has now been created.
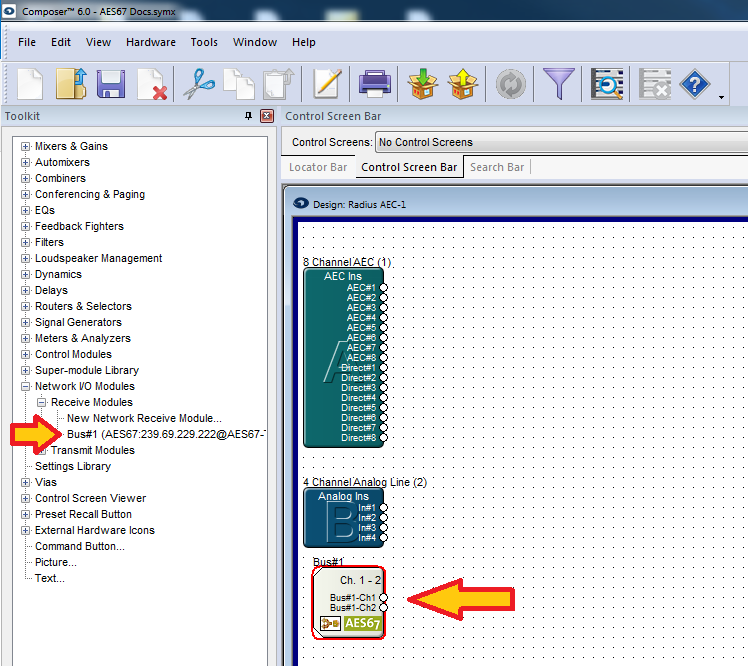
14. Push the site file and Composer will make the AES67 to Dante subscriptions.
Transmit Buses¶
The initial steps when creating transmit buses are the same, regardless of what device audio is being transmit to.
Creating a Transmit Bus¶
Here are the steps to create a transmit bus:
1. Open the site file to the Design View page.
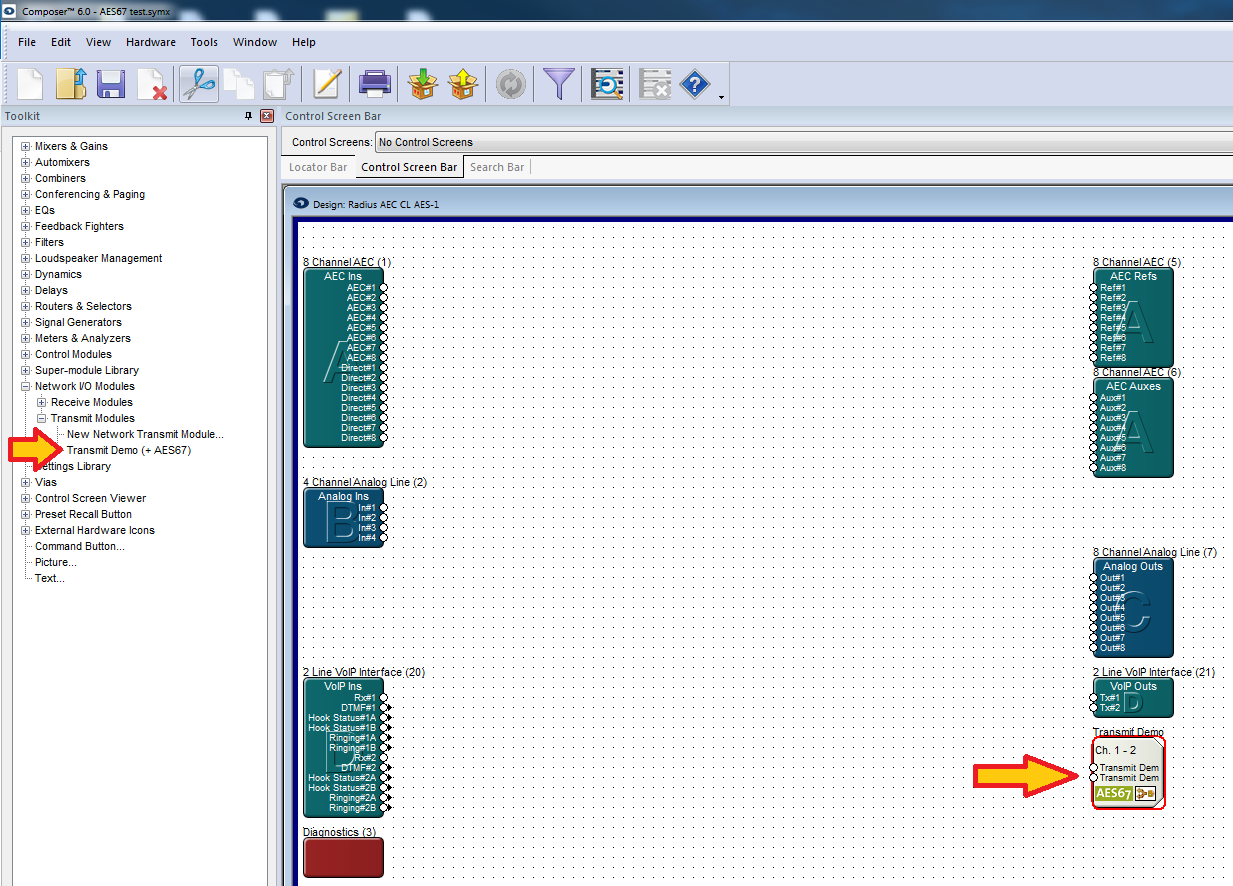
2. From the Toolkit expand Network I/O Modules and then expand Transmit Modules.
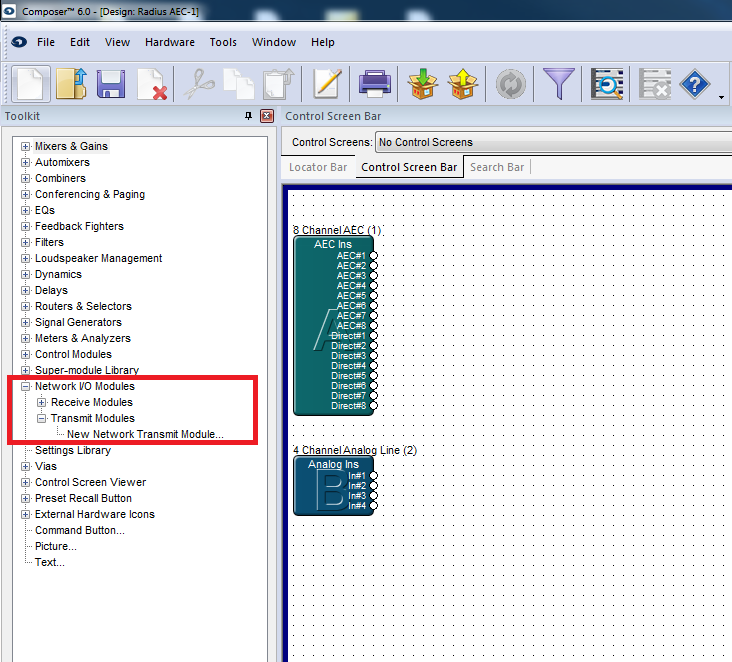
3. Add a New Network Transmit Module. The Network Transmit Module Properties window will open.
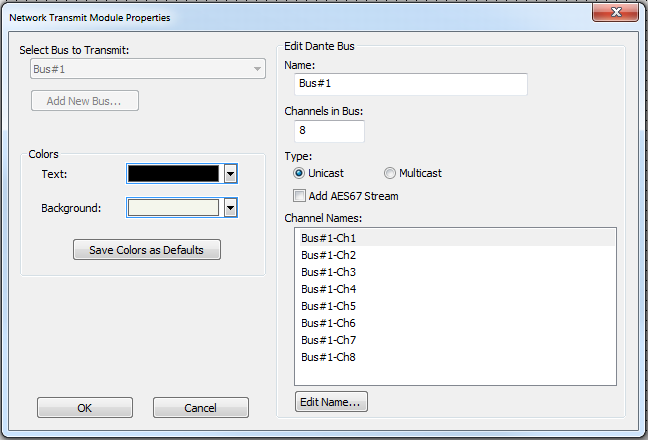
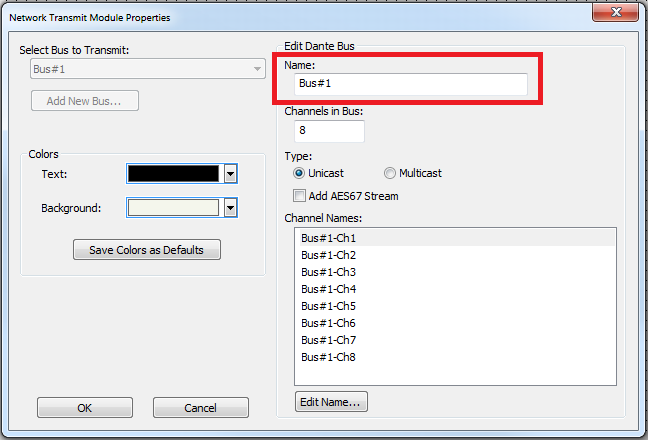
4. Edit the name of the transmit bus.
5. Select the number of channels (up to 64 channels) in the transmit bus.
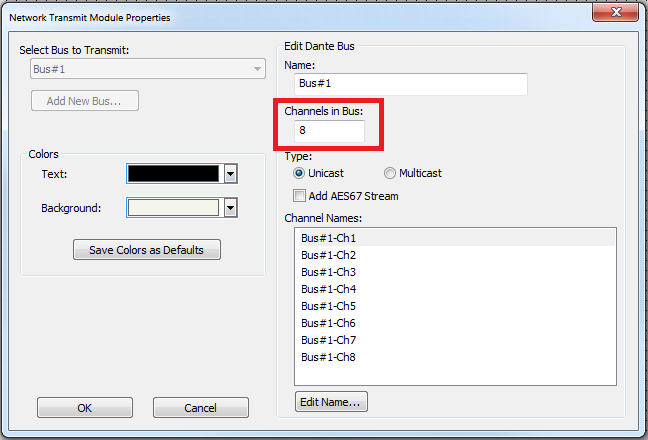
6. Select the transmit bus type.
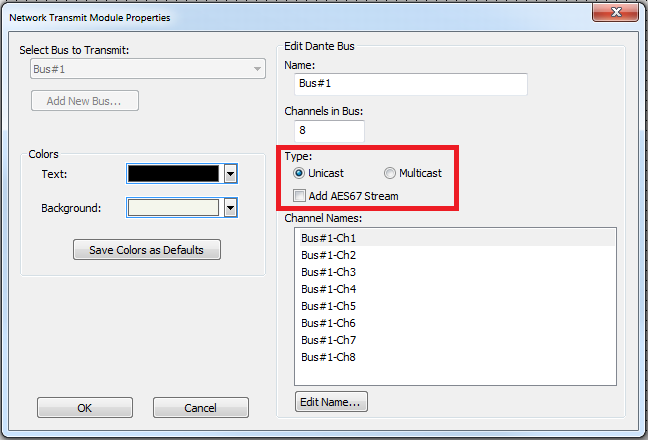
7. Name the individual transmit channels.
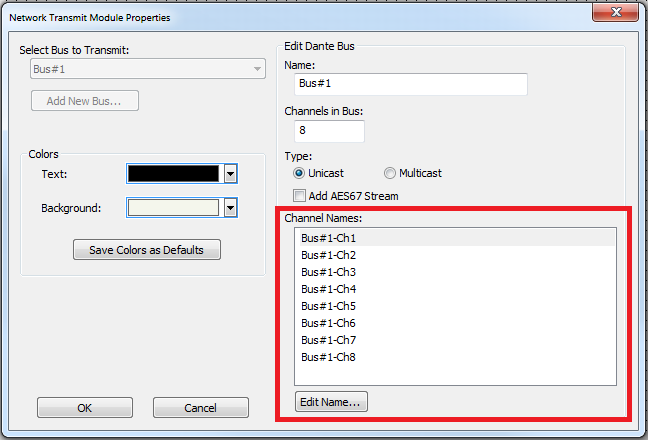
8. Click OK and the transmit bus will be added to the site file.
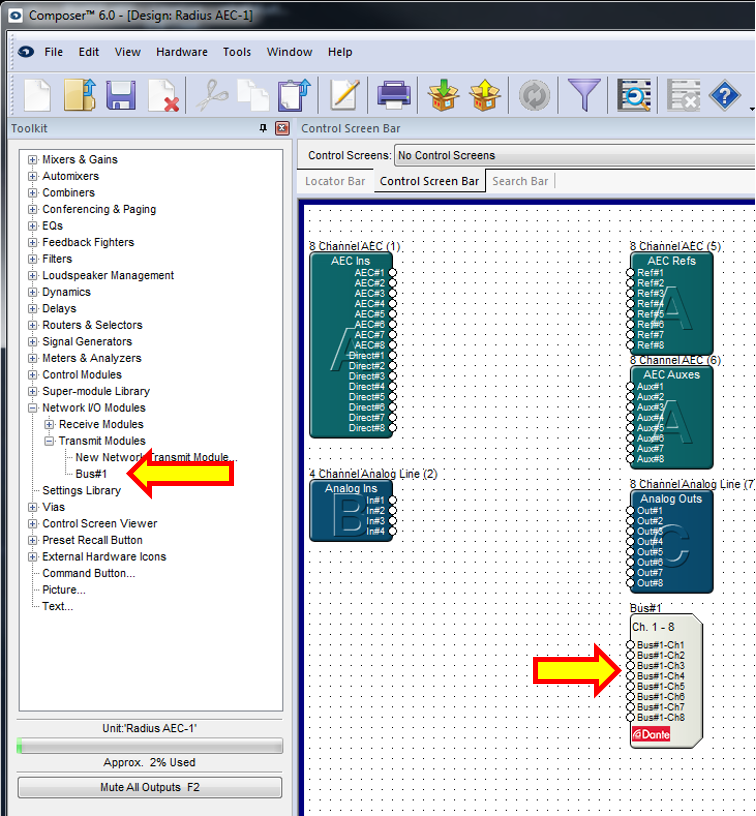
Assign a Transmit Bus to a Symetrix Dante-enabled DSP¶
Here are instructions for assigning a Transmit Bus to a Symetrix Dante-enabled DSP:
(In this example, audio is transmitted from a Radius AEC to a Prism 8x8 using the transmit bus from the Creating a Transmit Bus section)
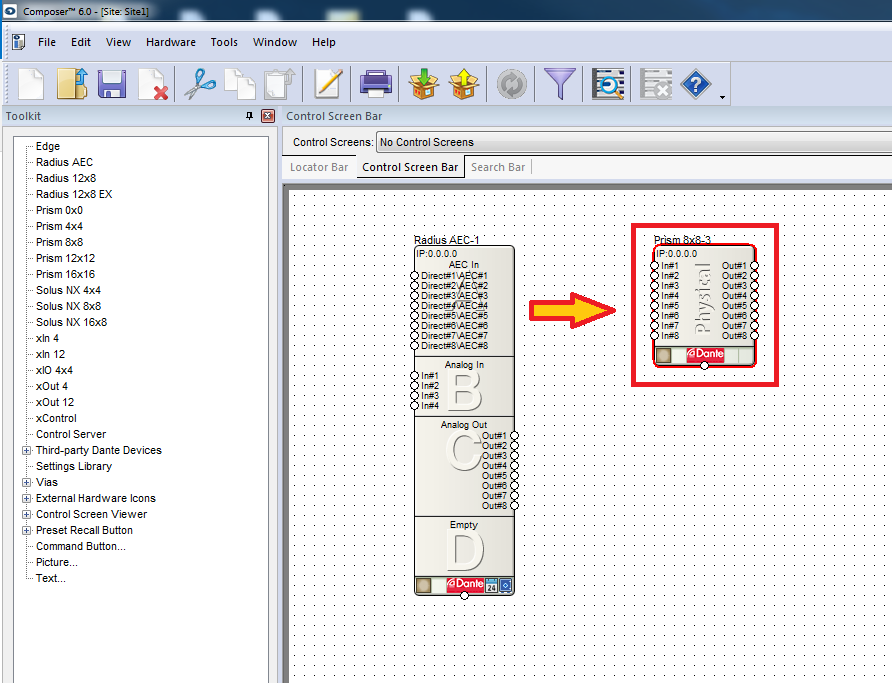
1. Double-click and open the Design View of the DSP to receive the audio from the transmit bus.
2. From the Toolkit expand Network I/O Modules and then expand Receive Modules.
3. Notice the receive module for the transmit bus named “Transmit Demo” is automatically available.
Note: When a transmit bus is created in Composer, its corresponding receive module will be automatically created. This receive module may be used in any DSP contained within that site file.
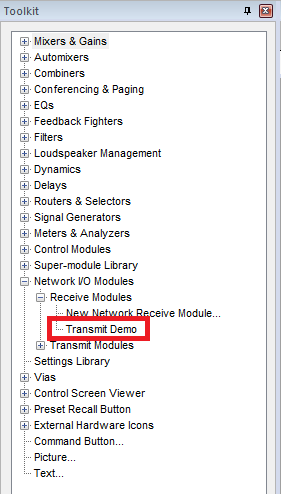
4. Add the receive module to the Design View page of the DSP.
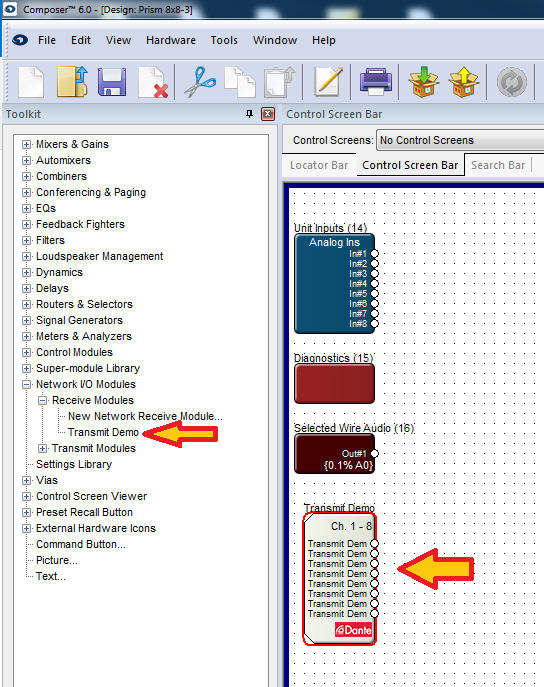
5. Push the site file and Composer will make the Dante subscriptions.
Symetrix Dante-enabled Analog I/O Expander¶
Here are instructions for assigning a Transmit Bus to a Symetrix Dante-enabled Analog I/O Expander:
(In this example, audio is transmitted from a Radius AEC to an xOut 4 using the transmit bus from the Creating a Transmit Bus section)
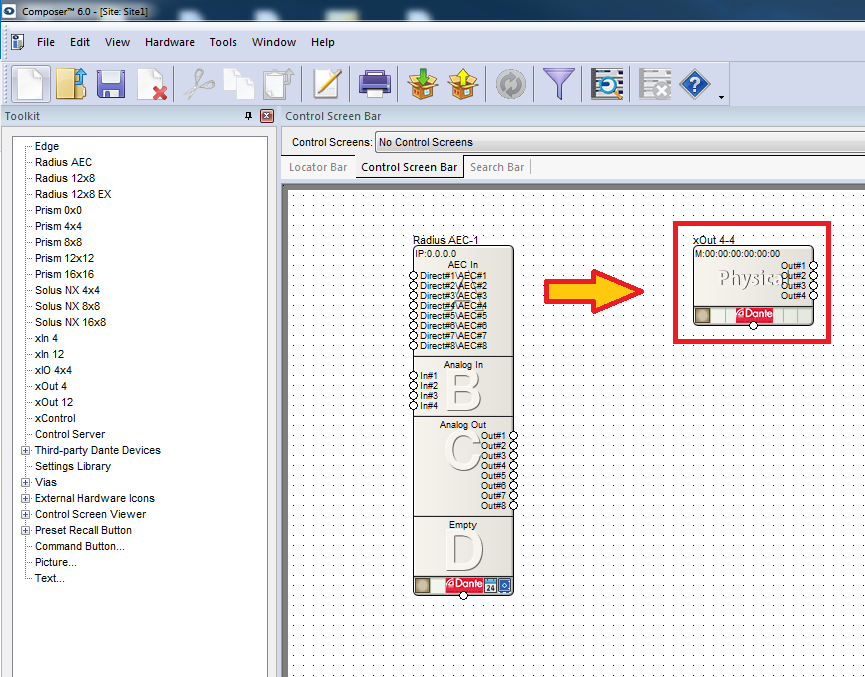
1. Right-click the Symetrix Dante-enabled Analog I/O Expander and select Unit Properties.
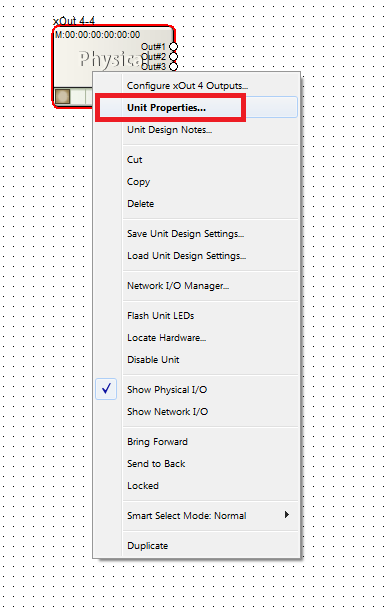
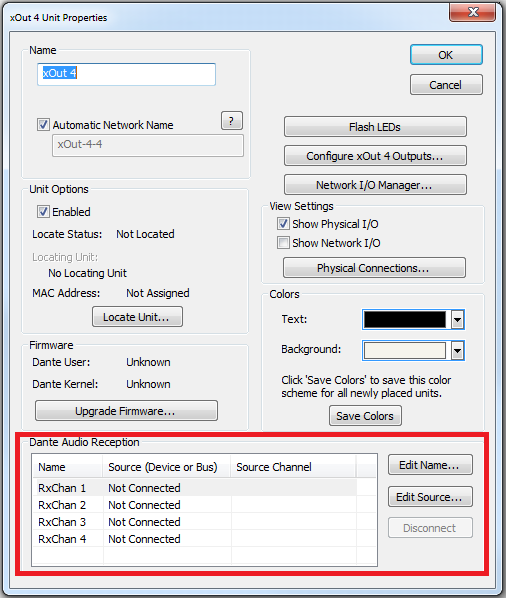
2. From the Unit Properties window, either double-click the first channel in the Dante Audio Reception section or select the first channel and click the “Edit Source” button.
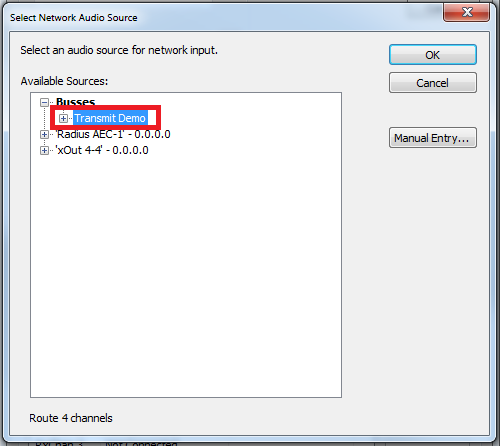
3. From the Select Network Audio Source window, select the desired transmit bus.
4. Click OK. The Unit Properties window is now updated with the transmit bus and channel information.
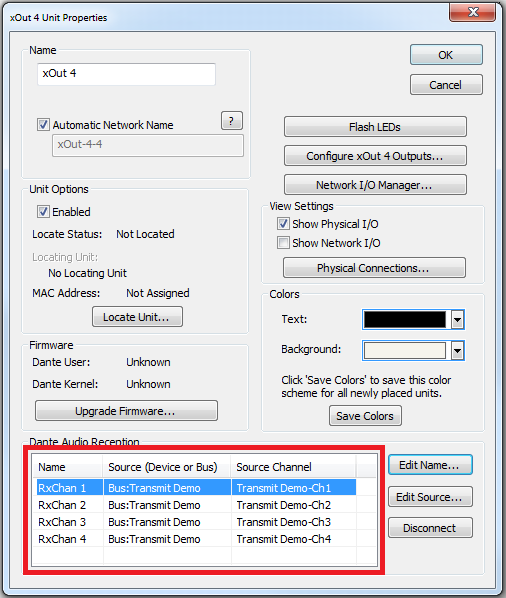
5. Click OK.
6. Push the site file and Composer will make the Dante subscriptions.
Assign a Transmit Bus to Third-party Dante Devices¶
The process to assign a Transmit Bus or channel to a third-party Dante device (Device List and/or User Library) is the same as assigning them to a Symetrix Dante-enabled Analog I/O Expander.
Here are instructions for assigning a Transmit Bus to a third-party Dante device that is located in the Device List or User Library:
(In this example, audio is transmitted from a Radius AEC to an Ashley 8 channel Dante amplifier, using the transmit bus from the Creating a Transmit Bus section)
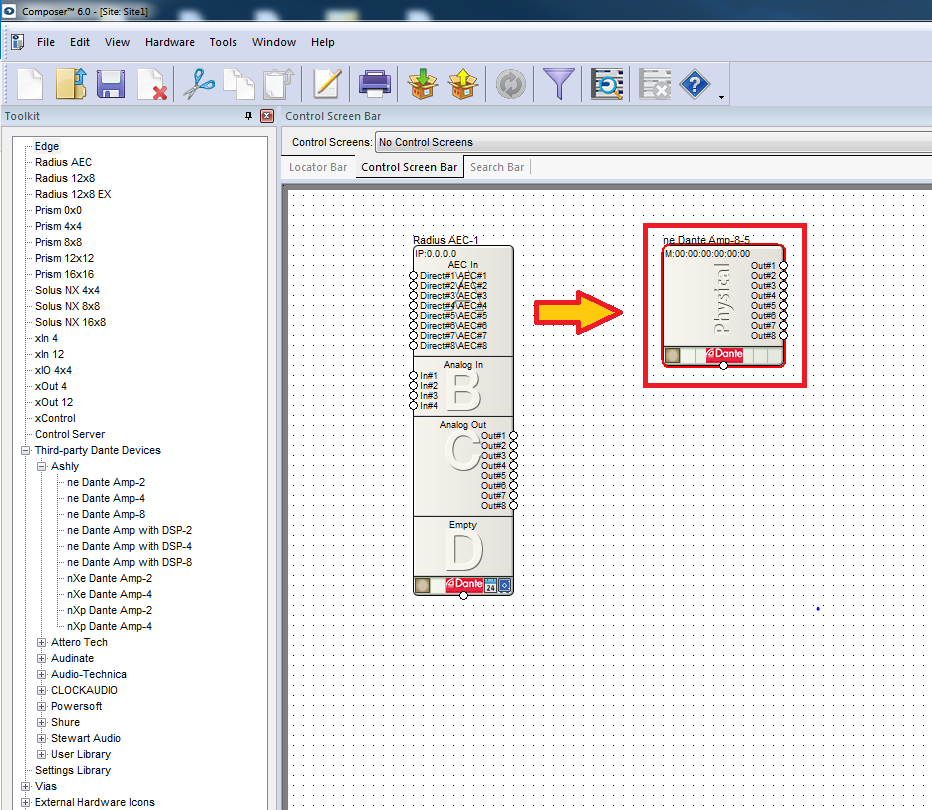
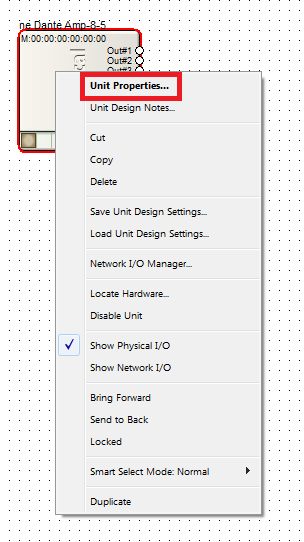
1. Right-click the third-party Dante device and select Unit Properties.
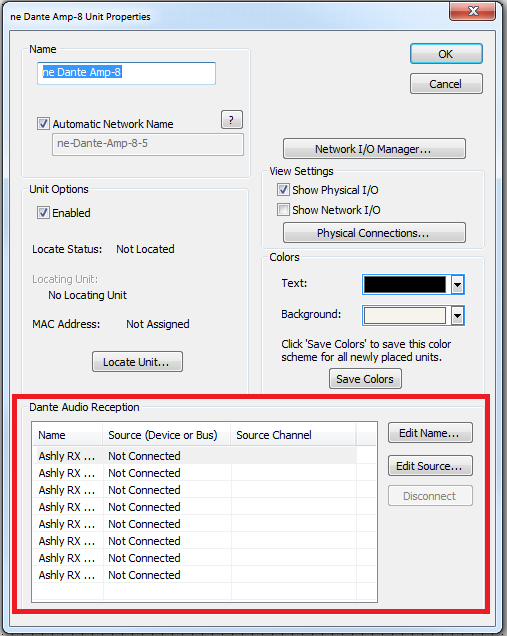
2. From the Unit Properties window, either double-click the first channel in the Dante Audio Reception section, or select the first channel and click the “Edit Source” button.
3. From the Select Network Audio Source window, select the desired transmit bus.
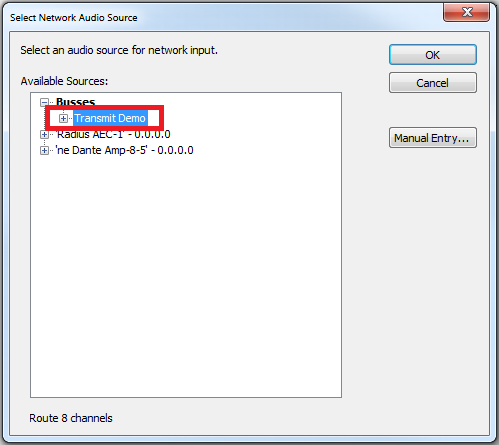
4. Click OK. The Unit Properties window is now updated with the transmit bus and channel information.
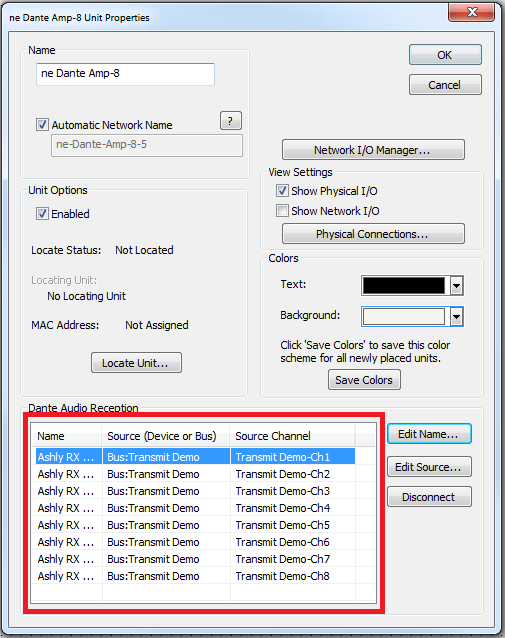
5. Click OK.
6. Push the site file and Composer will make the Dante subscriptions.
Assign a Transmit Bus to Generic Third-party Devices¶
Once the transmit bus has been created, the assignments or subscriptions to the generic device is done outside of Symetrix Composer using Dante Controller.
Here are instructions for assigning transmit channels to a Generic Network Transmit Bus:
(In this example, audio is transmitted from a Radius AEC to an Attero Tech unDAES-0, using the transmit bus from the Creating Transmit Bus section)
1. Make sure your PC is connected to the Dante network.
2. Open Dante Controller (Download link: https://audinate.com/products/software/dante-controller).
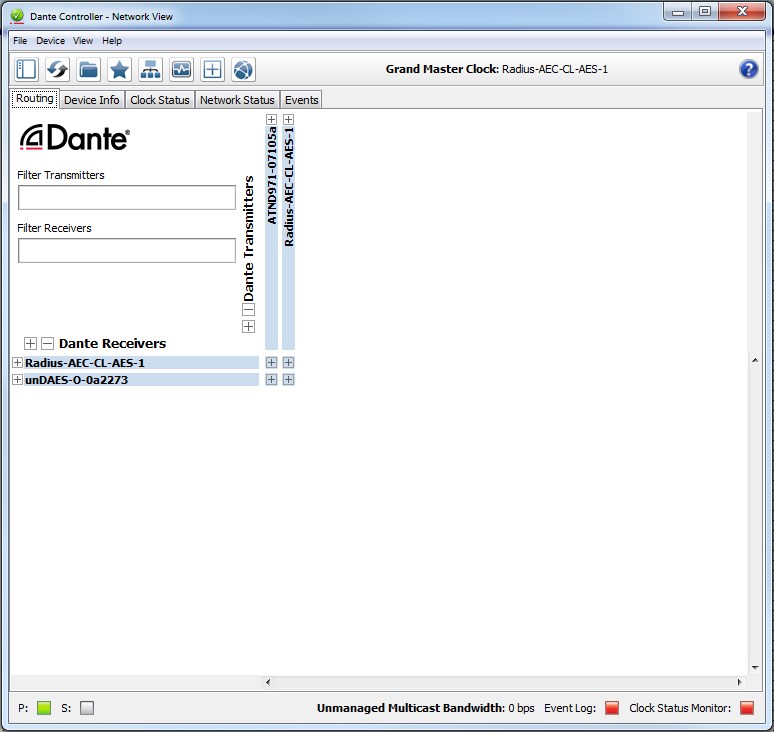
3. Expand the transmit and receive devices to show their available channels.
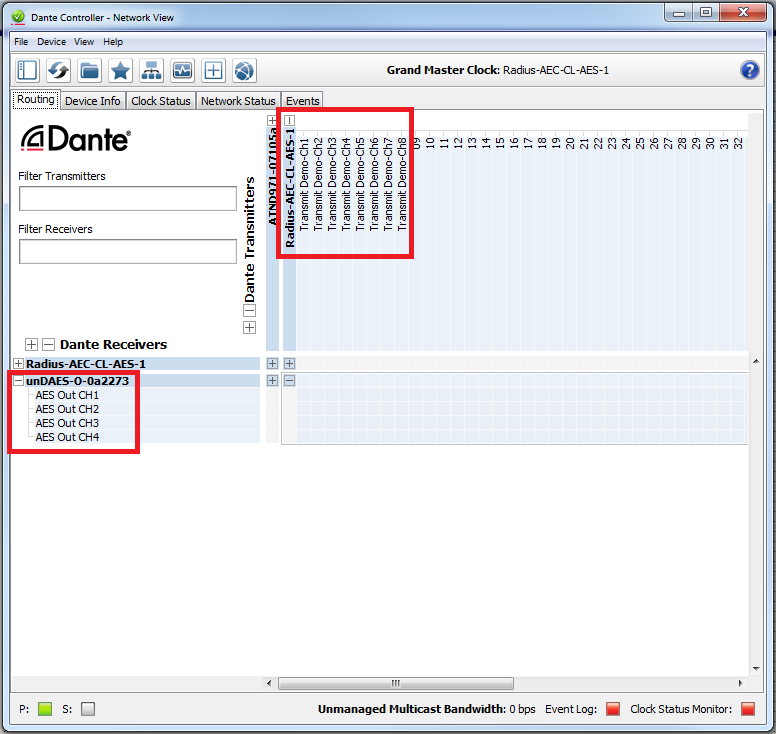
4. Click on the channel crosspoints to create a subscription.
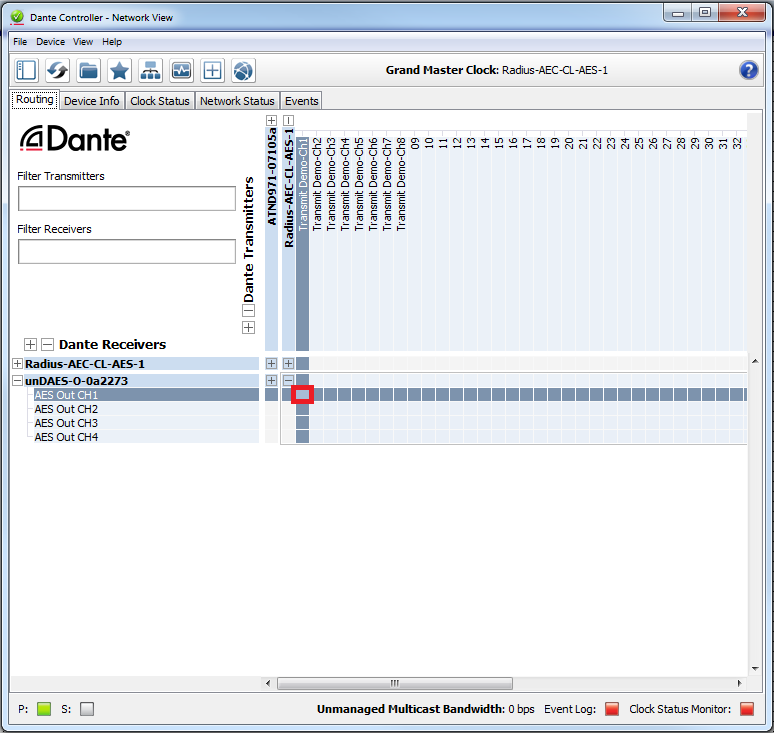
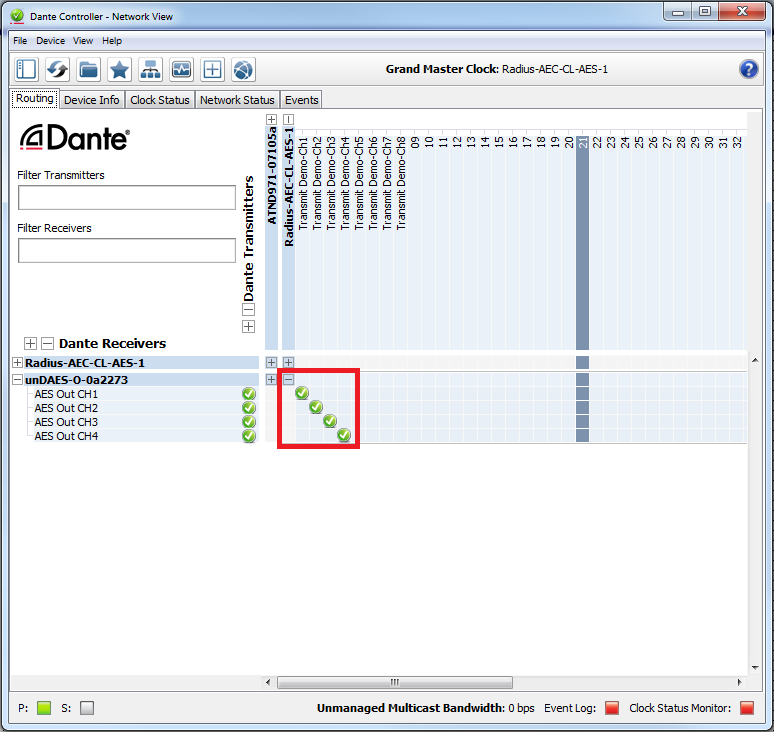
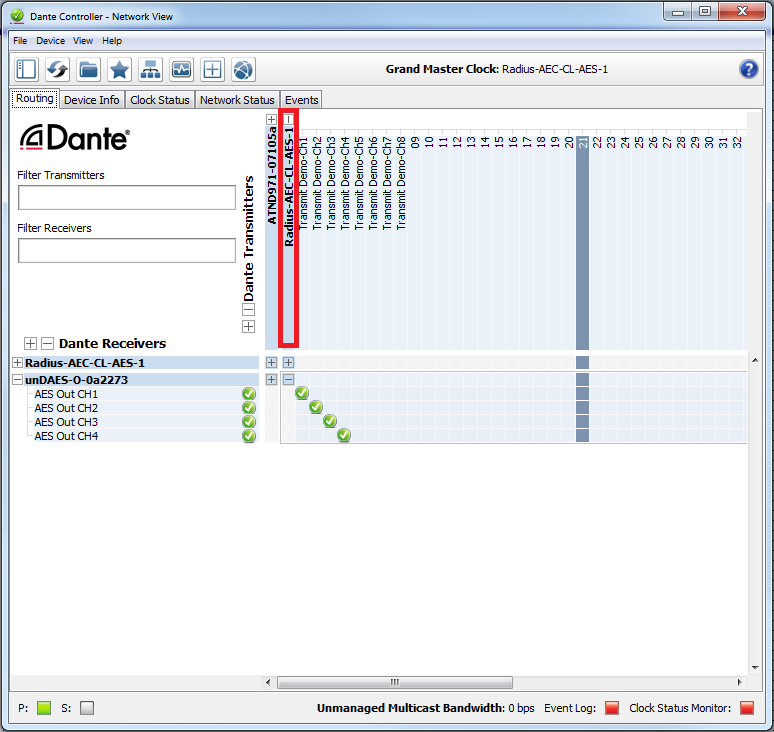
5. Successful subscriptions are indicated with green checks. To verify audio is passing across the network, double-click the name of the transmit device to open the Device View page.
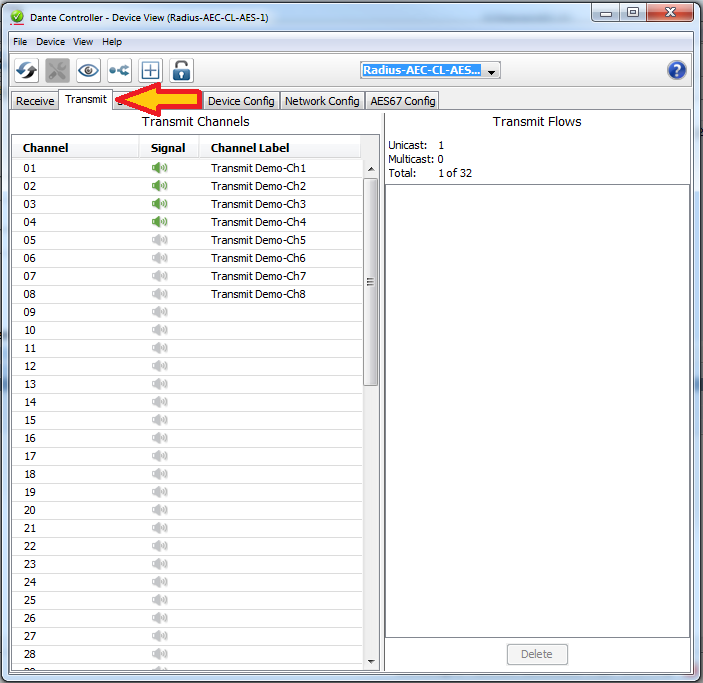
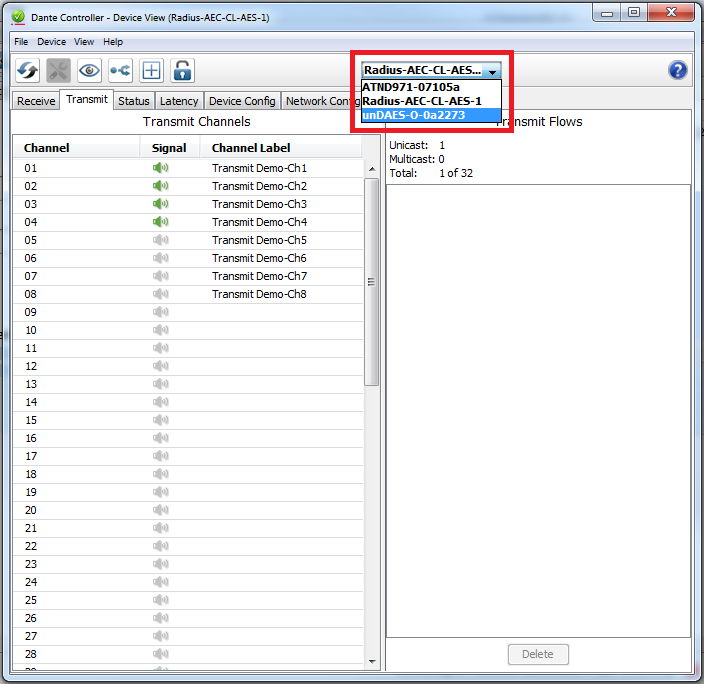
6. Select the Transmit tab.
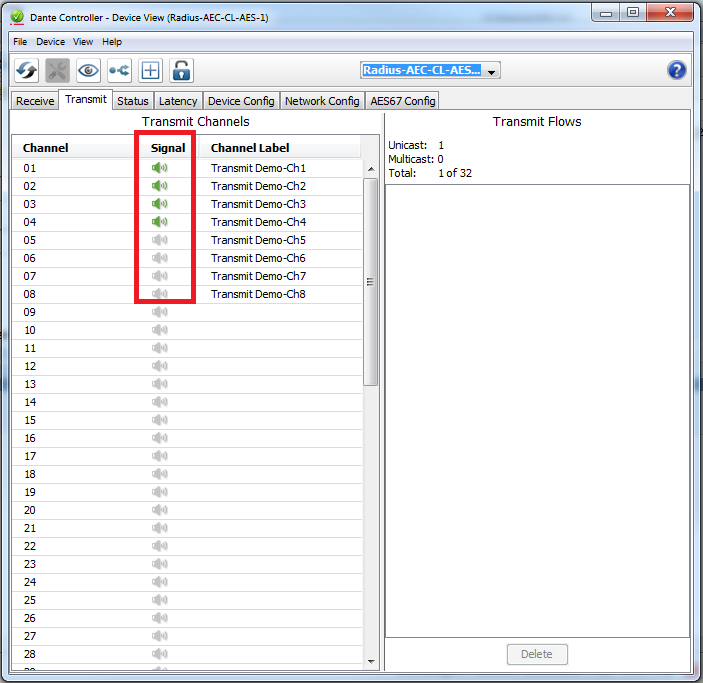
7. The signal indicator will be green if an audio signal is present on that channel. Use the drop-down menu to navigate to the receiving device.
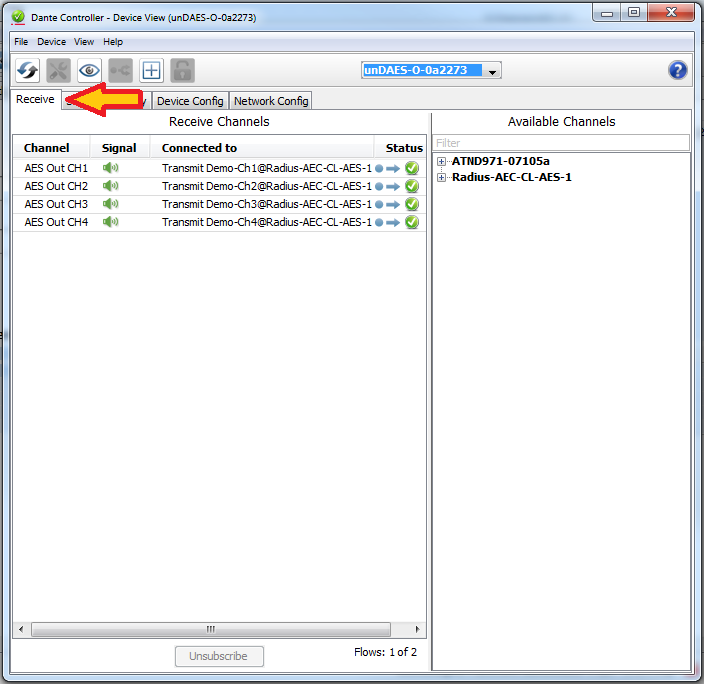
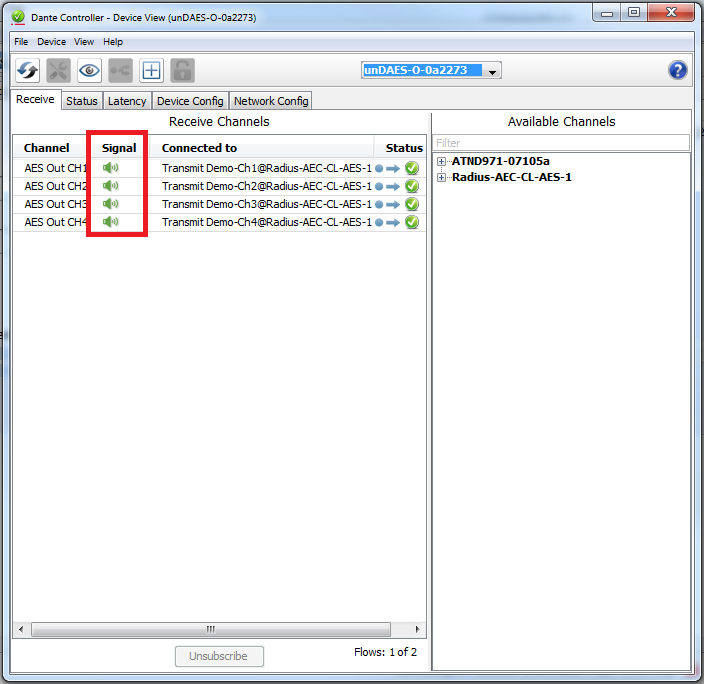
8. Select the Receive tab. The signal indicator will be green if an audio signal is present on that channel.
For further information about Composer’s Sync Push and Pull options and how it affects or is affected by Dante controller, click here.
AES67 Transmit Stream¶
When using Symetrix Dante-enabled DSPs to transmit audio using AES67, there a few key points to keep in mind:
§ Symetrix Dante-enabled DSPs are compatible with AES67, but are not AES67 specific hardware.
§ Audinate's Ultimo chipset currently does not support AES67.
§ AES67 stream assignments are handled by the receiving device:
o AES67 streams will only appear as a transmitter in Dante Controller.
o AES67 transmit streams from a Symetrix Dante-enabled DSP will NOT be assignable in Dante controller.
o Here is a link to set up AES67 receive flows with Q-SYS: https://www.qsc.com/resource-files/applicationguides/systems/q_qsg_sys_dn_qsys_aes67.pdf
§ AES67 is capable of unicast and multicast communication, however Dante currently only supports multicast.
§ When two Dante-enabled devices are passing audio between each other they will always use Dante for the communication, regardless of AES67 streams.
Here are the steps to create AES67 transmit streams:
1. Open the site file to the Design View page.
2. From the Toolkit expand Network I/O Modules and then expand Transmit Modules.
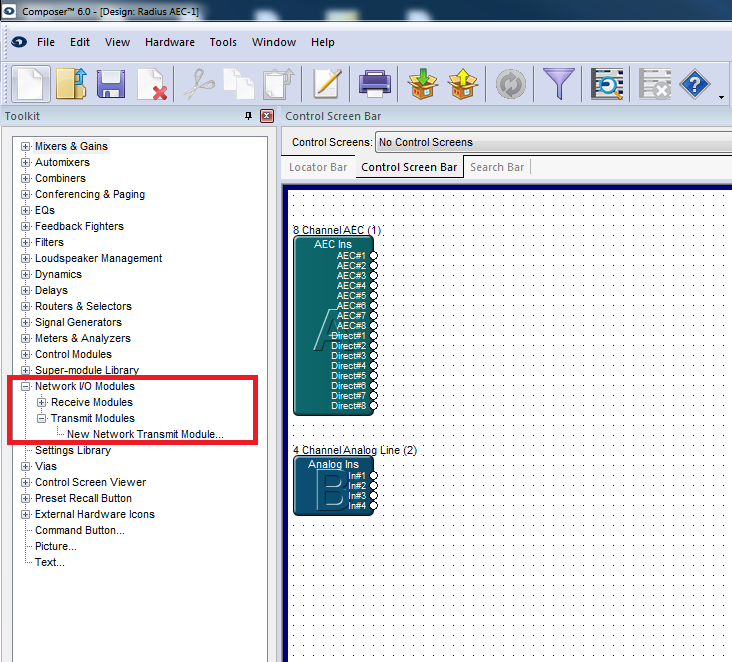
3. Add a New Network Transmit Module. The Network Transmit Module Properties window will open.
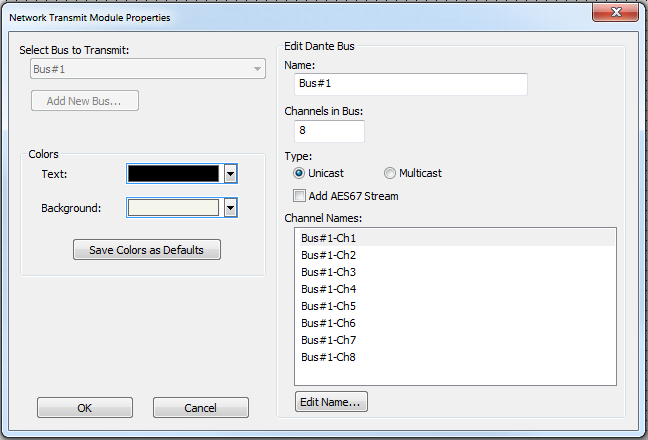
4. Edit the name of the transmit bus.
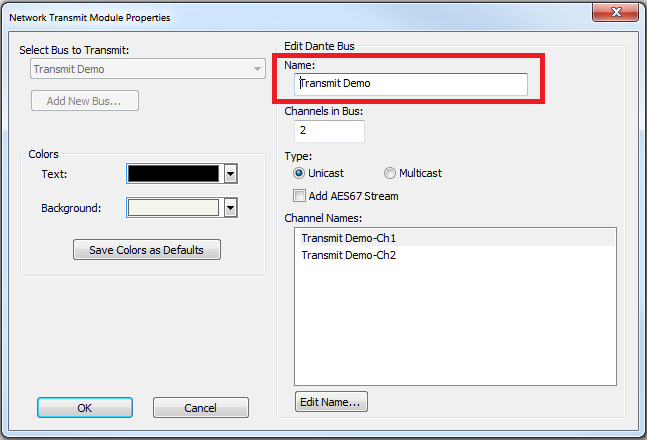
5. Select the number of channels (up to 64 channels) in the transmit stream.
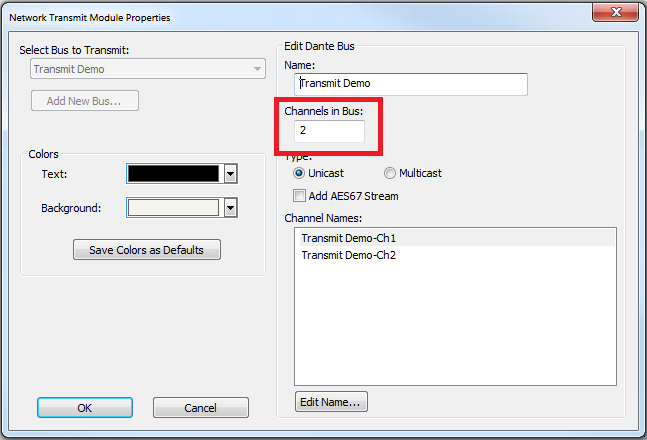
6. Select the transmit bus type.
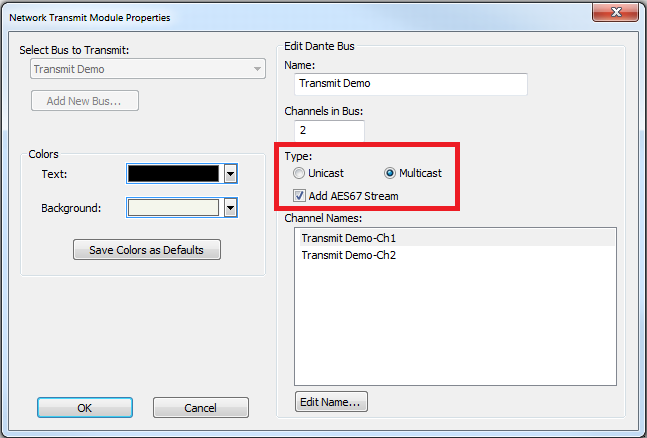
7. Name the individual transmit channels.
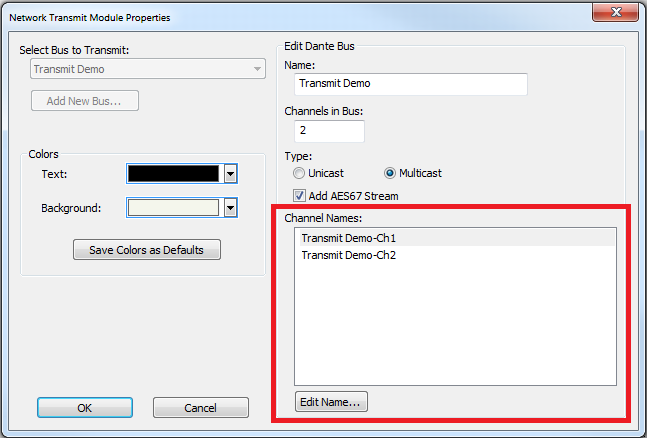
8. Click OK and the transmit bus will be added to the site file.
Additional information about Dante and AES67 may be found in the following Tech Tips:
Tech Tip: Adding Third-party Dante Devices to the User Library
Tech Tip: Composer 6.0 Sync Push & Pull Options
Tech Tip: Adding Multiple Sources to a Single Network I/O Receive Module