Recording
Hardware/Format Requirements
*Compatibility*
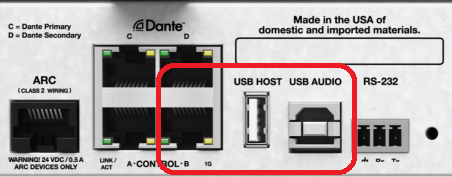
The Radius NX and the Server D100 are the two DSP model families that support recording and playback. The Radius NX utilizes an attached USB drive connected the "USB Host" port, while the Server D100 uses the dedicated internal media SSD. This feature is not available on other DSP hardware, and thus will not be visible within the Toolkit in Composer for those units.
*File Format*
The WAV uncompressed audio format is supported.
*External USB Drive - Radius NX*
For Radius NX, recordings are stored on an externally connected USB flash storage device and the available recording space is determined by capacity of the device present. The total and available space is indicated within the Recording module once placed into the design. Not all USB drives are created equal, and currently only a select few USB drives have been found to perform without issues. The drive that performs very well, is the SanDisk Ultra Fit USB 3.1 Flash Drive G46. If the recording feature is highly critical to your installation, please use this drive.
*Internal Media SSD - Server D100*
For Server D100, Recordings are stored on the dedicated 500GB internal Media SSD device. The total and available space is indicated within the Recording module once placed into the design.
Composer Software
Recording modules are located within the Design View Toolkit under the section called “Recording & Playback”. Within this category you will find “Recording Modules”, under which you will find “Custom…”
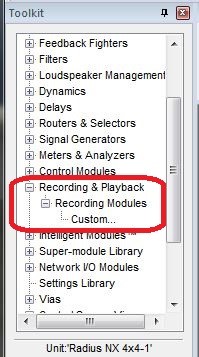
When selecting the “Custom…” item by double-clicking or dragging to the design view workspace, the “Place Custom Audio Recording Module” dialog is displayed…
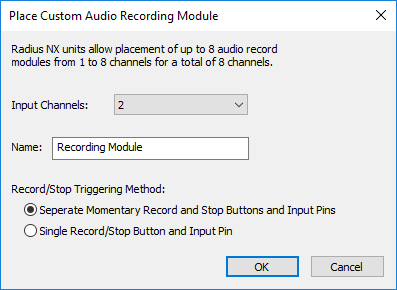
This dialog allows the adjustment of Input Channels, Name and Record/Stop Triggering Method.
-
Input Channels -The channel count is selectable via Combo box from 1 to 8 channels. There is a maximum of EIGHT (8) channels per DSP that may be used for simultaneous recording within a design.
-
Module Name -The module name field is like other customizable modules. This sets the standard module label that appears above the module in the design view. The user-entered name does not affect the default name when additional modules are placed. The default is always “Recording Module”.
-
Record/Stop Triggering Method -This option allows you to configure the module with separate record and stop buttons or a single stop/record button.
-
Separate Momentary Record and Stop Buttons and Input Pins -The default is separate buttons labeled STOP and RECORD, so that different logic or controls can trigger starting and stopping recording individually. Both button and control signal input pins are available for each function on the module in Design View. With separate controls, the separate “Recording” LED” indicates the current state of recording by flashing, since the buttons are momentary and return to their resting state when depressed.
-
Single Record/Stop Button and Input Pin -If a single control is needed to start and stop recording such as with an ARC menu or logic to record based on audio level, select the combined stop/record option. This creates a single, latching button and control signal input. The state of recording is directly controlled by the state of this control or input pin. When not recording, the button is labeled “STOPPED”. When recording is initiated, the label changes to “Recording” and the button will flash red along with the “Recording” LED.
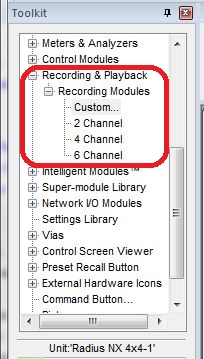
Multiple Modules
As Custom modules are configured and placed, those configurations are added to the Recording Modules section so they may be immediately placed later, but ONLY within the current Composer session.
NOTE: There is a limit of EIGHT (8) separate recording modules that may be placed within a device. The total channel count may be allotted over multiple modules, each having from 1 to 8 channels (to a max of 8 channels total). When pushing online, the design is analyzed for faults including the number of record channels configured. If more than 8 modules are detected, or more than 8 total recording channels, a warning message is issued, and the push fails.
Composer does not allow placement of recording modules in units other than Radius NX and Server D100. When attempting to paste a recording module into an inappropriate unit, the module will be automatically deleted. If a recording module should somehow end up in an inappropriate device through an unanticipated edit, a warning message is issued, and the push fails.
Design View
In the design view, the module looks like other modules. It has an input pin for each configured record channel and control pins dependent on the record trigger mode configured. It either has separate “Stop” and “Record” inputs or a combined “Stop/Rec” input. Triggering the module through control pins happens on the transition, not the state of the control, so momentary buttons works well for this purpose.
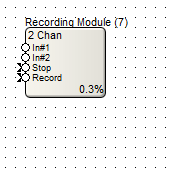
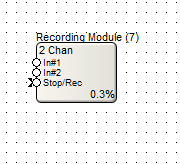
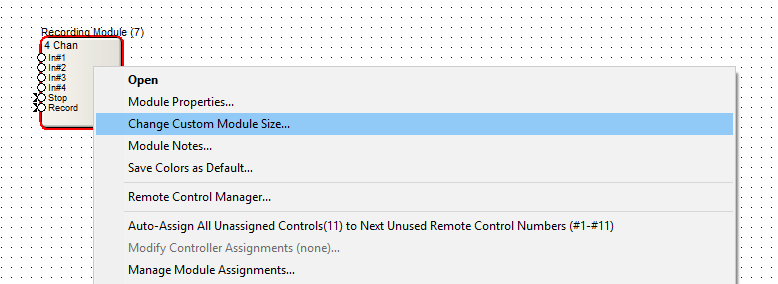
As with other customizable modules (matrix, input selectors, combiners, etc.), the module may be reconfigured for a different channel count after being placed. The right-click menu for the module has the added “Change Custom Module Size” menu item.
Selecting this option opens the same “Place Custom Audio Recording Module” dialog as when the module was initially placed however the title is changed to “Edit Custom Audio Recording Module”. As with other customizable modules, Modifying the channel count of an existing module to a new count will not add that configuration to the list of recording module configurations in the tool kit.
Double-clicking on the module or choosing the “Open” menu item from the right click menu for the module opens the module view for the module.
Module View
An 8-channel recording module with separate STOP/RECORD buttons, is shown below:
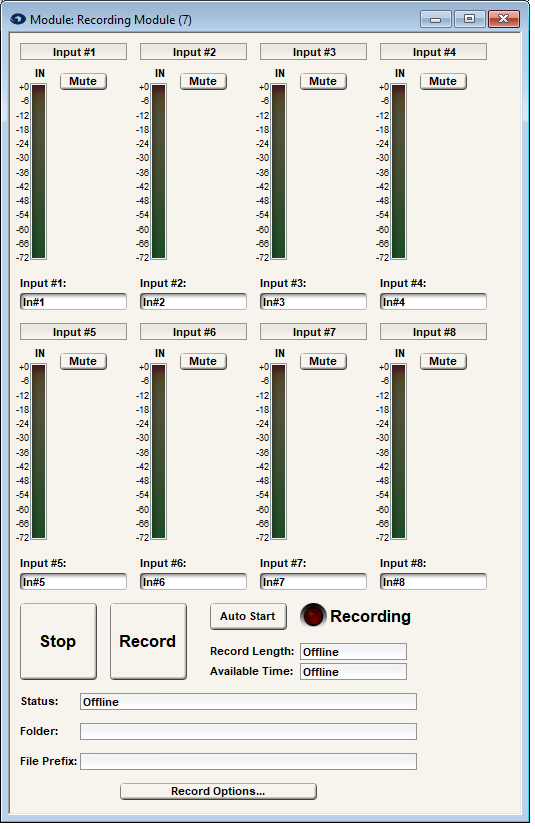
Smaller channel count versions would be similar with fewer channels displayed.
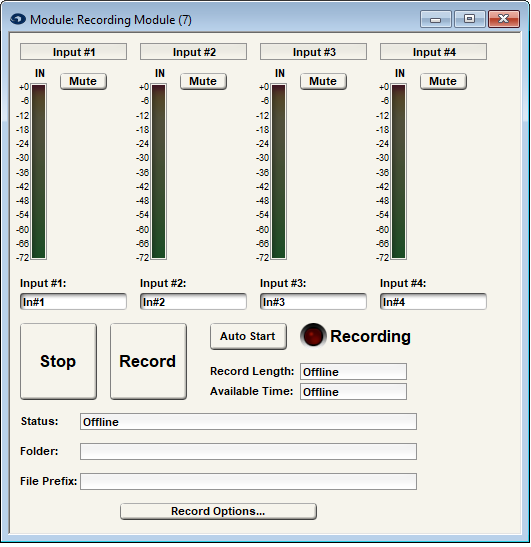
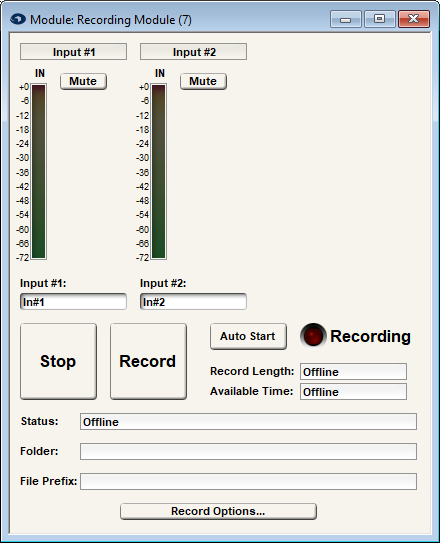
The module view has two major sections. The top section is the per-channel section which varies with the channel count. The bottom section is the same for all channel count versions and references all channels.
All non-static controls can be remote-controlled, and all controls can be exported to Control Screen and SymVue. Even the “Record Options…” button that opens a configuration dialog can be exported.
The upper section operates similarly to other modules with editable channel names, mutes and meters.
In the lower section, the “Stop” and “Record” buttons are momentary buttons if configured for separate controls.
The “Stop/Record” button is a latched button if configured for combined controls. The button blinks if recording, as well as the Recording LED.
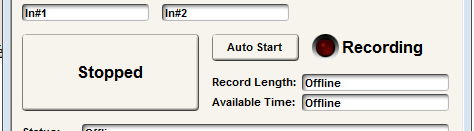
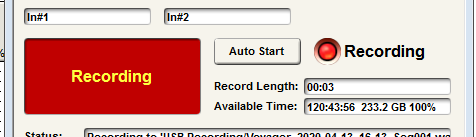
-
Auto Start - When pressed, causes a recording to be automatically started by pushing online or a power cycle of the hardware. It does not automatically start recording if activated while already online.
-
Recording LED - LED flashes red when the module is actively recording.
-
Record Length/Available Time - Displays show “Offline” when offline. When online, they show the current record operation length and available time to record remaining. The available record time remaining is calculated based on every record module currently in the design view recording simultaneously.
-
Status - Displays messages regarding success or error states of the recording module. The status is an important mechanism for displaying media related actions and states. This is the primary way that users will be notified of issues with the media or recording operations. The status is specific to a given recording module, but some messages may display in all recording module’s status displays. See the section “Setup & Troubleshooting”.
-
Folder - Allows the user to control which sub folder the recordings for this module are recorded into. All recordings are in the “Recordings” sub folder in the root of the flash drive. If this folder field is not blank, the recordings are placed in that named sub folder of the “Recordings” folder. The “Recordings” folder and this folder will be created if they do not exist on the first recording. The folder name may be up to 255 ASCII characters and must be a valid Linux folder name.
-
File Prefix - Allows the user to control text to be added to the beginning of the name of recorded files. The file name is constructed from a pattern composed of various optional components:
Prefix_StartDate_StartTime_Sequence_Channel.wav
If the prefix is not blank, it is added ahead of the other components and separated with an underscore. The prefix may be up to 64 ASCII characters and all must be valid for a Linux filename. The rest of the pattern components to construct the file name are configured using the “Record Options” Dialog.
The “Folder and “Prefix” fields are intentionally included in the module view instead of in the “Record Options” dialog because they are the most frequently changed, and perhaps only parameters changed by the operator. The changing of the “Folder and “Prefix” fields may happen without any active recording being stopped. Instead, any new filename and location will be applied to the active recording immediately.
Record Options
The “Record Options ...” button is used to access a configuration dialog for the module. Any changes made in the dialog while online will force any recording in progress to be terminated. It must be restarted by control logic or user action to resume. It will not restart even if the “Auto Start” option was enabled.
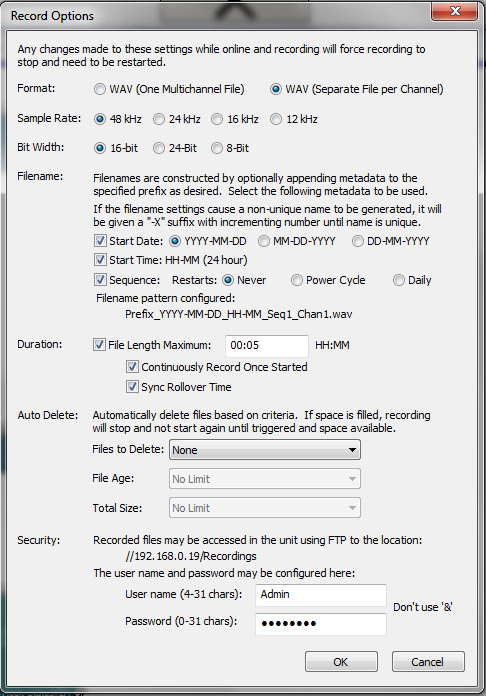
When the dialog opens offline, Composer allows configuration of the options. The default states are shown in the dialog above. When online, Composer and SymVue retrieve the current options from the hardware. They populate the dialog controls by interpreting the string and pulling out the individual configuration parameters from the string.
While open, the user can make changes to controls with no immediate effect. However, the Record Options dialog allows configuration of record parameters that require any existing recording to be stopped. When selecting “OK”, the dialog checks if there are any changes to parameters made. If there are, and running in SymVue or online in Composer, it asks the user to confirm that the changes should be made and that any recording in progress will be stopped by proceeding.
Upon confirmation, the options are set in the hardware. The hardware interprets the string and does its own comparison against the current state to guard against multiple changes from different sources causing unnecessary stops.
If changes are detected, any current recording associated with that single record module is stopped.
-
Format - Choose between writing all channels to a single file or to multiple files (number based on channel count). Only WAV is supported.
-
WAV (Multichannel) = default
-
WAV (Single Channel)
-
Sample Rate - Choose Sample rate for recording. Lower sample rates increase recording time, but lower audio quality.
-
- 48 kHz (default), 24 kHz or 12 kHz
-
Bit Width - Choose Bit depth for recording. Lower values are truncated, and not dithered.
-
- 24 Bit, 16 Bit (default) or 8 Bit
-
Filename - Set file naming syntax for recordings, which conform to the pattern:
-
- Prefix_StartDate_StartTime_Sequence_Channel.wav
-
-
Start Date - YYYY-MM-DD (default), MM-DD-YYYY or DD-MM-YYYY
-
Start Time - HH-MM (24-Hour). Enabled (default). Disabling this option removes the timestamp from filename
-
Sequence - This option chooses if the Seq# in filename RESTARTS back to Seq1 at a predetermined point, or continues to enumerate indefinitely (Seq1, Seq2, Seq3, etc.)
-
- Never (default) - Never Restarts
-
Restarts on Power Cycle or Push - Restarts on a Power Cycle or Push
-
Daily - Restarts Daily
-
-
Duration -
-
- File Length Maximum - Limits the record time of files to an HH-MM format (enabled by default, at 5 minutes) set by user. Disabling this option means that files have no size/time limitations. If enabled, the following options are available:
-
- Continuously Record Once Started - If enabled, once the time limit is reached, the recording will continue seamlessly onto a new file. If disable, the recording will cease.
-
Sync Rollover Time - This option will align the File Start time (HH-MM) to a multiple of the Record Length to make reading the file name easier. This only affect the start and ending file (if multiple sequences) of a channel (or single file, depending on settings)
-
Auto Delete - Automatically deletes files based on the following settings.
-
- Files to Delete -
-
-
None - When selected, the File Age and Total Size options are unavailable.
-
In Folder - Chooses to delete ALL FILES in the current Folder, as set by the user in the Module View.
-
In Folder with Matching Prefix - Chooses to delete ONLY FILES that have the user specified Prefix, as set by the user in the Module View.
-
-
File Age - Sets how old the files need to be before deleting. Options are; No Limit (default), 1 Day, 1 Week, 2 Weeks, 1 Month, 2 Months, 3 Months, 6 Months and 1 Year.
-
Total Size - Sets how large the files need to be before deleting. Options are; No Limit (default), 500 MB, 1 GB, 2 GB, 5 GB, 10 GB, 20 GB, 50 GB, 100 GB, 200 GB and ‘When Full’.
-
Security - Sets the username and password for FTP access of the recorded files. Note that FTP access is only available for Radius NX and only if enabled on the Audio-Media Device Settings.
-
- Username - Default is Admin.
-
Password - Default is Password.
-
- Character Limitations: can use all ASCII characters, except the ampersand ‘&’.
Network/FTP Access
As configured in the Recordings>Security dialog described above, recordings can be accessed over the network via FTP. The username and password can be modified as needed but will only ever have access to the “Recordings” sub-folder on Radius NX and the "Media" sub-folder on Server D100. For the Radius NX, any FTP client such as FileZilla or custom code can be used to retrieve the files if FTP is enabled in the Audio-Media Device Settings. There is no prevention for access to the recordings folder while recording.
Control Screen Operation When Changing Trigger Mode
All controls from the module view may be copied to a Control Screen. Changing the record trigger mode changes the controls available in the module view. If controls are copied to a control screen prior to changing the trigger mode so those copied controls are no longer present in the module, they will still function as originally placed. For example, the “Recording” LED is only present in the module view if Separate “Stop” and “Record” controls are configured. If they are coped to a controls screen and then the trigger mode is changed to Combined controls, the “Recording” LED will still light when the module is recording. However, the control may be redundant with the “Stop/Record” latched button which also shows the state of actively recording.
Setup & Troubleshooting
Summary
The status field of the Recording Module displays ‘event-based’ text information, and its current value will continue to display that text until there is another event.
When offline, the status within Composer will show as “Offline”. However, ControlNet or the unit’s front panel, will show “Initializing…” on boot. It will stay that way until an event, like mounting or failure to mount occurs.
When online and no record trigger has been encountered but a drive is mounted, the status will show “Ready”. If there is no drive mounted it will show “No media”.
When online, if a drive is mounted and a record trigger is encountered and successfully performed, the status will show “Record started”. The Recording Module Status is more verbose and shows ‘Recording to ‘file name format.wav’.
Normally, when online, if a drive is mounted and a stop trigger is encountered and successfully performed, the status will show “Record stopped”.
Write Protect
Some USB flash drives have a mechanical or electronic write protect setting. When attempting to record if the drive is write-protected, the error message “Record failed – Write protected media” will be displayed in the status until the next record stop/start trigger or other event, and recording will not execute.
Drive Full
The cleanup settings may not be set or effective, resulting in a full drive. The recording process will stop, as if a stop trigger were encountered. The Status will show the “Recording stopped – Media full”. Trying to trigger a new recording with a full drive will display “Record failed – Media full”. A drive having less than 5 seconds of record space will be considered full. This threshold could be set as a round value in megabytes if preferred.
Drive Mounting and Unmounting
For Radius NX, USB drive mounting and unmounting is automatic. When a drive is inserted, this is detected, and the drive mounted and prepared for access. It may be accessed by FTP at any time. Following a completion of a recorded file, the media organizational structures will be flushed to the media so that if the drive is removed without warning, only the recording currently happening would fail. Ideally, when a drive is mounted, errors caused by a pervious premature ejection should be discovered and cleaned up.
If a drive cannot be mounted due to format or corruptions the status will display “Media not formatted”.
There is no specific command to unmount a drive. The drive should be unmounted during a controlled shutdown of the host device.
Unexpected Removal
For Radius NX, if the drive is physically removed or unexpectedly unmounted by another process, the status will display “Media removed”. If there was a recording active at the time, the status will display “Recording failed – Media removed”.
Drive Formatting
For Radius NX, it is the user’s responsibility to format the USB media in advance before inserting using exFAT or FAT32 format. If a drive can’t be mounted or the format is not acceptable, the status will display “Media Not Formatted”.
For Server D100, the internal drive should be formatted properly from the factory.
Buffer Underruns
If the flash drive can’t keep up with the bandwidth requirements of the active recording (in conjunction with FTP access), the transport will continue recording as best as possible, though with dropouts, The file length adjusts to the actual number of samples included (minus lost samples), and when any samples are lost, the status displays “Recording error - Media slow”. This error will also display if there is no active recording and the current session settings will result in a bandwidth issue.
Front Panel
The Radius NX front panel LCD display will show the last status message of the last recording module event that occurred. Since there can be a maximum of 8 recording modules per hardware, the front panel will display whatever the last event message encountered for all modules was.
Logging
All status message event-based changes are written to a log file (.txt file) within the ‘Recordings’ folder in the root of the drive. Logging information includes time stamp (date/time), IP address of DSP, module identifier and event. This log is initialized on each power cycle/ push and the last one archived, though only a single archived file is kept (the latest).